|
Größe: 4395
Kommentar:
|
Größe: 11867
Kommentar:
|
| Gelöschter Text ist auf diese Art markiert. | Hinzugefügter Text ist auf diese Art markiert. |
| Zeile 1: | Zeile 1: |
| #acl AdminGroup:read,write,revert EditorsGroup:read,write,revert All:read ############################################################################## |
|
| Zeile 7: | Zeile 11: |
| ############################################################################## ############################################################################## ## Navigation oben ---- {{{#!html <div style="float: left; margin-right:20px;"> }}} '''__Quick selection__'''<<BR>> '''Open the description -> click Button''' <<BR>> [[en/EasySetup/EasySetup|{{ http://gallery3.mikrokopter.de/var/albums/intern/KopterTool_ab_V2_0/Reiter/Reiter-EasySETUP.gif?m=1409707309 }}]] [[en/EasySetup/Kanaele|{{ http://gallery3.mikrokopter.de/var/albums/intern/KopterTool_ab_V2_0/Reiter/Reiter_aktiv-Kan_le_en.gif?m=1409707201 }}]] [[en/EasySetup/Kamera|{{ http://gallery3.mikrokopter.de/var/albums/intern/KopterTool_ab_V2_0/Reiter/Reiter-Kamera_en.gif?m=1409707200 }}]] [[en/EasySetup/CamCtrll|{{ http://gallery3.mikrokopter.de/var/albums/intern/KopterTool_ab_V2_0/Reiter/Reiter-CamCtrl.jpg?m=1464700388 }}]] [[en/EasySetup/Ausgaenge|{{ http://gallery3.mikrokopter.de/var/albums/intern/KopterTool_ab_V2_0/Reiter/Reiter-Ausg_nge_en.gif?m=1409707196 }}]] {{{#!html </div> }}} ############################################################################## ############################################################################## <<BR>> [[MK-Parameter|{{ http://gallery3.mikrokopter.de/var/albums/intern/KopterTool_ab_V2_0/Reiter/Reiter-Einstellungen_en.jpg?m=1464703564 }}]] ||<class="MK_TableNoBorder">~-This page as an '''PDF-Document'''? <<BR>>Click on that Symbol ...-~||<class="MK_TableNoBorder"><<PDFIcon>>|| <<BR>> ############################################################################## ############################################################################## ## Überschrift |
|
| Zeile 10: | Zeile 51: |
| ||<class="MK_Nav_Header" width= "100%">Channels|| ||<class="MK_TBody":>'''[[en/EasySetup|Back to mainview]]'''|| }}} |
||<class="MK_Nav_left": height= "60px">||<class="MK_Nav_Header">!EasySetup - Channels||<class="MK_Nav_right":>|| }}} |
| Zeile 16: | Zeile 55: |
| Zeile 18: | Zeile 56: |
| * {{http://mikrokopter.de/images/fra.gif}} [[fr/EasySetup/Kanaele|français]] }}} |
}}} ############################################################################## ############################################################################## ## Bild rechts {{{#!html <div style="float: right; margin: 15px;"> }}} {{ http://gallery3.mikrokopter.de/var/albums/intern/KopterTool_ab_V2_0/Einstellungen_ab_2_14/Button-350x350/en/02_en_KopterTool_EasySetup_Kan%C3%A4le_Setting_%28350%29.jpg?m=1466430972 }} {{{#!html </div> }}} ############################################################################## ############################################################################## ## Inhaltsverzeichnis |
| Zeile 24: | Zeile 82: |
= Channels = The FlightCtrl can handle up to 12 channels from the transmitter. <<BR>> The channels, transfered from the transmitter, can be checked in that view and assigned to the MikroKopter-Functions.<<BR>> To control the Kopter you need to have 4 channels: GAS (THROTTLE), YAW, NICK, ROLL<<BR>><<BR>> {{http://gallery.mikrokopter.de/main.php?g2_view=core.DownloadItem&g2_itemId=90880&g2_serialNumber=1}}<<BR>><<BR>> == Choosing the receiver == First at all you need to choose the the receiver.<<BR>><<BR>> <<Include(include/KopterTool/Settings-Channels, , from="##include_receiver_begin_en", to="##include_receiver_end_en")>> == Channel function of the transmitter == Depending on the transmitter/receiver you can use a different amount of channels. (See [[http://www.mikrokopter.de/ucwiki/Sender|Transmitter]])<<BR>> Is the receiver correctly connected to the FlightCtrl and is the transmitter switched ON you can check of the function of each channel.<<BR>><<BR>> Below the graphic you can see the respective channel (1-12). If you move now the sticks or you activate a switch at your transmitter the appropriate values will change. That will be shown above throughout the graphic bars and the values of each channel. (0 = down / 127 = middle / 254 = up). <<BR>><<BR>> {{http://gallery.mikrokopter.de/main.php?g2_view=core.DownloadItem&g2_itemId=91085&g2_serialNumber=2}}<<BR>><<BR>> == Assign channels == To each channel a function / POTI can be assigned. <<BR>> The first 4 channels are already pre-set for '''Mode2''': <<BR>> * GAS/THROTTLE (Channel 1) * YAW (Channel4) * NICK (Channel 3) * ROLL (Channel 2) Has the used transmitter more than 4 channels you can assign them to the POTI1-8 as you like: <<BR>><<BR>> {{http://gallery.mikrokopter.de/main.php?g2_view=core.DownloadItem&g2_itemId=91093&g2_serialNumber=2}}<<BR>><<BR>> With a "click" on the downwards pointing triangle you can assign the channels to the POTI as desired: <<BR>><<BR>> {{http://gallery.mikrokopter.de/main.php?g2_view=core.DownloadItem&g2_itemId=91101&g2_serialNumber=2}}<<BR>> (Example for POTI 7) <<BR>><<BR>><<BR>> In the bottom bar of the POTI additional switch function will be shown. This bar is under the setting window visible.<<BR>> So in that way you can see in each setting window throughout operating a switch or a regulator at your transmitter which channel (POTI) has been assigned without switching back to the window.<<BR>><<BR>> {{http://gallery.mikrokopter.de/main.php?g2_view=core.DownloadItem&g2_itemId=80247&g2_serialNumber=1}}<<BR>><<BR>><<BR>> == Motor-Safety switch == Here a channel can be set which is assigned to a free switch at the transmitter. <<BR>> With that you can block to switch the engines ON / OFF.<<BR>><<BR>> {{http://gallery.mikrokopter.de/main.php?g2_view=core.DownloadItem&g2_itemId=80262&g2_serialNumber=3}}<<BR>><<BR> Is the switch at the transmitter '''ON''': <<BR>> * you can not switch the motors off (if they are on). * you can not switch the motors on (if they are off). Is the switch at the transmitter '''OFF''': <<BR>> * you can switch the motors off (if they are on). * you can switch the motors on (if they are off). <<BR>> {i} With that function you can avoid that the Kopter will be switched off accidently during a flight. <<BR>> That could be happen if the Kopter has to come down quickly and also been turned. <<BR>> For that you push Gas/Throttle completely down and Yaw completely to the left. This is also the command to switch off the motors! <<BR>><<BR>><<BR>> A describtion of more functions i.e. for the serial channels or the WP-Event you can read in the expert settings: [[en/MK-Parameter|Expert Settings]] |
<<BR>><<BR>><<BR>> <<BR>><<BR>><<BR>> <<BR>><<BR>><<BR>> ############################################################################## ############################################################################## = Overview -> Channels = {{ http://gallery3.mikrokopter.de/var/albums/intern/KopterTool_ab_V2_0/Einstellungen_ab_2_14/Easy/02_en_KopterTool_EasySetup_Kan%C3%A4le_Setting.jpg?m=1466431123 }} ############################################################################## ############################################################################## = Function + Channel = {{ http://gallery3.mikrokopter.de/var/albums/intern/KopterTool_ab_V2_0/Einstellungen_ab_2_14/Details/en/en_Kanal-Poti.jpg?m=1467628790 }} ############################################################################## <<BR>><<BR>><<BR>> ---- == Control == ##---------------------------------------------------------------------------- ## Bild rechts {{{#!html <div style="float: right; margin: 15px;"> }}} {{ http://gallery3.mikrokopter.de/var/albums/intern/KopterTool_ab_V2_0/Einstellungen_ab_2_14/Details/en/en_Kanal-Poti_Auswahl1.jpg?m=1467640569 }} {{{#!html </div> }}} ##---------------------------------------------------------------------------- The first 4 channels are for the controlling of the copter. These have already been set as follows: * '''Gas''' => Default channel 1 * '''Yaw''' => Default channel 4 * '''Nick''' => Default channel 3 * '''Roll''' => Default channel 2 This channel setting is suitable for the '' Mode 2 '' of different remote controls. <<BR>> If necessary, the channels can also be set individually. <<BR>> With the green bar (beside Gas, Yaw, Roll, Nick) you can check the right function of the sticks on your transmitter.<<BR>> When you move the sticks, the bar must move in the same direction. <<BR>> Tipp: If the bar is moving in the other direction then you move the stick, change the direction of the channel in your transmitter (see manual of the transmitter). <<BR>><<BR>> ##---------------------------------------------------------------------------- ## Infotext: Aufheben des "Float" Befehl damit nachfolgende Eintragungen in neuer Zeile beginnen. {{{#!html <div style="clear:both"> }}} ##---------------------------------------------------------------------------- ############################################################################## <<BR>><<BR>><<BR>> ---- == Poti == ##---------------------------------------------------------------------------- ## Bild rechts {{{#!html <div style="float: right; margin: 15px;"> }}} {{ http://gallery3.mikrokopter.de/var/albums/intern/KopterTool_ab_V2_0/Einstellungen_ab_2_14/Details/en/en_Kanal-Poti_Auswahl2.jpg?m=1467640569 }} {{{#!html </div> }}} ##---------------------------------------------------------------------------- All other channels your used transmitter offers you can set and use for the other functions of your copter. <<BR>> You will see that some functions can be set with a fix value or with a channel. For this channel we can set here a ''POTI''<<BR>> These have already been set as follows: * '''POTI1''' => Default channel 5 * '''POTI2''' => Default channel 6 * '''POTI3''' => Default channel 7 * '''POTI4''' => Default channel 8 * '''POTI5''' => Default channel 9 * '''POTI6''' => Default channel 10 * '''POTI7''' => Default channel 11 * '''POTI8''' => Default channel 12 Instead of the preset channel you can also set here a serial channel (to control a function via the computer), a fix channel value (Min. / Max. / Middle) or the controlling via a waypoint event. <<BR>><<BR>> ##---------------------------------------------------------------------------- ## Infotext: Aufheben des "Float" Befehl damit nachfolgende Eintragungen in neuer Zeile beginnen. {{{#!html <div style="clear:both"> }}} ##---------------------------------------------------------------------------- <<BR>><<BR>><<BR>> ############################################################################## ############################################################################## = Channel 1-16 = {{ http://gallery3.mikrokopter.de/var/albums/intern/KopterTool_ab_V2_0/Einstellungen_ab_2_14/Details/en/en_Kanalanzeige.jpg?m=1467628790 }} With the bar you can check the function of every single channel your transmitter offer. <<BR>> If you now move a stick or use a switch or potentiometer on your transmitter, you can see here the moving bar of the (in the transmitter) set channel.<<BR>> Above the bar you can see a number. The number shows you => * Channel OFF ~-(e.g. a switch is in position OFF)-~ <<BR>> => Channel number "0" -> bar is down * Channel center ~-(e.g. a Potentiometer or a 3way switch is centered)-~ <<BR>> => Channel number "127" -> bar is in the middle * Channel ON ~-(e.g. a switch is in position ON)-~ <<BR>> => Channel number "254" -> bar is full ############################################################################## ############################################################################## = Select receiver = {{ http://gallery3.mikrokopter.de/var/albums/intern/KopterTool_ab_V2_0/Einstellungen_ab_2_14/Details/en/en_Empfaenger.jpg?m=1467628789 }} ############################################################################## <<BR>><<BR>><<BR>> ---- == Receiver == ##---------------------------------------------------------------------------- ## Bild rechts {{{#!html <div style="float: right; margin: 15px;"> }}} {{ http://gallery3.mikrokopter.de/var/albums/intern/KopterTool_ab_V2_0/Einstellungen_ab_2_14/Details/en/en_Empfaenger-Auswahl.jpg?m=1467710624 }} {{{#!html </div> }}} ##---------------------------------------------------------------------------- To receiver the right channels you have to set here the right receiver.<<BR>> Please note that the receiver must use a * ''PPM-summ signal'' or a * ''serial signal'' or a * ''S-Bus'' A receiver only with pur servo outputs can not be used. How to connect the receiver you can see here: [[en/FlightCtrl_V3.0#Receiver_connections|Receiver_connections]] <<BR>> The available receivers are: * Multisignal (PPM) ~-=> Standard receiver (e.g. ACT DSL4 top, 2.4GHz-Receiver R6107SP)-~ * Spektrum Satellit ~-=> 2.4GHz satellite receiver Spektrum-~ * Spektrum Satellit (HIRES) ~-=> 2.4GHz satellite receiver with high resolution of Spektrum (2048) (e.g. DSX7, DX8, DSX9, DSX12)-~ * Spektrum Satellit (LowRES) ~-=> 2.4GHz satellite-receiver with low resolution (512) (is used in some plug-in modules)-~ * Jeti Satellit ~-=> 2.4GHz Jeti Satellit (e.g. RMK2)-~ <<BR>> ~-With this setting, the output of the telemetry is activated too.-~<<BR>> ~-Displayed is the telemetry e.g. on the Jeti Box or Jeti transmitter.-~ * ACT DSL ~-=> Special 35 MHz receiver with PPM sum signal-~ * Graupner HoTT ~-=> 2.4GHz Graupner HoTT receiver (e.g. GR-12, GR-16, GR-24)-~<<BR>> ~-With this setting, the output of the telemetry is activated too.-~<<BR>> ~-Displayed is the telemetry on the display of the transmitter.-~ * Futaba S.BUS ~-=> 2.4GHz Futaba S.BUS receiver <<BR>> ~-(To connect a S.BUS Receiver to th eFlightCtrl you need a Signal inverter ([[https://www.mikrocontroller.com/index.php?main_page=product_info&cPath=86&products_id=669|Shoplink]]).-~ * Benutzer(User) ~-=> Free for programmer.-~ ##---------------------------------------------------------------------------- ## Infotext: Aufheben des "Float" Befehl damit nachfolgende Eintragungen in neuer Zeile beginnen. {{{#!html <div style="clear:both"> }}} ##---------------------------------------------------------------------------- ############################################################################## <<BR>><<BR>><<BR>> ---- == Telemetry == {{ http://gallery3.mikrokopter.de/var/albums/intern/KopterTool_ab_V2_0/Einstellungen_ab_2_14/Details/en/en_Empfaenger.jpg?m=1467628789 }} The telemetry of the copter can be shown on a Graupner Hott or a Jeti transmitter.<<BR>> (unfortunately other transmitters do not support the MK telemetry display )<<BR>> If the used transmitter also have a speaker and the right voice file you can hear warnings etc. Then you can activate here "''Telemetry: Speak all events''" .<<BR>> ~-(see also informations about the transmitters: [[en/HoTT|Graupner HoTT]] / [[en/Jeti|Jeti]]-~ ############################################################################## <<BR>><<BR>><<BR>> |
Diese Seite befindet sich derzeit in der Überarbeitung. |
|
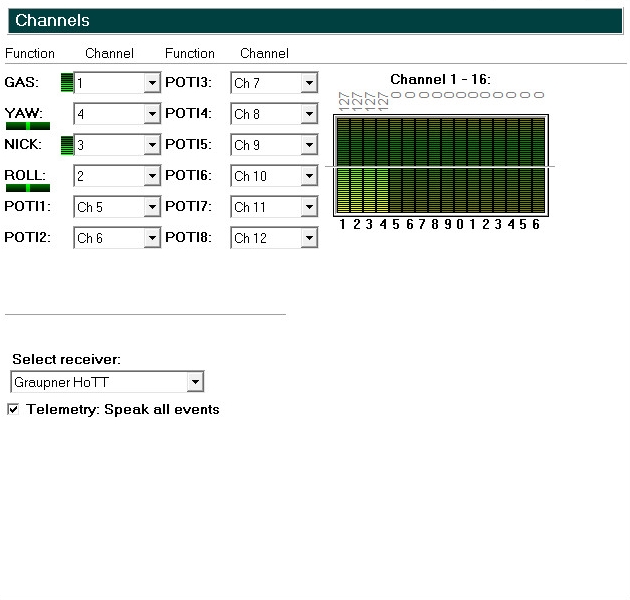
EasySetup - Channels |
.jpg?m=1466430972)
Inhaltsverzeichnis
Overview -> Channels

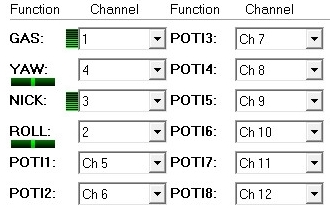
Function + Channel

Control

- The first 4 channels are for the controlling of the copter. These have already been set as follows:
Gas => Default channel 1
Yaw => Default channel 4
Nick => Default channel 3
Roll => Default channel 2
This channel setting is suitable for the Mode 2 of different remote controls.
If necessary, the channels can also be set individually.
With the green bar (beside Gas, Yaw, Roll, Nick) you can check the right function of the sticks on your transmitter.
When you move the sticks, the bar must move in the same direction.
- Tipp: If the bar is moving in the other direction then you move the stick, change the direction of the channel in your transmitter (see manual of the transmitter).
Poti

All other channels your used transmitter offers you can set and use for the other functions of your copter.
You will see that some functions can be set with a fix value or with a channel. For this channel we can set here a POTI
These have already been set as follows:POTI1 => Default channel 5
POTI2 => Default channel 6
POTI3 => Default channel 7
POTI4 => Default channel 8
POTI5 => Default channel 9
POTI6 => Default channel 10
POTI7 => Default channel 11
POTI8 => Default channel 12
Channel 1-16

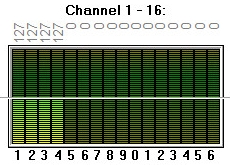
With the bar you can check the function of every single channel your transmitter offer.
If you now move a stick or use a switch or potentiometer on your transmitter, you can see here the moving bar of the (in the transmitter) set channel.
Above the bar you can see a number.
The number shows you =>
Channel OFF (e.g. a switch is in position OFF)
=> Channel number "0" -> bar is downChannel center (e.g. a Potentiometer or a 3way switch is centered)
=> Channel number "127" -> bar is in the middleChannel ON (e.g. a switch is in position ON)
=> Channel number "254" -> bar is full
Select receiver

Receiver

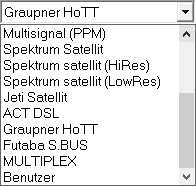
To receiver the right channels you have to set here the right receiver.
Please note that the receiver must use aPPM-summ signal or a
serial signal or a
S-Bus
How to connect the receiver you can see here: Receiver_connections
- The available receivers are:
- Multisignal (PPM)
=> Standard receiver (e.g. ACT DSL4 top, 2.4GHz-Receiver R6107SP)
- Spektrum Satellit
=> 2.4GHz satellite receiver Spektrum
- Spektrum Satellit (HIRES)
=> 2.4GHz satellite receiver with high resolution of Spektrum (2048) (e.g. DSX7, DX8, DSX9, DSX12)
- Spektrum Satellit (LowRES)
=> 2.4GHz satellite-receiver with low resolution (512) (is used in some plug-in modules)
- Jeti Satellit
=> 2.4GHz Jeti Satellit (e.g. RMK2)
With this setting, the output of the telemetry is activated too.
Displayed is the telemetry e.g. on the Jeti Box or Jeti transmitter.
- ACT DSL
=> Special 35 MHz receiver with PPM sum signal
- Graupner HoTT
=> 2.4GHz Graupner HoTT receiver (e.g. GR-12, GR-16, GR-24)
With this setting, the output of the telemetry is activated too.
Displayed is the telemetry on the display of the transmitter.
- Futaba S.BUS
=> 2.4GHz Futaba S.BUS receiver
~-(To connect a S.BUS Receiver to th eFlightCtrl you need a Signal inverter (Shoplink).
- Benutzer(User)
=> Free for programmer.
- Multisignal (PPM)
Telemetry

The telemetry of the copter can be shown on a Graupner Hott or a Jeti transmitter.
(unfortunately other transmitters do not support the MK telemetry display )
If the used transmitter also have a speaker and the right voice file you can hear warnings etc. Then you can activate here "Telemetry: Speak all events" .
(see also informations about the transmitters: Graupner HoTT / Jeti


