Firmware 0.86
 This page as PDF-Document? Just click on the symbol on the right and wait a few seconds -->
Inhaltsverzeichnis
- Firmware 0.86
- How do I update?
- Compatibility
- Videos
- EasySetup in the KopterTool
- Expert-Settings
- Adjustable altitude for ComingHome
- Dynamic PositionHold
- No Receiver Beep
- GPS-Characters in the Jeti/HoTT-Display
- Teachable CareFree (CareFree 2.0)
- The function
- Radius
- CareFree "Inside"
- CareFree "Outside"
- Waypoint-Generator
- The WayPoint-Generator
- Error-messages in the Jeti-Box
- Implementation for HoTT-transmitter (FC 2.1 only)
- ComingHome as FailSafe
- Maximum Altitude
- Check of the magnet-vector
- New Error-messages
- GPS-Logging
- The new names of the settings
- Other changes
- Bugfixes
Date of release: 15.09.2011
Licence: LICENSE.TXT
Forum-Link:
http://forum.mikrokopter.de/topic-28183.html
Download:
FlightControl V0.86d (FC1.0 - FC2.0) (MEGA644)
FlightControl V0.86d (FC2.1) (MEGA1284)
Specialversion for ACT-2,4GHz S3D-receiver
FlightControl bis FC2.0 V0.86d - nur für ACT-S3D 2.4GHz Empfänger
FlightControl ab FC2.1 V0.86d - nur für ACT-S3D 2.4GHz Empfänger
![]() Only works with this 2,4GHz-s3d-version!
Only works with this 2,4GHz-s3d-version!
How do I update?
Never made an update before? Read this: Software Update
Compatibility
Compared to version 0.84 the FC settings not remained compatible and will be re-initialized!
- The MK3Mag remains on the old version. Please do not update!
The compass must be re-calibrated. Attention: The new version of the calibration is nessecary!
![]() You should never import settings of previous versions via the KopterTool. The settings should be done manually!
You should never import settings of previous versions via the KopterTool. The settings should be done manually!
Videos
EasySetup in the KopterTool
All important settings are summarized here. This makes it easier for beginners to find their way.

More information: Easy Setup
Expert-Settings
If you need access to all settings you can make them visible by clicking on "expert view".


Adjustable altitude for ComingHome

In the settings you can set a fixed height for coming home (EasySetup or NaviControl2).
With this function the Mikrokopter not only comes back... it also stays im a height of 25 meters for example. The clibing / descending speed is 3.0 meters per seconds - you can't change this value
![]() Notice: The altitude will be used only in Vario-altitude-control. And only if the throttle-stick is in neutral-position.
Notice: The altitude will be used only in Vario-altitude-control. And only if the throttle-stick is in neutral-position.
Dynamic PositionHold

- In PH-mode the GPS-target position will be changed by the stickmovement.
- So the MK will not log-off in PH-mode
- That makes it much easier to fly during windy conditions because the MK can be moved more precisely
- The direct stick-influence to the MK will be damped simultaneously.
![]() Note: Default is ON. It can be disabled under "EasySetup" or "NaviControl2".
Note: Default is ON. It can be disabled under "EasySetup" or "NaviControl2".
No Receiver Beep

In "MISC" you can activate "no beep without active sender". Then you can switch on the Kopter without turning the transmitter on. If the Kopter gets connection once it is beeping constantly again.
GPS-Characters in the Jeti/HoTT-Display
Character behind the distance:
- - : no GPS possible
- / : Free
- W : Waypoint flight
- H : Coming Home
- D : Dynamic Position Hold
- P : Position Hold
Teachable CareFree (CareFree 2.0)
Include: Textmarkierung "##include_teach_begin" nicht gefunden!
Include: Textmarkierung "##include_teach_end" nicht gefunden!
CareFree |
Inhaltsverzeichnis
The function
The movements of your MikroKopter are controlled by remote control via the sticks nick (forward/backward) and roll (left/right).
If you move the nick-stick away from you => "nick - forward" then the copter flies forward over the front (red rigger).
As long as the copter is facing away from the pilot, it is like sitting in the copter yourself..
Bewegt man den Steuerknüppel nach links, fliegt der Kopter nach links. Steuert man nach rechts, fliegt der Kopter nach rechts.
If you now fly e.g. a 180 ° turn and the front (red rigger) looks to the pilot, confusion can occur.
From the point of view of the MikroKopter is still everything right. Front is still in front, left is left, right is right.
But for the pilot on the ground everything is now upside down. If he controls e.g. to the left, the model flies to the right.
This "nose flying" requires a little practice.
With the Function CareFree (or Headless Mode) there is no front on your copter.
If the function is "on" the MikroKopter will fly in the direction you move with the transmitter - So you have a "fixed flight direction" no matter where the front of the copter is in flight then points.
It is only important to know that the direction forward/back/left/right is fixed in your copter.
In order to avoid confusion in the control, the pilot should then turn with the remote control in the new orientation and remain so.
How to use the function CareFree as help or as a emergency function you can see here.
Radius
The CareFree function can be used differently depending on the distance to the starting point.
The distances are:
Distance Kopter <-> starting point => 0-20m = Inside
- Here, the "fixed flight direction" can be determined by the orientation via your copter itself
Distance Kopter <-> starting point => mehr als 20m = Outside
Here, the "fixed flight direction" will be determined by the position of your copter and the starting point
Via the MK-Telemetrie (next to the house icon) the distance from the copter to the starting point can be viewed =>
CareFree "Inside"
the MikroKopter is within a 20m radius around the starting point around, it is easy to see the front (red rigger) of the copter.
Within this radius, the "fixed flight direction" can be determined by the orientation of the copter itself.
The function:
By default, the CareFree function is disabled.
The front of the copter (red rigger) is therefore the flight direction forward.
To determine the "fixed flight direction" yourself, fly the copter inside the 20m range
around the starting point.
If the copter is within the 20m radius around the starting point, the "fixed flight direction" is determined as follows =>
Turn the copter with the front (red rigger) in the desired direction.
Activate the CareFree function
The direction in which the front (red rigger) now shows, is now automatically set as the direction of flight "forward"
As long as the CareFree function is active, the copter retains this "fixed flight direction" for forward/back/left/right - no matter how you turn the copter during the flight and how far away the copter is.
IMPORTANT
The pilot should turn now in the now set forward / backward direction and stay in this position!!!
If the pilot turns with the remote control, it can lead to confusion in the control !
The (flight)directions are fixed to the copter, not to the remote control !
CareFree "Outside"
Befindet sich der MikroKopter außerhalb des 20m Radius um den Startpunkt herum, kann es schwierig sein die Ausrichtung des Kopter zu bestimmen.
Hier kann die Funktion CareFree auch als Notfunktion genutzt werden.
Aktiviert man nun die Funktion CareFree, wird die aktuelle Position des Kopters und die Position des Startpunktes genutzt.
Die Richtung zwischen diesen beiden Positionen wird automatisch als vor/zurück Flugrichtung festgelegt.
The function:
By default, the CareFree function is disabled.
The front of the copter (red rigger) is therefore the flight direction forward.
The Kopter is located outside of the 20m radius around the starting point..
If the copter is outside the 20m radius around the starting point, the "fixed flight direction" is automatically set as follows =>
The front of the copter (red rigger) points in any direction (usually not visible)
Activate the CareFree function
- On the line between copter position and start position, the alignment is now automatically set backwards / forwards
As long as the CareFree function is active, the copter retains this "fixed flight direction" for forward/back/left/right - no matter how you turn the copter during the flight and how far away the copter is.
IMPORTANT
The pilot should turn now in the now set forward / backward direction and stay in this position!!!
If the pilot turns with the remote control, it can lead to confusion in the control !
The (flight)directions are fixed to the copter, not to the remote control !
Example
The pilot wants to teach-in a new CareFree direction, even if he doesn't know the actual direction of the MK
CareFree was already on, but the control direction is inconvenient
If the pilot switches CareFree off, the actual direction will become the control direction
CareFree is switched on -> the actual bearing between MK and pilot will become the control-direction - no matter of the actual MK-Direction
- Pulling the stick then means "back"
More examples here: CareFree
Waypoint-Generator
Include: Textmarkierung "##include_begin" nicht gefunden!
Include: Textmarkierung "##include_end" nicht gefunden!
WaypointGenerator |
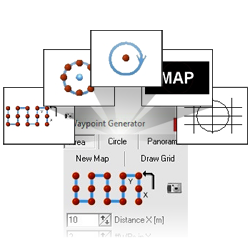
The WayPoint-Generator
With the waypoint generator you can create quick and easy waypoints and POI. And you can also place a grid for dimension determination or generate blank cards for testings.
How the WayPoints, POI, maps or grids can be set and been used you can read here for the individual functions.
Error-messages in the Jeti-Box
When using the Jeti-display error messages will be issued as morse "O" (3* beep) and displayed as text


Note: This text is only available at version FC 2.1 or higher, because of the space in the processor
Also look at: ErrorCodes
Implementation for HoTT-transmitter (FC 2.1 only)
There is a new transmitter-generation from Graupner: "HoTT"
Together with the developers of Graupner we have created an interface for the MikroKopter, to display the telemetry of the MikroKopter.
Include: Textmarkierung "##include_hott_menu_begin" nicht gefunden!
Include: Textmarkierung "##include_hott_menu_end" nicht gefunden!
Graupner HoTT Transmitter |
![]() If you select HoTT as receiver the zero-position of the sticks will be moved by 5 positions. Otherwise you have to trim all stick positions manually.
If you select HoTT as receiver the zero-position of the sticks will be moved by 5 positions. Otherwise you have to trim all stick positions manually.

More information here: HoTT
ComingHome as FailSafe

In case of RC transmisstion-lost, the MK can now automatically fly to the Home-Position (and altitude)
Basically the idea is, to bring the MikroKopter back into the reception range.
- In this case GPS, compass and altitude control will be automaically enabled. When the signal is back, it goes back to 'Manual Control'
- After the set time, the MK uses "Emergency Gas" and the "Emergency Time" to perform a descending
The time is limited to 30 seconds, this is enough to go through short rc signal lost times and put the MikroKopter nearer to the starting point
- The MK will do this for the preset time (no matter if it reached home or not).
- Waypoints are cancelled until the reception is back
- The MK is flying a direct route towards the home position
- If a "Coming Home Altitude" is set, this will be used immideately with a sink/rise-speed of 3.0m/sek
When signal is back, the MK will not go back to the old Position or altitude automatically
![]() Note: By default, the CH-Time is to 0sec, that means it is disabled by default. It can be set under "MISC" (expert setting).
Note: By default, the CH-Time is to 0sec, that means it is disabled by default. It can be set under "MISC" (expert setting).
Example:
- MK is in 120 distance and 50m altitude.
FailSafe-Time is 30sek and Emergency-gas-time is 15sek.
- CH-Altitude would be 20m
So in the example the MK would:
- fly back and descend simultainusly
- altitude would be reached in second 10 after Transmitter fails
- position would be reached in second 20
- there it would wait for a while, because the FS-Time is 30 seconds
- Emergency gas would be used in second 30 and the MK comes down
- the motors would be stopped in second 45
![]() ATTENTION: Before using this function the user have to clarify whether such a mode acceptable to the particular place or not of a legal, actuarial or other provisions is permitted.
ATTENTION: Before using this function the user have to clarify whether such a mode acceptable to the particular place or not of a legal, actuarial or other provisions is permitted.
FailSafe Video
![]() Attention: Please do not imitate! If you turn off the transmitter, the MK is not necessarily under control. Turning on the transmitter may take a few seconds.
Attention: Please do not imitate! If you turn off the transmitter, the MK is not necessarily under control. Turning on the transmitter may take a few seconds.
Maximum Altitude
In the settings you can set a maximun height. If you set these to 0, it is disabled.
![]() only if Vario-altitude-control is enabled and the gas-stick in neutral position
only if Vario-altitude-control is enabled and the gas-stick in neutral position
Check of the magnet-vector

In GPS-flight the exact compass angle is very important. By interferences (elektricity oder magnets) there can quite a difference of 30°
Now the NaviCtrl is checking the magnet-vector in flight - It only may have a difference of 20% from the vector at the calibration (which corresponds to a measurement error of about 30° , depending on location)
![]() In this firmware the compass has to be calibrated according to the neuen Methode !
In this firmware the compass has to be calibrated according to the neuen Methode !
![]() in case the calibration fails: read
in case the calibration fails: read
Inclination
The NaviCtrl now measures the magnetic inclination. It's the angle in which the magnetic fieldlines go into the ground. In Germany it is about 62-69°.
Here you can compare the values: http://www.magnetic-declination.com
![]() The value may differ to start no more than 10° from the theoretical. Otherwise you can start the engines, but do not takeoff.
The value may differ to start no more than 10° from the theoretical. Otherwise you can start the engines, but do not takeoff.
New Error-messages
Error-message 21: "GPS Fix lost"
Message, that during the flight the GPS signal got interrupted or the amount of satellites dropped under 4

Error-message 22: "Magnet error"
- the difference of the value of the magnetic field is more than 20% from that of the calibration.
- or the measured inclination differed more than 10° from the theoretical value.
- This error-message prevent the Kopter from starting. The engines begin to start but you can't give throttle.
- If that bothers you, you can disable it in the "misc" settings.
![]() If you get these error-messages but no interferences (wires or iron nearby), then you have to re-calibrate the compass. new methode
If you get these error-messages but no interferences (wires or iron nearby), then you have to re-calibrate the compass. new methode
![]() Read more: MagnetError
Read more: MagnetError
Error-message 23: "Motor restart"
- a BL-Ctrl tries to restart the engine
- maybe an engine is blocked or a cable is broken during flight
Error-message 24: "BL Limitation"
- a BL-Ctrl goes into the power limitation
- either overcurrent or too high temperature
GPS-Logging
The information in the GPS logging were extended by:
- all the individual streams of the BL controller
- all temperatures of each BL-controller (only BL-Ctrl2.0)
- Performance of brushless controllers (e.g. if the temperature goes over the limitation)
- FC I2C error count
the current strength of the magnetic field and the current measured inclination -> If a source of interference are available
free analog inputs Ch4-7 -> if someone wants to connect external sensors there
Tool for loading the Files: MK_GPX
The new names of the settings
- Setting 1: "Fast"
- Setting 2: "Normal"
- Setting 3: "Easy"
The "sport"-setting was removed
Other changes
- LED-switch-threshold reduced from 10 to 5
- If the GPS is deactivated - display no failure. If GPS is not plugged - display no failure as well
The display of the nose-direction in the KopterTool was faulty, when you have changed the "front"-alignment of the MK (X-formation)
- Mixer-settings won't be deleted, if the parameter-revision is changing
GPS-Angle limit from 100 to 140 + GPS-I-Limit from 75 to 85 -> With this the MK can hold the GPS-Position at a wind speed of about 50km/h. Previously it was about 40km/h
- Throttle had a ground-position of 120 instead of 127 just as the other channels. Now it was unified because it was confusing.
- Pressure-sensor Vario-Mode: Soft takeover of the height-target-value
Motor smooth adjustable (Settings -> Gyro) - default is OFF
there is a thread in our board about it.
Bugfixes
- Version NC 0.26g creates KML-Files that are compatible with the latest Version on Google Earth
Version NC 0.26g supports the MK-GPS with the new LEA-6S-0-001 chipset
- KategorieFirmware/FC

 Seite in
  Page en


