MikroKopterTool-OSD |
Info
Diese Seite befindet sich derzeit in der Überarbeitung.
This page is currently under revision
.jpg?m=1427786700)
Inhaltsverzeichnis
MikroKopterTool-OSD
With the MikroKopterTool-OSD you can see the telemetry of the copter (if the copter is connected) and also plan a waypoint flight.
Thereby you can plan a waypoint flight with, but also without connected copter.
You can place up to 32 (200 with license) way points, POI or FailSafe emergency landing sites easy, fast and personalized on a map.
If you have a connection between copter <-> PC you can send your planed waypoint flight directly to your copter.
But you can also save the planed waypoint flight on your computer and open it later. Or you can save it on the
SD card in your copter So you can also load and use the planed waypoint flight without computer whenever you want.
For the hobby use of we have an operating range of 250m (around the starting point) where you can use the waypoints..
Commercial users can use a larger range for the waypoint flight (depending on the purchased license).
INFO
The MikroKopterTool-OSD can only be used if you use a Set Navigation on your copter.
Before using the Waipoint-Function it is necessary that the user clarifies wether such a mode of operation is permitted in the country / to the respective site or by legal, insurance or other terms..
The Waypoint fly can be used only if a GPS-System is available on the Kopter and a Sat-Fix is present!
Open the MikroKopterTool-OSD
In the main window of the KopterTool you will find the button "OSD".
A "click" on the button "OSD" will open the MikroKopterTool-OSD.
OSD window structure
The OSD has four sections:
Titlebar --> |
|
Menubar --> |
|
Telemetry display --> |
|
Map window --> |
|
Titlebar
In the left corner of the titlebar you can see the size of the map window.
With the mouse you can grab the corners / sides of the OSD window and change the size as you want.

Move the mouse over a loaded map and you will see the position in decimal degrees (latitude / longitude).

Menubar
Different settings can be made via the menu bar.
More info on this can be found below under Menubar.

Telemetry display
In the telemetry display all telemetry data of a connected Copters are displayed.
More info on this can be found below under Telemetry display.

Map window
In the map window you see the loaded map.
More info on this can be found below under Get online map.

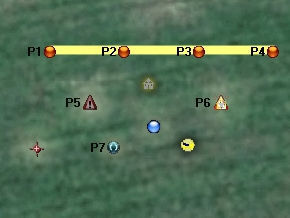
Symbols in the map window
If you place a Waypoint, POI or Failsafe-Point on the map, you will see a Symbol for it. |
|
Die Symbole:
Waypoint
A "right-click" with your mouse at the Map
will place a Waypoint.
Copter
Position and orientation of the copter. Only to see with connected Copter <-> PC + !Satfix.
POI - Point of Interest
Can be generated from an existing waypoint by right-clicking.
Target
The copter will follow this point.See also "Target".
Failsafe-Point
Can be generated from an existing waypoint by right-clicking.
Home
Displays the HomepPosition at which the copter is started.
Active Failsafe-Point
See Failsafe-Point. Automatically activated when the copter is near this point.
Cursor
Marks the spot on the map where you have make a "left click" with the mouse.
Target
The target point is indicated visually on the map, where the copter will fly next.
When you have placed some Waypoints on the map and fly now automatically this points, the next position where the copter have to fly will be marked by a target point.
Also if the function PositionHold is activated you will see this point. When you now move the Nick/Roll stick on you r transmitter, you will move the target point. Here also the copter follows then that target point.
Distance
If you have loaded a map and if you want to determining a distance between e.g. 2 points or the length and width of a field, you can do this quickly and easily.
- place a waypoint there (by clicking the left mouse button) where you will start your measurement
- then move the cursor (with your mouse) on the map
- in the "Titlebar" you can ow see the distance between the waypoint and the cursor
The Menubar
Different settings can be made via the menu bar:
File
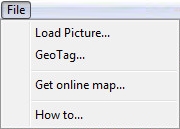
Via File The following functions can be selected.
Load Picture...
Stored maps can be opened here anddisplayed in the map window.
You can use also your own map if it is a .jpg or .mkz format with geodata.
INFO:
A .mkz file is a zipped file (like e.g. .zip) and includes 2 .jpg pictures.
(See also MikroKopter MapTool).
GeoTag...
The key data of the GPS positions of a loaded image, can be seen here. If you use a .jpg picture without GPS positions you can insert it here then manually (if you know the values). The GPS positions are needed to locate the positions on the map.
The setting window is looks like this:
Info:
If you safe a map with the MikroKopter MapTool the GPS positions are already safed in the map.
(See also GeoTag).
Get online map
The needed maps can be loaded and safed with our "MikroKopter MapTool". Please note that you need a internetconnection to open it.
(See also MikroKopter MapTool)
How to...
A "click" on this entry opens this wiki page.
(An Internet connection is required)
GPX Log
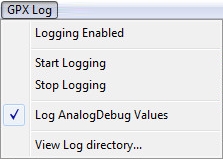
These functions can be selected in the menu "GPX Log".
Logging Enabled
Here you can activate or deactivate the automatically logging of the telemetry data from your copter on your computer.
If the logging is activ the program is waiting
that you start and fly the copter ...
... then he record the telemetry data ...

... and stop the recording when
the copter is landed and switch off.
Start Logging
- Manually start of the logging. The telemetry data will be stored in a file on the computer.
Stop Logging
Stops the logging of telemetry data.
INFO: If the logging starts automatically you can not stop it manually.
Log AnalogDebug Values
Enables the logging of !Analog Debug values in log file
(e.g. AngleNick, AngleRoll, ACCNick, ACCRoll, .....)
View Log directory...
- Opens the folder in which the recorded log files were stored.
Data Link

With "Data Link" you can activate "RX only". If you activate this you can only receive Data from the copter.
A sending of data to the copter (like Waypoints) is then not possible.
You can use this if you need e.g. 2 computers to show the telemetry of the copter. Here only one computer can receive and send data from/to the copter. If more computers can also send data to the copter the connection will break down. So the second use "RX only".
WayPoints

Under "WayPoints" you can do this.
Editor...
Here you can open the waypoint editor. In this editor you can change all settings of the single waypoints, POIs or FailSafe points.
A description of this can be found at: waypoint editor.
Generator...
With the Generator you can set automatically various waypoints pattern with different settings on the map.
A description of the Generator you can find here: Wegpunkt-Generator
Add MK Pos. to WP list
If you use this entry or if you press the button "F9" on your computer, the current position of you r copter will be stored on the loaded map.
Please note that this is only possible if there is a (wireless) connection between your copter and your computer.
So you can fly your copter wherever you want and save quick and easy the current position.
This waypoints you can save and also load whenever you want and fly again and again and again to the same position.
Display
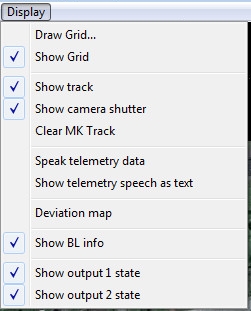
These functions can be selected in the menu "Display".
Draw Grid...
Wit this feature you can display a grid or one/two circles on the map. The size of the grid or of the circles can be set as desired.
A grid or cirle can help to see the dimensions of the map. A description of this can be found here: Draw Grid.
Show Grid
- A created grid/circle can hereby be displayed/hidden.
Show track
During the real flight you can see a track on the map where the copter is flying.
(For this you need a (wireless) connection between copter and computer)
Show camera shutter
If you use e.g. "trigger all X meters" with the output 1 you can see when the output is triggering. Then you see in your map a little dot on the track.
(For this you need a (wireless) connection between copter and computer)
Clear MK Track
- Deletes the recorded track on the map.
Speak telemetry data
If you switch a function on your transmitter (e.g. altitude control, PositionHold etc.) your computer will speak the telemetry data.
Show telemetry speech as text
If you switch a function on your transmitter (e.g. altitude control, PositionHold etc.) your computer will show the telemetry data.
Deviation map
With this function you can open a new window where you see the GPS accuracy of the GPS reception. For this the copter must be outside on the ground and receive the satellites.
In the center of the cross (at "0") you find the position of your copter. The circles indicate the variation in "meter".
The accuracy depends on the number of satellites and the signal quality. The better the reception, the smaller the GPS deviations. With a smaller GPS deviations you will have a more accurate GPS function (like PositionHold etc.).
Draws the line a large radius around the center point, the accuracy is insufficient (e.g. with a GPS shadowing by buildings or existing solar storms). In this case, you also have an inaccurate GPS function and the copter can fly e.g. with activated function PositionHold in circles.
Show BL info
The temperature and current of each BL-Ctrl (V2.0 or V3) can be displayed in the OSD Map.
The indicator is red with disabled engines and black with running engines.
If you move the mouse over one of this BL-Ctrl, a display will show the I2C errors (if that occurred).

Show output 1 state
Display of the switching state of output OUT1.
The following applies: number visible => output switched. No number => output open.
Show output 2 state
Display of the switching state of output OUT2.
The following applies: number visible => output switched. No number => output open.
GPS coordinates

In this view, the current position of your MikroKopter will be displayed (with longitude and latitude coordinates in decimal degrees).
Telemetry display
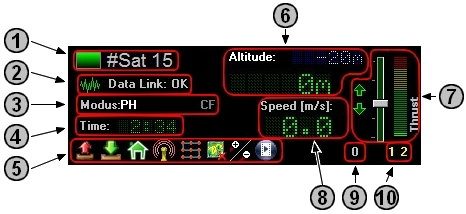
The telemetry display is in the upper part of the "OSD". Here you can see telemetry data like LiPo voltage, current consumption, altitude, speed etc.

On the left side this is the display for:
Number of satellites
The number of currently received satellites can be read here.
For a "Satfix" we need minimum 6 satellites. Only then we can accurately determining the position of the MikroKopter.
Data Link active / passive
Here you can see if you have a connection between your copter and the computer.
You can use for the connection e.g. a Wi.232, Bluetooth or a RangeExtender.
Used Modus
The activated GPS functions can be shown here:
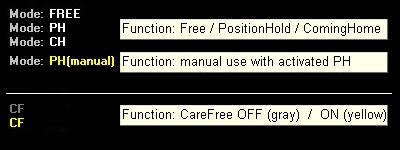
If you see PH(manual) you use the function PositionHold and you fly your copter manually by using the nick/roll stick.
Flight time
- Here you can see the flight time. It starts with starting the motors and ends when you switch off the motors.
Function buttons
Through this buttons you can quickly open this following functions:

Sends all planed waypoints/POI/FailSafe points to your copter.

Received all waypoints/POI/FailSafe points who are in your copter loaded.

Deletes the waypoints/POI/FailSafe points in your copter and causes the direct flight back to the starting position.

Opens the waypoint generator. More information can be found here: Waypoint Generator

Deletes the yellow copter track on the map.

Switch between the two views of an loaded map from the MikroKopter MapTool.

Starts the flight simulator. With the simulator you can fly your waypoints virtual. During this flight the camera mount will tilt and the connected camera will trigger in the way you have programmed it your your waypoint flight. More information can be found here: Flight Simulator
Altitude
When the switch for the altitude on the transmitter is switched to the "ON" position, the target height is displayed blue.
The current copter altitude (measured by the barometric pressure sensor) is displayed in large green numbers.
Thrust
- At the bar graph, the movement of the throttle stick and the corresponding boost can be read.
Speed
- Displays the current airspeed in m / s
Triggering
The number of switching operations of the switching output OUT1 are shown here.
This number normally should then match with the number of taken photos on your camera.
(Assuming the camera is set correctly and triggers with the switching operations of the switching output OUT1)
Display switching channel Out1 / Out2
- Here you can see which of the two switching channels is currently active.
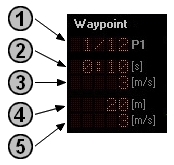
Waypoint Info:
During the waypoint flight you see here some informations:
P1 => Waypoint x of y
- Here the total number of transmitted waypoints (right) and the currently flown waypoint (left) is displayed.
[s] => Waypoint time
Each waypoint can be assigned a residence time. For this time the copter will stay at the waypoint.
The retention period begins upon reaching the waypoint radius and count down backwards.
[m/s] => Airspeed
The speed in which the next waypoint is approached can be set individually for each waypoint.
Here you can see the speed.
[m] => Waypoint altitude
- The height of the current waypoint is displayed.
[m/s] => Waypoint climb rate
If the next waypoint is higher or lower than the current, you can set the climb rate individually.
Here you see then the speed of the climb rate.
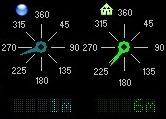
Direction readings:
The left display shows the direction and distance to the next waypoint / target.
The right display indicates the direction and distance from the starting point of the copter (Home position) at the current position of the copter.
Consumption values:
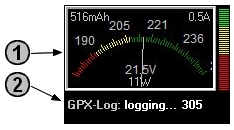
Battery indicator
- The current battery voltage and consumption are shown here.
GPX-Log
Status indication of the recording progress of the log over the KopterTool.
(See also GPX Log)
Alert messages
In case of a warning you will see a message at the OSD and the indicator turns red:
Example battery warning:
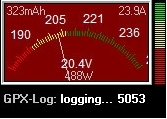
Error messages are displayed in the map below. Here are some examples:

The exact meaning of the error codes can be found in the Wiki: ErrorCodes
Additional links
Get a map
To place a waypoint, POI or a FailSafe points we need a map where we can do it. Easy and fast you can get a map of your location with our "MikroKopter Map-Tool".
More information can be found here: MikroKopter MapTool
How to place a waypoint / POI / Emergency landing sites ?
A waypoint can be set easy and fast by clicking with the right mouse button on the map.
To change a waypoint to a POI or a FailSafe points you have to click again the right mouse button directly on the waypoint you will change.
More information can be found here: Wegpunkt-Editor
Run a waypoint flight
There are several ways to perform a waypoint flight.
- Send your planed waypoint flight directly to your copter and run it directly
-> More information can be found here: Perform a waypoint flight
- Save your planed waypoint flight on the micro SD card in the copter and load it from there and run it whenever you want
-> More information can be found here: Load and run a WP flight from SD card
- Send your planed waypoint flight directly to your copter and run it directly
Save and load waypoints with the remote control
If you use a Graupner HoTT or Jeti transmitter you can also save and load waypoints directly with your transmitter. The waypoints will be stored on your copter.
More information can be found here: SinglePoint
Waypoint Generator
With the Wegpunkte Generator different settings can be placed automatically on a map.
More information can be found here: Waypoint Generator
Waypoint Editor
All waypoints / POI or FailSafe points who you place on the map are listed in the waypoint editor.
Here these individual entries can be changed and edited.
More information can be found here: Waypoint Editor
Waypoint Automatic
In order that a connected camera can automatically trigger at a waypoint, or all X meters the automatic must be enabled.
More information can be found here: Waypointe Automatic
Connect a Shuttercable
Using a Shuttercable to trigger a camera also during the waypoints flight.
The Shuttercable will be connected to Out1 at the FlightCtrl.
More information can be found here: Shuttercable
Flight Simulator
With the flight simulator you can fly virtual a previously applied waypoint flight.
To use it you must connect the copter with your computer (e.g. with the MK-USB or a wireless connection).
During the virtual flight, the camera tilt and the camera triggering will be executed on copter on the settings of the waypoints flight.
More information can be found here: Flugsimulator
Videos
Waypoints Flight - Programmable speed:
Waypoint flight with POI:
(german)
Waypoint flight with POI:
(english)
FollowMe-flight witht Wakeboarder:


