 This web-site as a PDF-Document? Click on the symbol and wait a moment... -->
Firmware 0.88
Inhaltsverzeichnis
- Firmware 0.88
- Download
- Compatibility
-
What's new
- HoTT V4 with improved Telemetrie and Speech
- WayPoint-Flight - Programmable Speed
- WayPoint-Flight - Adjustable CAM-Nick per WayPoint
- WayPoint-Flight - Fly WayPoints without a Stop
- WayPoint-Flight - Maximum numbers of WayPoints
- WayPoint-Flight - Send WayPoints
- WayPoint-Flight - WayPoint Infos
- WayPoint-Flight - Set POI and change WayPoint into POI
- WayPoint-Flight - Use saved WayPoints as a template
- WayPoint-Flight - Set position of the Kopter as a WayPoint
- WayPoint-Flight - Copy MK heading
- WayPoint-Flight - Display Switch Output
- FailSafe
- Use GPS max. radius for dPH
- SD-Card in NaviCtrl
- 0.88m & 0.28m Update
- Other
Date of Release: 2012.03.26
License: LICENSE.TXT
Forum-Link:
http://forum.mikrokopter.de/topic-32936.html
Download
Here you can download the actual software version:
![]() Version for Graupner HoTT V4
Version for Graupner HoTT V4
FlightControl V0.88n (FC1.0 - FC2.0) (MEGA644)
FlightControl V0.88n (FC2.1) (MEGA1284)
 Here the latest changes
Special version for ACT-2,4GHz S3D-receiver
FlightControl until FC2.0 V0.88n - only for ACT-S3D 2.4GHz receivers
FlightControl > FC2.1 V0.88n - only for ACT-S3D 2.4GHz receivers
![]() ONLY functional with this 2,4GHz-s3d-version!
ONLY functional with this 2,4GHz-s3d-version!
Old Version 0.88/0.28 for HoTT V3
How to update?
Never made an update before? A description how that works you'll find here: SoftwareUpdate
Compatibility
INFO
If you use a MK3Mag you do not need a new software for the MK3Mag.
You should not upload settings from earlier versions via the KopterTool. That can lead to failures.
If you want to change settings you should do it manually. A saved setting can be printed and been used as a template.
If a SD-Card is used in the NaviCtrl, please delete the existing Settings.ini . A new Settings.ini with new settings will be automatically generated with the next start.
What's new
HoTT V4 with improved Telemetrie and Speech
- the new menu is shown in 4:10 in the video
The Graupner transmitters contain a special MikroKopter-Menu now
also a MikroKopter-Specific voice-file is available that contains:"Starting", "Calibrating", "Error compass", and many more
The Transmitter can write an own logfile of the telemetry data a SD-card. That can be helpful if a MikroKopter gets lost - then you could see the last GPS-coordinate.
WayPoint-Flight - Programmable Speed
Now it is possible to set the speed, in which the WayPoints will be flown, in 0,1m/sec per WayPoint.

Here you can:
- enter the speed with a fixed value of 1-247 (x 0,1 m/s),
- enter one of the POTI1-8 for a continuous control. You can enter for the speed i.e. "poti3"
- Or - you can set the value "0". Here the maximum of speed will be used, so basically the old mode.
A description of this setting you will find here: Programmable Speed
Hit-Radius
In previous firmware versions the waypoint was always achieved as soon as the MK came into the capture radius (i.e. within 10m).
That has been changed in this version! The next WayPoint is reached at the earliest after the theoretical shortest time.
EXAMPLE: If there is a distance i.e. of about 30m between two WayPoints and the MK should fly to the next point with 3m/sec the WayPoint will be reached after 10 seconds even if the radius of capture would be i.e. 30m. Throughout that, well planned WayPoint-Flights will be possible.
![]() HINT: The hit-radius you can choose greater with this version as with previous firmware-versions. A good value is i.e. 15-25m
HINT: The hit-radius you can choose greater with this version as with previous firmware-versions. A good value is i.e. 15-25m
WayPoint-Flight - Adjustable CAM-Nick per WayPoint
The CAM-Nick is now adjustable for each WayPoint. Here you can enter either degree values or the value "AUTO".
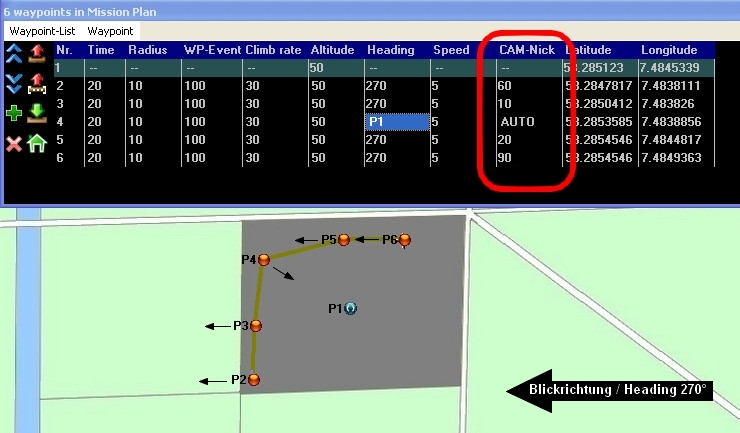
The example image shows 1x POI and 5x WayPoints. Here with example entries.
The Kopter / the camera are pointing in following directions:
(P1) POI 1 => Point Of Interest
(P2) WayPoint 2 => Heading = 270° / CAM-Nick = 60° downwards
(P3) WayPoint 3 => Heading = 270° / CAM-Nick = 10° downwards
(P4) WayPoint 4 => Heading = towards POI / CAM-Nick = AUTO = Points towards entered POI-Height/Altitude
(P5) WayPoint 5 => Heading = 270° / CAM-Nick = 20° downwards
(P6) WayPoint 6 => Heading = 270° / CAM-Nick = 90° downwards
A description of those settings you will find here: Camera-Nick
WayPoint-Flight - Fly WayPoints without a Stop
In a WayPoint-Flight you are able to setup the delay time at each WayPoint.
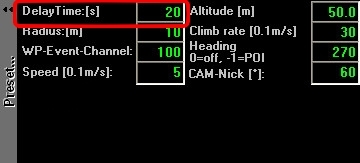
But - if you want to fly without a Stop from WayPoint to WayPoint you can enter here a "0" as a WayPoint-Time.
To trigger a camera on each waypoint on such an overflight, the WayPoint-Event is active for a minimum of at least 2 seconds in this setting.
A description of this setting you will find here: Delay Time
How to connect and to setup the camera you can read here: Connecting Camera
WayPoint-Flight - Maximum numbers of WayPoints
With the new version you are able to place a maximum of 200 WayPoints/POI on a map.
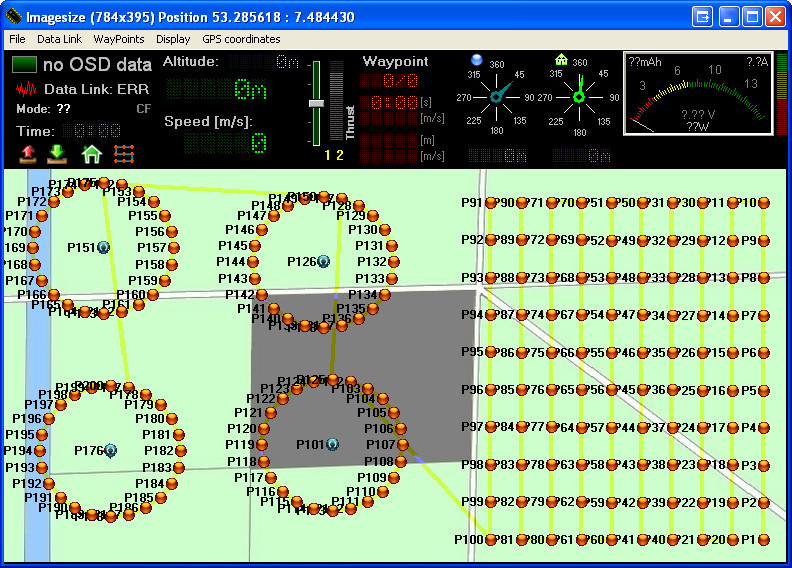
Here you can create different patterns with the WayPoint-Generator.
A description of the settings you can find here: WayPoints
WayPoint-Flight - Send WayPoints
Out of the total 200 WayPoints/POI you can send maximal 32 to the NaviCtrl for an automatic flight.
But if you only want to fly a certain range of the maximal 200 WayPoints entered in the map (i.e. WP40-WP60) you can send ONLY those WayPoints to the NaviCtrl.
A description of the setting you will find here: Transfer WayPoints
WayPoint-Flight - WayPoint Infos
For the WayPoint-Information there are two innovations.
In the OSD there is now a separated display available which provides you information of the WayPoint during a WayPoint-Flight.
Those are: WayPoint x of y, the delay time, the height/altitude and the speed in which the next WP will be flown.
A description of the setting you can find here: WayPoint Infos1
The data for each WayPoint or POI can not be checked ONLY in the editor since now.
If you move the mouse over the appropriate WayPoint or POI the display provides the data of the specific WP/POI.
A description of the setting you will find here: WayPoint-Flight Infos2
WayPoint-Flight - Set POI and change WayPoint into POI
On the map you can place several WayPoints and also several POI.
If you want to place directly a POI into the map you can do that by holding the "STRG/CTRL"-Button and a "Right-click" with the mouse on the map.
If an already existing WayPoint should be transformed into a POI, that is also now possible.
With a "Right-click" on the WayPoint you can change that one now into a POI.
On the other side you are also able to transform a POI into a WayPoint.
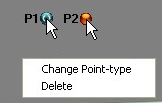
A description of this settings you will find here: Set POI + WP <-> POI
WayPoint-Flight - Use saved WayPoints as a template
Until now it was possible only to save and to load WayPoints/POI for specific coordinates.
Now you are able to use ANY stored WayPoint or POI as a template.
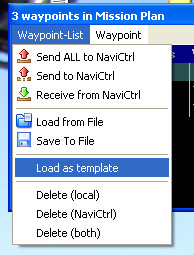
You are also able now to plan and to save a flight at home.
These saved flight-plan can be used now in any other map and at each place as a template and been flown in that way.
A description of the settings you can find here: Templates
WayPoint-Flight - Set position of the Kopter as a WayPoint
That you can enter WayPoints manually into a map is really not new.
New is, that you are able now to set the actual position of the Kopter as a WayPoint.
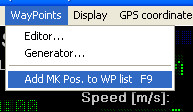
If you fly the Kopter, in example, to a specific position or you discovered an interesting place during a flight to which you want to fly-by again you can push "F9" in the "OSD" of the KopterTool. Here then the current position of the Kopter will be entered immediately into the map as a WayPoint.
In that way you can create several WayPoints, save those and fly those whenever you like.
A description of the settings you will find here: Add MK-Position with "F9"
WayPoint-Flight - Copy MK heading
Who wants to make panorama images with the MikroKopter knows surely about the WayPoint-Generator.
New is here the function "Copy MK heading".

Here you just need to turn the "nose" of the Kopter into the direction in which you want to take the first image and then you "click" on "Copy MK heading".
That can be pretty much helpful if you don't want to have i.e. a specific building in the cut-line of two images.
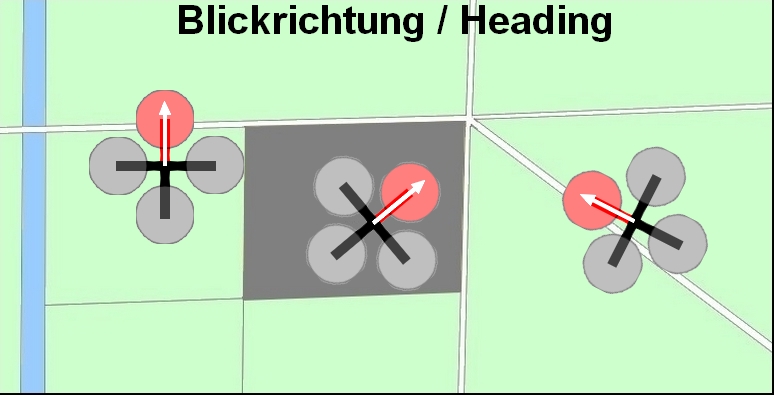
A description of the settings you will find here: Copy MK heading
WayPoint-Flight - Display Switch Output
If you have assigned a switch output i.e. to trigger a camera you can check now this function in the OSD.
Both switch outputs can be displayed now in the OSD. Is an output active it will be displayed here.
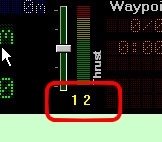
HINT: The display will be refreshed in the KopterTool around 4 times per second. If the display flashes faster it could be possible that it is displayed not correctly.
A setup of the speed in the switch pattern with a value greater 30 (0,3sek) will be displayed pretty well.
A description of the settings you can find here: Display switch output
FailSafe
During a loss of a signal it is now possible to activate automatically a "FailSafe"-Function throughout the Kopter.
The Kopter is here not going down at that actual position but - flies back now automatically into the direction "Homeposition" instead.
If the reception continues without any problems a normal control is possible again.
If a recovery of the connection is still not possible the Kopter continues to fly into the direction "Homeposition" and tries there to land with a fixed rate of descent.
Integrated is a "ComingHome Height/altitude" function. That can be set up manually so that the Kopter is not flying into obstacles on its direct way to the "Homeposition".
Video of the FailSafe
![]() ATTENTION: PLEASE DO NOT IMITATE!! If you turn off the transmitter the Kopter is inevitably out of control and can crash. To turn on the transmittes can take a few seconds under circumstances.
ATTENTION: PLEASE DO NOT IMITATE!! If you turn off the transmitter the Kopter is inevitably out of control and can crash. To turn on the transmittes can take a few seconds under circumstances.
FailSafe - FailSafe Time
In general a reception failure is caused by flying out of the range..
Is that the case automatically FailSafe will be activated and the Kopter flies back into the direction of the Homeposition.
Then it usually takes a few seconds until the reception is available again.
The FailSafe-Time can be set here infinitely variable up to 60 seconds.
For information: If this time is not enough because the Kopter is too far away or way too high the Kopter will be landed with the entered "Emergency-Gas/Throttle Time" and the entered "Emergency-Gas/Throttle" after that time.
A description of the function and the settings you will find here: FailSafe-Time
Emergency-Gas/Throttle
The already known "Emergency-Gas/Throttle" has also a new function.
Until now you had to determine individually the "Emergency-Gas/Throttle" depending on the weight of the Kopter. That is also still possible.
Alternative you can enter also now, throughout activating the new button "Use vario control for failsafe altitude", a percentage value of the hovering gas/throttle value.
Here the automatically determined hovering-gas/throttle through the FC-Software will be used.
A description of this function and the settings you can find here: Emergency-Gas/Throttle
FailSafe - Receiver without signal loss indicator
So that the Kopter recognizes a receiver failure the receiver must display a reception failure.
Is that not the case the Kopter could continue to fly with the last received settings.
So that you can use also receiver which does not show explicitly a loss of a signal you can set an own channel for that function.
Here the receiver needs to be switched - please use the appropriate Failsafe-Setting of the specific receiver.
A description of the function and the settings you will find here: Signal loss indicator
Use GPS max. radius for dPH
If you activate this safety-feature in the settings, you can fly during an activated GPS-function (such as PositionHold) only inside the GPS-Radius.
If you fly outside of the GPS-Radius and activate then e.g. PositionHold, the Kopter will fly automatically back into the GPS-Radius.
A description of the function and the settings you will find here: GPS-Range for dPH
SD-Card in NaviCtrl
No start without SD-Card
You can choose in the settings under "MISC" if you want to start the Kopter only with inserted SD-Card in the NaviCtrl.
That can be very important to make sure that the Kopter flies only with its noted settings. Or you need forcibly a log-file.
A description of this settings you can find here: No start without SD-Card
Data on the SD-Card
If a SD-Card is inserted in the NaviCtrl data of the Kopter will be recorded during the flight.
The NaviCtrl creates also automatically a file "Settings.ini". In that file settings of the Kopter will be deposited.
Those settings you can read in the description of the NaviCtrl in our Wiki.
NEW is here:
MAX_FLYING_ALT:
Here you can enter a maximal Flight-altitude. If the Kopter is going over this altitude you will get an error message "29:Err:Max Altitude".
A NaviCtrl with a commercial license will switch automatically to Emergency-Gas/Throttle after another 10m to go down again into the allowed range.
This function is independently on the position of the switch for the height/altitude.
MAX_FLYING_RANGE
Here you can enter a maximal flight range. If the Kopter is flying out of this range GPS will be activated automatically and the MK tries to fly back.
Also an error message appears in the telemetry display of Jeti+HoTT.
DESCEND_RANGE (Only to use with the commercial license)
Here you can enter a maximal allowed flight radius. If you want to enter that here the entry should be smaller under "MAX_FLYING_RANGE"!
If the Mikrokopter for some reason does not stop at the "MAX_FLYING_RANGE" registered border the MikroKopter will automatically go with emergency-gas/throttle into descent flight - regardless of whether the height control is on or off.
For information:
The "DESCEND_RANGE" is required in France. The law provides that a flight model (which flies commercial operations) must come down after 150m!
All three values are deactivated in the basic settings, so they are set to ZERO (0). For the setting the SD-Card must be read from a PC and been changed.
MIN_EVENT_TIME
During a WayPoint-Flight the Kopter can stay at each WayPoint with the set delay time or flies one WayPoint after the other without a delay time.
So that the Kopter can trigger i.e. a camera in a continuously flight without having a delay time at each WayPoint is here a minimum trigger-time of 2 seconds already pre-set.
During that time the setup WP-Event is active. Whom is that time maybe to short can make an own entry with an own period of time on the SD-Card.
GPS_SBAS_DGPS_ON
With this entry ( if necessary ) you can disable the GPS-Config "SBAS" (DGPS) (EGNOS).
An explaination for each setting with the default values you can find under the appropriate NaviCtrl (under Micro SD-Card): NaviCtrl
IMPORTANT
After downloading the new software into the NaviCtrl you should delete an already existing file named "Settings.ini" on the SD-Card.
A new file "Settings.ini" will be created after switching ON. If the card is not inserted or the parameter in the SETTINGS.INI is not available the MikroKopter is using the default values.
GPX-File
In addition to the previously stored data in the GPX-file further values will be stored also:
Which WayPoint is currently used.
- The actual value of the WP-Event.
- Nominal values of Nick- and Roll-Servo.
![]() find the complete description of the GPX-Tags here: GPX
find the complete description of the GPX-Tags here: GPX
All data which will be stored in the GPX-file including the latest you can find here for the appropriate NaviCtrl (under Micro SD-Card): NaviCtrl
Those data you can view i.e. with the "GPX-Viewer" or with the "MK_GPX" program: Link
KML-Log
Since the latest Google Earth version the flight data that was saved in the KML file was not displayed correctly.
The data in the KML file have been adjusted accordingly. They are now also displayed correctly again in Google Earth.
Infos for the appropriate NaviCtrl (under Micro SD-Card) you can find also here: NaviCtrl
0.88m & 0.28m Update
HoTT V4 with improved Telemetry and speech
The Graupner transmitters contain a special MikroKopter-Menu now
also a MikroKopter-Specific voice-file is available that contains:"Starting", "Calibrating", "Error compass", and many more
The Data can be logged on a SD card in the HoTT-Transmitter. Just in case you would loose a MikroKopter, you could see the last GPS Position in the Logfile of the Transmitter.
![]() use the 'Flight Time clock' in the transmitter to start the logging in the Transmitter. A small SD-Symbol will appear on the LCD
use the 'Flight Time clock' in the transmitter to start the logging in the Transmitter. A small SD-Symbol will appear on the LCD
short instruction to update to HoTT V4
- update: FC, NC
update: Receiver and Transmitter (Firmware and Voice-File) (Hint: hidden menü in the Transmitter: left touchfield press up & down together and than "Set")
- Activate all Graupner sensors in the Transmitter: GPS, Vario, electric air, general
- select "HoTT" as receiver in the Koptertool settings
- connect the telemetry cable between FC and receiver and the "JET" bridge must be closed on the FC
Waiting for GPS-fix
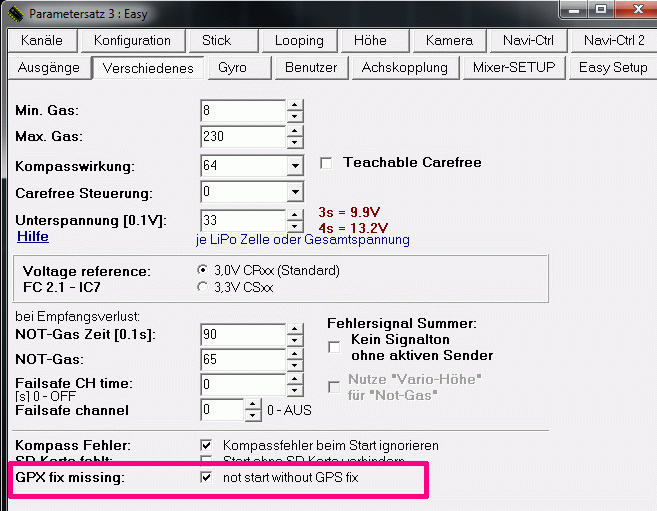
- now you can avoid starting without GPS-fix
Motor switch

- Now you can assign a switch for direct starting and stopping the Motors.
 First pull gas (throttle) to zero before switching. The sequence is important there
The advantages against the old safety-switch are
- you can't forget the switch
you can start the flight time counter in the transmitter with this switch
 the Graupner HoTT-Transmitter will start logging then
Servo Output
- the servooutput is not switched off during calibrating - some servos had problems with that
Other
Futaba S.Bus
Since this version receiver from Futaba with the S.Bus will be also supported. Connected are those by a Signal-Inverter to the FlightCtrl.
![]() That is ONLY possible since FlightCtrl V2.1! Not with a FlightCtrl V2.0 or older.
That is ONLY possible since FlightCtrl V2.1! Not with a FlightCtrl V2.0 or older.
A description for the connection and the settings you can find here: Futaba S.Bus
KopterTool - 3D + Sticks
With the 3D Button you have opened until now the 3D view of the Kopter and also the balance view.
New is now an additional view for the function of the control-sticks.
Either way which button has been opened before the appropriate display will be viewed:
Before: Button NaviCtrl and then on the Button 3D = 3D-View + displayed control-sticks
Before: Button FlightCtrl and then on the Button 3D = 3D-display + Balance view
A description of this function you can find here: 3D
Servo Output-Filter
There is now a filter available for the servo-control. Thus, depending on your filter setting the quick movements of the MKs are been filtered before they go to the servos.
This value can be set between 0 - 25. Depending on the entry the servos will be controlled softer (5-20) or harder (0-4).
A description of the settings you can find here: Servo Filter
Servo 3+4
Servo 3 and 4 you can use now i.e. as a mechanical trigger for the camera. Here you can place the servo signals to the switch outputs.
A description of those settings you will find here: Servo 3,4
Error-Codes
New Error-Codes have been created: "No SD-Card", "Flying-Range!", "Error SD-Logging" and "Error Max Altitude".
A description of the "Error-Code" you will find here: ErrorCodes
Altimeter
The altimeter is calibrated new. The old displayed value has been displayed approx. 10% to high.
Temperature- and Power indicator of the BL-Ctrl in the OSD
In the OSD the actual temperature and current of each BL-Ctrl can be viewed. But it is only possible to display the temperature with the BL-Ctrl V2.0.
others
Space removed from the KML-Files to become compatible to the last VErsion of GoogleEarth
Support for MKGPS with SW-Version 7 (LEA-6S-0.001)
- increased the SD-Karten-Speed from 1MBit/s to 2MBit/s
- Comments in the Settings.ini
Bugfixes
NC:0.28i Bugfixes (2012.03.29)
- MK3Mag didn't come out of Step 5
- Menue point 19 was invisible
- Autralia (and maybe also other locations): Waypoint with Speed-Selection didn't reach the Point and didn't switch to the next Waypoint
- Magnet-Error supressed for some seconds after Gyro calibration, because that message came without any reason and was confusing
NC:0.28n Bugfix (2012.07.02)
- Follow-ME-Bugfix: Camera angle was wrong. Needs also the Follow-Me-Transmitter in Version 0.28n
NC:0.28o Bugfix (2012.07.19)
- HoTT-Telemetry: On the southern hemisphere, the negative sign of the GPS-Coordinates were not shown and the compass value was shown as 2° in the HoTT-Telemetry
FC:088n Bugfix (2012.07.06)
- the last outputted pulse on the FC-Servo-outputs was too short
NC 0.28p (Bugfix 22.11.2012)
FC_I2C_ErrorConter in the Logfile was always zero
- Start Logfile with 3 satelites
- KategorieFirmware/FC


