|
Größe: 6394
Kommentar: Addresses 9-12
|
← Revision 32 vom 20.01.2016 11:45 ⇥
Größe: 9747
Kommentar:
|
| Gelöschter Text ist auf diese Art markiert. | Hinzugefügter Text ist auf diese Art markiert. |
| Zeile 1: | Zeile 1: |
| ||<tablewidth="720px" tablestyle="text-align: center;"bgcolor="#ffffa0"> {{http://mikrokopter.de/images/fra.gif}} Page in [[fr/BL-Ctrl_2.0|french]] ||<bgcolor="#ffffa0"> {{http://mikrokopter.de/images/deu.gif}} Seite in [[BL-Ctrl_2.0|deutsch]] || | #acl AdminGroup:read,write,revert EditorsGroup:read,write,revert All:read ||<class="MK_TableNoBorder">This page as an '''PDF-Document'''? Click on that Symbol and wait a little moment... ---> ||<class="MK_TableNoBorder"><<PDFIcon>>|| {{{#!wiki MK_Nav ||<class="MK_Nav_Header">'''BL-Ctrl V2.0'''|| }}} {{{#!wiki MK_select1 * {{http://mikrokopter.de/images/deu.gif}} [[BL-Ctrl_2.0|deutsch]] * {{http://mikrokopter.de/images/fra.gif}} [[fr/BL-Ctrl_2.0|français]] }}} <<BR>> See also:[[en/BL-Ctrl|BL-Ctrl]] <<BR>><<BR>> <<TableOfContents>> |
| Zeile 4: | Zeile 22: |
| Zeile 8: | Zeile 25: |
| <<BR>><<BR>> '''Note:''' <<BR>> The BL-Ctrl 2.0 controller is specifically designed and optimized for our MK3638 motor. <<BR>> For maximum stability of the MikroKopter setpoints are set almost instantaneously on the motor. <<BR>> If other motors (especially larger power classes) are used with this controller, this fast change <<BR>> of setpoints can easily lead to very high peak currents, which bring the BL-Ctrl control to the <<BR>> limit or an overload. This is no fault of BL-Ctrl2.0 controller, but a systemic property.<<BR>> Please consider carefully whether a different motor is suitable. <<BR>><<BR>> |
|
| Zeile 11: | Zeile 37: |
| * ATMEGA168 with 16kB Flash | * ATMEGA168 with 16kB Flash |
| Zeile 13: | Zeile 39: |
| * Voltage: up to 5s-[[LiPo|Lipo]] (18,5V) | * Voltage: up to 5s-[[LiPo|Lipo]] (18,5V) |
| Zeile 32: | Zeile 58: |
| [[http://gallery.mikrokopter.de/main.php/v/tech/BL_20_Scope.jpg.html|{{http://gallery.mikrokopter.de/main.php?g2_view=core.DownloadItem&g2_itemId=63304}}]] | [[http://gallery.mikrokopter.de/main.php/v/tech/BL_20_Scope.jpg.html|{{http://gallery.mikrokopter.de/main.php?g2_view=core.DownloadItem&g2_itemId=63304|http://gallery.mikrokopter.de/main.php/v/tech/BL_20_Scope.jpg.html}}]] |
| Zeile 36: | Zeile 62: |
| === value of the rotation speed === The motor speed in RPM (Rotation per minute) is: * UPM = raw * 780 / no. of magnets * Example: at rpm(raw) = 30 is the speed 2340rpm if the motor has 10 magnets Electrical commutation frequency vs. rotation speed * RPM = f * 60 * 2 / magnets The maximum electrical commutation frequency of the BL2.0 is 1666Hz, so the max rotation speed is 20.000rpm if the motor has 10 magnets |
|
| Zeile 37: | Zeile 73: |
| [[http://gallery.mikrokopter.de/main.php/v/tech/Jeti_Temperatures.gif.html|{{http://gallery.mikrokopter.de/main.php?g2_view=core.DownloadItem&g2_itemId=63235}}]] | [[http://gallery.mikrokopter.de/main.php/v/tech/Jeti_Temperatures.gif.html|{{http://gallery.mikrokopter.de/main.php?g2_view=core.DownloadItem&g2_itemId=63235|http://gallery.mikrokopter.de/main.php/v/tech/Jeti_Temperatures.gif.html}}]] |
| Zeile 46: | Zeile 82: |
| [[http://gallery.mikrokopter.de/main.php/v/tech/BL2_0_40A_TemperatureLimitation2.gif.html|{{http://gallery.mikrokopter.de/main.php?g2_view=core.DownloadItem&g2_itemId=88664}}]] |
|
| Zeile 47: | Zeile 85: |
| The settings are recordered at the start of the MK into the BL-Controller. | The settings are recordered at the start of the MK into the BL-Controller. |
| Zeile 56: | Zeile 94: |
| Zeile 72: | Zeile 109: |
| Zeile 81: | Zeile 119: |
| [[http://gallery.mikrokopter.de/main.php/v/tech/BL20_ADR.jpg.html|{{http://gallery.mikrokopter.de/main.php?g2_view=core.DownloadItem&g2_itemId=63356}}]] | [[http://gallery.mikrokopter.de/main.php/v/tech/BL20_ADR.jpg.html|{{http://gallery.mikrokopter.de/main.php?g2_view=core.DownloadItem&g2_itemId=63356|http://gallery.mikrokopter.de/main.php/v/tech/BL20_ADR.jpg.html}}]] <<BR>><<BR>> |
| Zeile 94: | Zeile 134: |
| [[en/BrushlessCtrl|General info on BL-Ctrl]] | <<BR>><<BR>> [[http://gallery.mikrokopter.de/main.php/v/tech/BL-Ctrl2_0-Adr.jpg.html|{{http://gallery.mikrokopter.de/main.php?g2_view=core.DownloadItem&g2_itemId=76977}}]] <<BR>><<BR>> |
| Zeile 99: | Zeile 141: |
| [[http://gallery.mikrokopter.de/main.php/v/tech/BL_20_Elko.jpg.html|{{http://gallery.mikrokopter.de/main.php?g2_view=core.DownloadItem&g2_itemId=63348}}]] | [[http://gallery.mikrokopter.de/main.php/v/tech/BL_20_Elko.jpg.html|{{http://gallery.mikrokopter.de/main.php?g2_view=core.DownloadItem&g2_itemId=63348|http://gallery.mikrokopter.de/main.php/v/tech/BL_20_Elko.jpg.html}}]] |
| Zeile 104: | Zeile 146: |
| Zeile 107: | Zeile 148: |
| [[http://gallery.mikrokopter.de/main.php/v/tech/BL_20_BOT.jpg.html|{{http://gallery.mikrokopter.de/main.php?g2_view=core.DownloadItem&g2_itemId=63339}}]] | [[http://gallery.mikrokopter.de/main.php/v/tech/BL_20_BOT.jpg.html|{{http://gallery.mikrokopter.de/main.php?g2_view=core.DownloadItem&g2_itemId=63339|http://gallery.mikrokopter.de/main.php/v/tech/BL_20_BOT.jpg.html}}]] |
| Zeile 109: | Zeile 150: |
| [[http://gallery.mikrokopter.de/main.php/v/tech/BL_20_TOP_001.jpg.html|{{http://gallery.mikrokopter.de/main.php?g2_view=core.DownloadItem&g2_itemId=63345}}]] | [[http://gallery.mikrokopter.de/main.php/v/tech/BL_20_TOP_001.jpg.html|{{http://gallery.mikrokopter.de/main.php?g2_view=core.DownloadItem&g2_itemId=63345|http://gallery.mikrokopter.de/main.php/v/tech/BL_20_TOP_001.jpg.html}}]] == Connection == [[http://gallery.mikrokopter.de/main.php?g2_view=core.DownloadItem&g2_itemId=93654&g2_serialNumber=2|{{http://gallery.mikrokopter.de/main.php?g2_view=core.DownloadItem&g2_itemId=93656&g2_serialNumber=2}}]] [[http://gallery.mikrokopter.de/main.php?g2_view=core.DownloadItem&g2_itemId=93657&g2_serialNumber=2|{{http://gallery.mikrokopter.de/main.php?g2_view=core.DownloadItem&g2_itemId=93659&g2_serialNumber=2}}]] <<BR>><<BR>> '''INFO:''' Normally you connect the BL-Ctrl on the "I2C-Bus" of the FlightCtrl and set the needed address with a solder-bridge on the BL. But if you want to connect the BL-Ctrl with an PPM-cable (see second picture: PPM connection), an addressing with a solder-bridge is not necessary. |
| Zeile 112: | Zeile 163: |
| [[http://gallery.mikrokopter.de/main.php/v/tech/Okto_BLs.jpg.html|{{http://gallery.mikrokopter.de/main.php?g2_view=core.DownloadItem&g2_itemId=63352}}]] | [[http://gallery.mikrokopter.de/main.php/v/tech/Okto_BLs.jpg.html|{{http://gallery.mikrokopter.de/main.php?g2_view=core.DownloadItem&g2_itemId=63352|http://gallery.mikrokopter.de/main.php/v/tech/Okto_BLs.jpg.html}}]] |
| Zeile 116: | Zeile 167: |
| Here the [[http://svn.mikrokopter.de/listing.php?repname=BL-Ctrl&path=%2FBL-Ctrl_2.0%2F&#A77a6d89d8f15ebae7c35261da413b3a1|HEX-files]] | All BL-Ctrl are already set with the latest software and also tested. If you have to install the software again you can find it here: <<BR>><<BR>> |
| Zeile 118: | Zeile 169: |
| [[en/BrushlessCtrl#Software_update|description]] of the BL-Update | BL-Ctrl V2.0 - Adr. 1-8: [[http://svn.mikrokopter.de/filedetails.php?repname=BL-Ctrl&path=%2FBL-Ctrl_2.0%2FV0.31b%2FBL-Ctrl_MEGA168_V0_31b.hex|Download]] <<BR>><<BR>> [[en/SoftwareUpdate#include.2BAC8-KopterTool.2BAC8-TerminalWindow-SoftwareUpdate.BL-Ctrl|description]] of the BL-Update |
| Zeile 121: | Zeile 175: |
| For larger MikroKopters with more than 8 motors, you need to update the firmware [[http://svn.mikrokopter.de/listing.php?repname=BL-Ctrl&path=%2FBL-Ctrl_2.0%2F&#A77a6d89d8f15ebae7c35261da413b3a1|"BL-Ctrl_MEGA168_V0_..._ADR9-12.hex"]] | For larger MikroKopters with more than 8 motors, you need to update the firmware: <<BR>><<BR>> BL-Ctrl V2.0 - Adr. 9-12: [[http://svn.mikrokopter.de/filedetails.php?repname=BL-Ctrl&path=%2FBL-Ctrl_2.0%2FV0.31b%2FBL-Ctrl_MEGA168_V0_31b_ADR9-12.hex|Download]] <<BR>><<BR>> |
| Zeile 127: | Zeile 186: |
[[en/BrushlessCtrl|General info on BL-Ctrl]] = I2C protocol for developers = Here the description of the BlCtrlProtocol ---- KategorieMK-Baugruppe/en |
BL-Ctrl V2.0 |
See also:BL-Ctrl
Inhaltsverzeichnis
Brushless-Controller Version 2.0

Note:
The BL-Ctrl 2.0 controller is specifically designed and optimized for our MK3638 motor.
For maximum stability of the MikroKopter setpoints are set almost instantaneously on the motor.
If other motors (especially larger power classes) are used with this controller, this fast change
of setpoints can easily lead to very high peak currents, which bring the BL-Ctrl control to the
limit or an overload. This is no fault of BL-Ctrl2.0 controller, but a systemic property.
Please consider carefully whether a different motor is suitable.
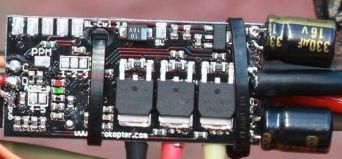
main Features
- ATMEGA168 with 16kB Flash
Current: 35A continuos & 40A Peak (provided there is good cooling)
Voltage: up to 5s-Lipo (18,5V)
- Sizes: 21 x 44mm (like the V1.0)
Capacitors: a second capacitor is required for currents > 20A
Features
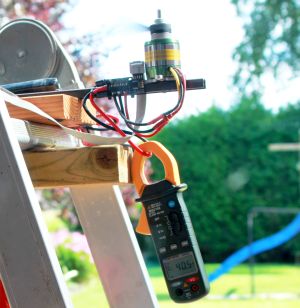
- Current measurement
Temperature measurement
Voltage measurement
11Bit Resolution (2047 steps)
I2C-Bus for MikroKopter
- serial port for MKTool
- PPM-input (Important: if the PPM-input is used make sure the 4-5 jumper is not closed)
Jumper to address the Addresses 1-8
Configurable by the I2C-bus using Koptertool -> the Koptertool can remain connected to the Navi or the FC
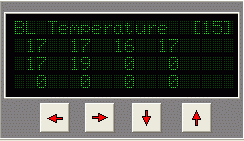
Show temperatures in the virtual display

Display of the measured values in MKTool
(in this case the BLC must directly connected to the MKUSB)
value of the rotation speed
The motor speed in RPM (Rotation per minute) is:
- UPM = raw * 780 / no. of magnets
- Example: at rpm(raw) = 30 is the speed 2340rpm if the motor has 10 magnets
Electrical commutation frequency vs. rotation speed
- RPM = f * 60 * 2 / magnets
The maximum electrical commutation frequency of the BL2.0 is 1666Hz, so the max rotation speed is 20.000rpm if the motor has 10 magnets
Display of the temperatures in the display Jeti
See also: JetiBox
Safety
- adjustable current limit, gently slows down and doesn't shut off
- gentle reduction of temperature
doesn't start at> 85 ° C (if the engine is blocked for some time)
Adjustable
The settings are recordered at the start of the MK into the BL-Controller.
The settings can be stored manually in the single controllers.
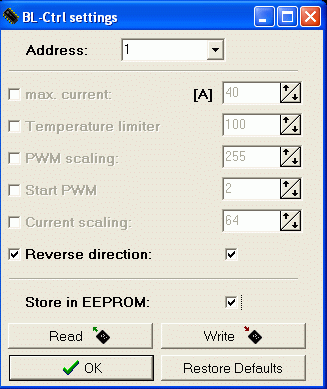
In order to show the BL-Ctrl menu press Ctrl + Settings.
Meaning of the parameters:
- Max. current: Sets the upper limit for the motor current in amperes. At higer currents it is not switched off but cut back
- Temperature Limiter: Limits the maximum temperature of the board in °C. At higher temperatures are not turned off, but cut back (one percent per 0.1 ° C)
- PWM Scaling: defines the maximum power at maximum setpoint. This allows you to limit the maximum thrust, without losing resolution on the gas control.
- Start PWM: set PWM when you start the engines. When the motors start badly, you can modify this value.
- Current Scaling: this value is used for individual fine tuning of the current measurement of a controller.
- Reverse Direction: Here you can reverse the direction of a controller by software.
Notes
- You can set the parameters of a single controller using its address, or even all at the same time (select "Any").
- Only activated (front chackbox) parameters are set.
- To store the settings permanently (ie, even after restart) in the controllers you must activate the option "Store to EEPROM" before writing.
- The default settings can be loaded again when the button "Restore Default" is pressed. However, these are stored permanently only if you have also selected the option "Store to EEPROM".
- Only settings of controllers whose gas mixing in the mixer table is greater than 0, which means are then used in the attitude control, can be written and read.
See also: Firmware 0.80
Address selection
Each engine requires a unique address. Therefore the BL controls addresses are assigned by 1-8.
On BL-Ctrl V2.0 the motor address is set on the board using jumpers (use solder).
Where:
Adress (Motor) |
1-2 |
2-3 |
4-5 |
1 |
open |
open |
open |
2 |
open |
closed |
open |
3 |
closed |
open |
open |
4 |
closed |
closed |
open |
5 |
open |
open |
closed |
6 |
open |
closed |
closed |
7 |
closed |
open |
closed |
8 |
closed |
closed |
closed |
Capacitors
The BL-controller comes with two capacitors. The second capacitor is needed from 20A. It does not hurt if you fit both capacitors.
Important note: polarity - the white, thick-minus mark of capacitors must be on the board margins
Wiring diagram
http://mikrocontroller.com/files/BL_Ctrl_V2_0_Doku.pdf
Connection
INFO: Normally you connect the BL-Ctrl on the "I2C-Bus" of the FlightCtrl and set the needed address with a solder-bridge on the BL. But if you want to connect the BL-Ctrl with an PPM-cable (see second picture: PPM connection), an addressing with a solder-bridge is not necessary.
BL-Ctrl in Okto distribution
Software Update
All BL-Ctrl are already set with the latest software and also tested. If you have to install the software again you can find it here:
BL-Ctrl V2.0 - Adr. 1-8: Download
description of the BL-Update
Addresses 9-12
For larger MikroKopters with more than 8 motors, you need to update the firmware:
BL-Ctrl V2.0 - Adr. 9-12: Download
Miscellaneous
- The software source of these BL-Ctrl is not open
Here the ATMEGA168 incl. Bootloader as spare part
- If there is a software update: the software may be updates only by serial MKTool. Using the SPI one would delete the boot loader - which is not public
I2C protocol for developers
Here the description of the BlCtrlProtocol
- KategorieMK-Baugruppe/en


