siehe auch: Firmware-0.86
Inhaltsverzeichnis
Easy Setup
In the Easy Setup all important settings of the Mikrokopter are summarized on one page.
This makes the basic setup very easy.
Name of configuration
In the KopterTool you can set and save 5 different settings (configurations). In this example we are in the setting Easy.
This name can be changed and saved individually.
Pressure sensor
The pressure sensor can be activated and deactivated via the setting Enable Altitude control.
The function:
If the pressure sensor was aktivated here, you can turn on/off the funktion automatic altitude-hold via switch on the transmitter.
If this function is active, the pressure sensor overtakes full control of the overall-thrust.
Here the gas stick no longer affect the speed of the motors. It sets the target-value for the height.
Example:
- Will the gas stick be moved up, the target-value for the height will be moved up as well.
- If the gas stick is in the center position, the Kopter stays at the actual position (+/- a certain tolerance), the target-value will not be moved.
- If the gas stick is moved down from the center position, the target-value for the height will be moved down.
Depending on how far the stick is moved up (or down), the height value is shifted less or more in that direction.
![]() Info: if you activate that function in EasySetup, the "Vario-height" mode automatically is activated.
Info: if you activate that function in EasySetup, the "Vario-height" mode automatically is activated.
 Expert-funktion:
More Informations about the modes vario-height, height limit you can find here: KopterTool-Höhe
How the height regulator itself works and how to configute it you can read here: Höhensensor
Target-value
To activate the pressure sensor a switch on the transmitter will be used. This switch has to be assigned to a channel / "POTI" in the KopterTool (the allocation of the channels you can find here: Kanaleinstellung).
(how to allocate the channels to the switches of the transmitter can be read in the manual of the transmitter)
In this example "Poti 1" (channel 5) is allocated to the switch of the transmitter.
With the appropriate swtich on the transmitter you can activate and deactivate the altitude control.- OFF: manual gas control
- ON: Vario-height-regulator via the pressure sensor
Stick neutral point
Normally, the gas stick (throttle) is set to "no neutralizing". It is not held by a spring in the middle like the second stick on the transmitter.<BR>>
For this a "0" is entered as default value (0 = automatc).
If you fly a lot with activated pressure sensor, it can be advantageous when the gas stick is set to "neutralizing".
If you leave the spring in the transmitter, the stick always goes back to the middle position (like the Nick/Rollstick).
Pro: Its comfortable to fly with activated height regulator in vario-mode, because you don't have to take care for the gas position for hovering.
Contra: If you are flying with manual gas, you should not let go the gas stick.
If the stick is set to "neutralizing" this position of the gas stick should be set as stick neutral point.
Normally the centerposition is 127.
But this can be different at other transmitters. Therefore the display GAS: on the right side can be helpful.
The middle position is displayed by a bar an the corresponding value. Ths value can be entered as stic neutral point.

(By clicking on the arrow next to the gasdisplay you can transfer the actually gasvalue into the field.)This also applies at this setting:
- Gasstick in neutralposition: No change of the target-height
- Gasstick above the neutralpoint: elevate
- Gasstick below the neutralpoint: fall
GPS
The MKGPS can be activated or deactivated via the entry GPS
The funktion:
If the GPS was activated here, funktions like PositionHold (PH) or ComingHome (CH) can be used via a switch on the transmitter.
For this a 3-way switch on the transmitter is needed.
With this, the respective function can be switched => The 3 switch positions are: ON - PH - CH.
GPS Modus steering
Here you can select the switch which you have assigned at "channels" (the allocation (check) of the channels can be found here: Kanaleinstellung).
In this example "Poti2" (cahnnel 6) is assigned to the switch on the transmitter.
Dynamic PositionHold
Here the function "Dynamic PositionHold" can be activated and deactivated.

"Dynamic PositionHold"is used together with PositionHold.
Function OFF:
The kopter is controlled directly by moving the nick-/ roll stick.
Here the function PH will be disabled on stick movement.
And it will be re-enabled at the new position after you release the sticks.
Function ON:
Here the kopter can be moved to a new position by using the nick- /roll stick as well.
The target-value of the GPS coordinates will be shifted. With this a more accurate positioning is possible - even with wind. It will be moved to the positions a bit slower.
 Note: Default is ON. Can be disabled at "EasySetup" or "NaviControl2".
ComingHome altitude
In this setting, a height can be entered, in which the kopter is moving in ComingHome mode.

In the function ComingHome the MikroKopte automatically comes back to the starting position. (if a GPS-fix is available!). Here it can move to the height u have set.
On top the kopter is 'parking' in this height when reaching the GPS coordinates.
During the flight to the position the kopter is moving with 3 meters per second - this value can not be changed!
 Please note: The kopter is only moving to that height in the vario-height-regulator. And only if the gas stick is in center position.
In this:
0: OFF -> the current height of the Kopter is maintained.
1-247: Value in meters -> to this height the Kopter will be moved with 3m/sec directly at activating of ComingHome (CH).
Carefree control
In connection with the GPS-System (NaviCtrl, Kompass and GPS) CareFree can be used.
This function can be activated and deactivated via a switch on the transmitter. The used switch (which you have assigned at "channels") you can select here.
The function:
When this function is activated, the direction of nick and roll is no longer depending on the "Front"-definition (Front/rigger 1 of the Kopter),
but by the compass direction, in which the front/rigger 1 was pointing at the starting of the motors.
So you can yaw the MikroKopter without consider the changing effects of Nick and roll.
Teachable CareFree
If "Teachable CareFree" is activated, then the CareFree-direction is re-determined every time the CareFree-switch is turned on.
A distinction is made:
1. Within 20m around the startingpoint the directionof the front (rigger 1) of the MikroKopter is front.
After activating that funktion this direktion is front, no matter how the Kopter turns around and how far away it is flying.
2. Outside of the 20m, the direction from the Kopter to the ComingHome-point (startpoint) is back and the opposit direction is front.
If the function is activated here, it doesn't matter in what direction the Kopter shows. The current direction of the Kopter to the startig point is front and the opposit direction is back.
Now the pilot can turn around and reset the CareFree-direction via the !Carefree-switch.
Outside the 20m he don't even have to know where the front of the Kopter was.
Pull the stick always means: "Back to the start" Note: The new CareFree-direction resets every time the CareFree-switch is used.
More information: CareFree
Motor-Safetyswitch
Die Motoren des MikroKopter lassen sich über die Knüppelstellung "Gas unten + Gier rechts" einschalten und mit der Knüppelstellung "Gas unten + Gier links" wieder ausschalten.
In der Vergangenheit kam es vor, dass der Pilot seinen MikroKopter im Flug, durch drücken des Gas-Gierhebels in die linke untere Ecke, versehentlich ausgeschaltet hatte.
Besonders beim schnellen Abstieg und bei gleichzeitigem Gieren konnte dieses Missgeschick passieren.
Über den Motor-Sicherheitsschalter kann dieses ungewollte Ein-/Ausschalten der Motoren verhindert werden.
Zum Ein- oder Ausschalten der Motoren können insgesamt drei Möglichkeiten genutzt werden:
(Ab Software Version V0.88m)
Möglichkeit 1
Ohne Motor-Sicherheitsschalter lassen sich die Motoren über Knüppelstellungen schalten :
Motoren einschalten:
- "Gas unten + Gier rechts"
Motoren ausschalten:
- "Gas unten + Gier links"
Möglichkeit 2
Das Ein-/Ausschalten der Motoren über die Knüppelstellungen wird mit einem Schalter oder Taster am Sender freigegeben.
Dazu wird ein Schalter (oder Taster) am Sender mit einem extra Kanal belegt und dieser Kanal dem Motor-Sicherheitsschalter zugeteilt.
Das Ein-/Ausschalten der Motoren ist dann nicht möglich, wenn der Wert des Kanals >35 ist => der Schalter also eingeschaltet ist).
(Info: Wird ein Taster genutzt, muss dieser in der Normalstellung (ohne Betätigung) "eingeschaltet" sein. Im Menü des Senders also diesen Kanal in der Schaltrichtung eventuell umstellen.)
Motoren einschalten:
- Schalter auf "aus" schalten (oder Taster betätigen).
"Gas unten + Gier rechts" => Motoren starten
- Schalter auf "ein" schalten (oder Taster loslassen).
- (Ein ungewolltes Ausschalten der Motoren ist nun nicht möglich.)
Motoren ausschalten:
- Schalter auf "aus" schalten (oder Taster betätigen).
"Gas unten + Gier links" => Motoren stoppen
- Schalter auf "ein" schalten (oder Taster loslassen).
- (Ein ungewolltes Einschalten der Motoren ist nun nicht möglich.)
Möglichkeit 3
Das Ein-/Ausschalten der Motoren wird über einen Schalter erledigt. Und dies nur, wenn der Gasstick auf "0", also ganz unten ist.
Hierfür wird ein Schalter am Sender mit einem extra Kanal belegt und dieser Kanal dem Motor-Sicherheitschalter zugeteilt...
... und es wird der Modus Motor start/stop -> Gas 0 & Motor-Schalter AN/AUS aktiviert.
So können die Motoren nur ein-/ausgeschaltet werden, wenn der Gas-Stick unten (auf "0") ist und der Schalter ein- oder ausgeschaltet wird.
Während der Gas-Stick in Nutzung ist (nicht unten auf "0") kann der Schalter betätigt werden, ohne dass die Motoren aus- oder eingeschlaltet werden.
Motoren einschalten:
- Gas-Stick unten auf "0"
Schalter auf "ein" schalten => Motoren starten.
Gas-Stick in Nutzung => Schalter hat keine Funktion.
Motoren ausschalten:
- Gas-Stick unten auf "0"
Schalter auf "aus" schalten => Motoren stoppen.
Gas-Stick in Nutzung => Schalter hat keine Funktion.
Mixer Setup
Depending on which Model has been build (QuadroKopter, HexaKopter or OktoKopter), the right Mixer has to be uploaded.
About this the FlightCtrl gets informations about how many engines are used and their arrangement. A so-called MischerTabelle will be used.
Es sind bereits verschiedene Mixertabellen der gängigsten Modelle im KopterTool vorhanden.
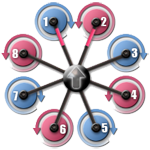
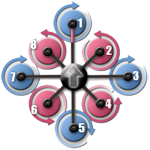
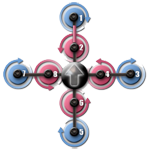
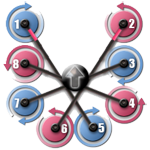
Um die richtige Mixertabelle zu laden, kann auf den Button Laden geklickt und die passende .mkm Datei geöffnet werden.
Nach dem Öffnen der passenden Tabelle wird diese dann mit einem "klick" auf den Button Schreiben in die Settings der FlightCtrl geschrieben.
INFO: .mkm Dateien => (die Drehrichtung wird pro Motor in der Grafik angezeigt)
Quadro.mkm
Quadro-X.mkm
Hexa.mkm
Hexa2.mkm
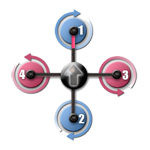
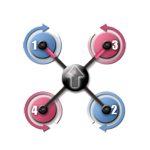
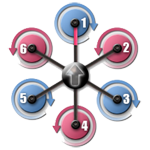
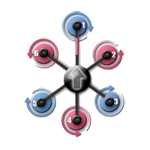
Für Basisset:
Quadro(L4-ME) / QuadroXLKein Basisset
vorhanden.Für Basisset:
Hexa / Hexa2 / HexaXLKein Basisset
vorhanden.
Okto.mkm
Okto2.mkm
Okto3.mkm
Okto-U
Für Basisset:
OktoFür Basisset:
Okto2-26 / OktoXLKein Basisset
vorhanden.Kein Basisset
vorhanden.
 Der Pfeil in der Mitte zeigt die Flugrichtung (vorne) an.
Weitere Mixertabellen können hier eingesehen werden: MKM-Daten .
- KategorieBeginner/en

 Seite in
  Page en