|
Größe: 6629
Kommentar:
|
Größe: 6397
Kommentar:
|
| Gelöschter Text ist auf diese Art markiert. | Hinzugefügter Text ist auf diese Art markiert. |
| Zeile 5: | Zeile 5: |
| ||||||<tablestyle="text-align: center; width: 100%; height: 40px;"#C9BDBF> '''Step 7 - !EasySetup - Basic settings''' || ||<(#C9BDBF 40%>[[en/Erstinbetriebnahme/Step6|{{http://gallery.mikrokopter.de/main.php?g2_view=core.DownloadItem&g2_itemId=98078&g2_serialNumber=2}}]]Back to Step 6||<:#C9BDBF 20%>[[en/Erstinbetriebnahme/Help|{{http://gallery.mikrokopter.de/main.php?g2_view=core.DownloadItem&g2_itemId=98072&g2_serialNumber=2}}]]||<)#C9BDBF 40%>Continue to step 8 [[en/Erstinbetriebnahme/Step8|{{http://gallery.mikrokopter.de/main.php?g2_view=core.DownloadItem&g2_itemId=98075&g2_serialNumber=2}}]]|| |
{{{#!wiki MK_Nav ||||||<class="MK_Nav_Header">Step 7 - !EasySetup - Basic settings|| ||<class="MK_Nav_left">[[en/Erstinbetriebnahme/Step6|{{attachment:symbols/Pfeil_links.png}}]]Wikiseite zurück||<class="MK_Nav_middle">[[Erstinbetriebnahme/Help|{{attachment:symbols/Help.png}}]]||<class="MK_Nav_right">Wikiseite vor [[en/Erstinbetriebnahme/Step8|{{attachment:symbols/Pfeil_rechts.png}}]]|| }}} |
| Zeile 8: | Zeile 10: |
| ||<tablewidth="520px" tablestyle="text-align: center;"bgcolor="#ffffa0"> {{http://mikrocontroller.cco-ev.de/images/deu.gif}} Seite in [[Erstinbetriebnahme/Step7|deutsch]] ||<bgcolor="#ffffa0"> {{http://mikrokopter.de/images/fra.gif}} Page en [[fr/Erstinbetriebnahme/Step7|français]] || | {{{#!wiki MK_select1 |
| Zeile 10: | Zeile 12: |
| = Requirement = | * {{http://mikrokopter.de/images/eng.gif}} [[Erstinbetriebnahme/Step7|deutsch]] * {{http://mikrokopter.de/images/fra.gif}} [[fr/Erstinbetriebnahme/Step7|français]] }}} ##include_step_begin = Step 7 - !EasySetup - Basic settings = == Requirement == |
| Zeile 13: | Zeile 23: |
| = Basic settings = | == Basic settings == |
| Zeile 38: | Zeile 48: |
| '''__GPS__'''<<BR>> | === GPS === |
| Zeile 53: | Zeile 63: |
| '''__!CareFree__'''<<BR>> | === CareFree === |
| Zeile 66: | Zeile 76: |
| '''__Motor-Safety Switch__'''<<BR>> | === Motor-Safety Switch === |
| Zeile 76: | Zeile 86: |
| = Set the mixer = | == Set the mixer == |
| Zeile 95: | Zeile 105: |
| ##include_step_end |
Step 7 - !EasySetup - Basic settings
Requirement
Step6 has been read.
Basic settings
Here in the EasySetup the first basic settings will be made.
Height regulator
Height regulator
With this function you can keep automatically the height of the Kopter during a flight.
![]() Switch ON the function
Switch ON the function
The height regulator on the FlightCtrl2.1 is installed by default. Here now the function should be activated. ("click" into the box)
As a switch channel (nominal value) is already Poti 1 => Channel 5 set by default.
Is a switch on the transmitter assigned to the channel 5 you can switch ON/OFF this function direct from the transmitter.- Function/Switch ON: The Kopter is holding in ~middle position of the throttle stick automatically the height.
- Function/Switch OFF: The Kopter need to be hold manually in the height.
As a Stick Neutral Point "0" is set by default. This value usually will be NOT changed.
Here you must set only a different value if you use a throttle stick with a centered spring (The throttle stick stays automatically in the middle position).
(The function is described here: Link)
GPS
The functions of the GPS can be used only, if the GPS-System (NaviCtrl with compass + MKGPS) is mounted to the Kopter and also connected.
![]() Switch ON the function
Switch ON the function
If the GPS will be activated you can use additional functions.
For the GPS Control Mode is already the Poti 2 => Channel 6 set by default.
Is a 3-way switch on the transmitter assigned to this channel 6 you can switch from the transmitter to the functions PositionHold and ComingHome. (Further information you can find here: Link)
In addition you can activate also the Dynamic PositionHold and set up the function ComingHome Altitude.
(More information you can find here: Link)
CareFree
With the GPS-System you can use also the function CareFree. This function can help the newcomer to learn how to fly way easier.
![]() Assign a free channel to this function
Assign a free channel to this function
This function can be also placed like the GPS or the height regulator to a switch on the transmitter (Poti1-8).
Is this function switched OFF, the red outrigger is pointing to the front.
Is this function switched ON, it doesn't matter in which direction the red outrigger points.
The function Teachable CareFree makes it easier to use the CareFree and provides more functions.
(An explaination of this function you can find here: Link)
Motor-Safety Switch
To prevent that the Kopter will be switched off accidentally during a flight a motor safety switch can be set.
![]() Assign a free channel to this function
Assign a free channel to this function
This function can be assigned with a free channel and then over a switch on the transmitter to enable/disable those functions.
INFO: The Kopter will be with "Throttle down + Yaw left" switched OFF. So that you do not turn OFF the Kopter accidentally during a flight this function can be enabled/disabled.
(An explaination of this function you can find here: Link)
Set the mixer
Is a QuadroKopter connected (4 Motors) it is not necessary to change something.
Was a HexaKopter (6 Motors) or an OktoKopter (8 Motors) connected the error Mixer Error has been shown in the virtual display.
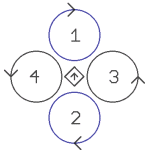
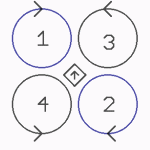
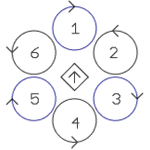
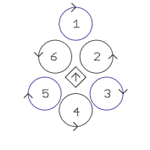
To eliminate this "Error" you must set the right mixer:
One "click" on the button "Load..." opens a selection of existing mixers.
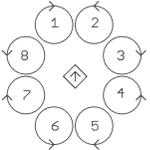
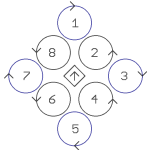
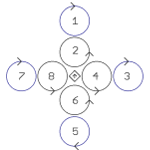
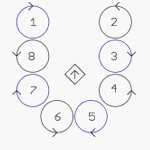
It depends on which Kopter you have you need to choose the appropriate mixer. The mixer you can find here:
INFO: .mkm Dateien => (the direction of rotation per motor will be shown in a graphic)
Quadro.mkm |
Quadro-X.mkm |
Hexa.mkm |
Hexa2.mkm |
|
|
|
|
For Basisset: |
For Basisset: |
For Basisset: |
No Basisset |
Okto.mkm |
Okto2.mkm |
Okto3.mkm |
Okto-U |
|
|
|
|
For Basisset: |
For Basisset: |
No Basisset |
No Basisset |
![]() The arrow in the middle represents the flight direction (forward) .
The arrow in the middle represents the flight direction (forward) .
If the right mixer has been chosen with "OPEN" the selection window will close. On the right of the Mixer-SETUP you can see the name of the mixer.
Those settings must be written now into the FlightCtrl.
Here a "click" on the button WRITE is enough.


