CamTriggerTool |

Download: CamTriggerTool
Inhaltsverzeichnis
Info / Download
If you fly with your MikroKopter a waypoint flight and trigger automatically pictures, the copter will record the position in an extra LOG file.
With the program CamTriggerTool you can put the name of the pictures and the positions of the LOG file together in an extra text file
This can be used if you will create e.g. a point cloud etc. with programms like Agisoft, Pix4D etc.
Here you can get the program CamTriggerTool: Download
Unzip
The downloaded file is a zipped file. To use it you have to unzip it.
(e.g. with Winrar, 7zip etc.)
On your copter you need a software version V2.14 (or later) to create the needed .txt LOG file that this program need.
Download the LOG
In the first step you copy the needed LOG file from your copter to your computer.
Connect your MikroKopter with your computer and start the KopterTool.
Here "click" on the button SD Card.... A small window will open now.
Here you can select the needed .txt LOG File and store it to your computer.
Using the Program
The CamTriggerTool is self-explanatory and easy to use.
You need the recorded pictures of the flight and the .txt LOG file of the copter.
The easiest way is to create an extra folder where you put in your pictures and the .txt LOG file of the flight.
In the following example, we put the images and the LOG file into a folder Testflug.
INFO:
The .txt LOG file will only record the position during flight. So if you e.g. trigger some pictures on the ground it will not recorded in the LOG. If e.g. 38 pictures are recorded on the camera, but the LOG includes only 35 entries, the 3 more pictures are triggered e.g. manually on the ground.
Step 1
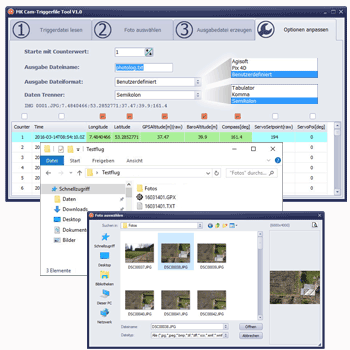
After you have started the CamTrigger.exe you see the Window Read Logfile.
Here you "click" now on the button Read Cam-Trigger logfile ...
... and it opens a selection window.
Here you can chose now the needed .txt LOG file and open it with the button Open.
Step 2
Now you see the window Select Photo.
Here we "click" on the button Select Photo file ...
... and it opens a other selection window.
Here you select the first required photo from the flight. Open it with a "click" on the button Open.
Step 3
The last window is Create Output file. It will open together with Change Output options.
Under Change Output options you can setup the output format or select a ready format for Agisoft or Pix4D.
After you have set your settings you can create now the needed file with a last "click" on the button Create Output file.


