SinglePoint + Fixed/Relative Waypoints |
Inhaltsverzeichnis
SinglePoint + Fixed/Relative Waypoints
With an appropriate remote control you have the option to:
save or load SinglePoint Waypoints during flight
oran to open an already existing Fixed/Relative Waypoints-flight .
SinglePoint Waypoints
When saving "single point" waypoints, teh position of the Copters can be saved directly and reloaded.
So you can fly over and over again at the same position.
Logged are In this case:
- the current position
- the current altitude
and the direction of view of the copter
(Camera tilt will be displayed but not saved!)
Fixed/Relative Waypoints
A planned waypoints flight, can be stored on the SD card in the copter.
Such an waypoit flight you can open and fly over and over again via the transmitter.
You can load such a waypoint flight Fixed. Here you load the planed waypoint flight exactly for the position for which it was planned.
Or you load such a waypoint flight Relative. Here you can open and place the Waypoint flight at the place where the copter actually is.
See also below under Fixed/Relative Waypoints.
Suitable transmitter
You can use this functions only with an Graupner HoTT or an Jeti transmitter.
Using other remote control models is currently not possible
Anzahl der zu speichernden SinglePoints / WP-Listen
In the free version you can save up to 4 !Single Points or Fix/Relative waypoints lists in your copter.
And if you buy the commercial license it is already included to save up to 99 SinglePoints or Fix/Relative lists in your copter.
SinglePoint place + load
Operation via Graupner HoTT
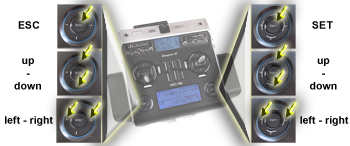
It is operated via the touch-buttons SET and ESC and |
1. open the Text-Telemetry
The menu to save and load a SinglePoints can be found in the Text-Telemetry.
press the touch-buttons ESC a little longer ... |
... until the TELEMETRIE opens. Select here the menu SETTING & DATA VIEW ... |
... and open it with the touch-button SET ... |
... then "click" to the right until the Text-Telemetry is displayed. |
|||
|
|
|
|
|
|
|
Once you open the text telemetry, you can reach different subwindows from here.
To navigate through the subwindows use the left/right/up/down touch-buttons.
2. place and save a SinglePoint
Fly your copter to the place in the air where you will save the waypoint and ...
... change in the Text-Telemetrie with the left/right buttons to |
... select with up / down the desired memory location ... |
... and save it with the touch-button SET. |
||
|
|
|
|
|
The stored waypoint includes now the current position, the altitude and the current direction of view of the copter.
Please note that the camera tilt will not be saved.
3. load SinglePoint
To load already individually saved "SinglePoint" waypoints...
... change in the Text-Telemetrie with the left/right buttons to |
... select with up / down the desired memory location ... |
... and load it with the touch-button SET. |
||
|
|
|
|
|
4. fly automatically to a SinglePoint
To start then the automatic waypoint flight to the SinglePoint, proceed as follows:
activate CareFree
activate AltitudeHold
activate ComingHome
Normally the function AltitudeHold and PositionHold are already activted. Then you only have to activate CareFree
and switch from PositionHold to ComingHome to start the waypoint flight.If you switch back to PositionHold during the waypoint flight, the copter then interrupts the waypoint flight.
Turn back to ComingHome to continue the waypoint flight.To stop and clear the waypoint flight you have to switch to OFF (from PositionHold or ComingHome).
If you now switch to ComingHome the copter will fly back to the place where you start and lift of the copter.
Operation via Jeti
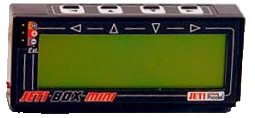
It is operated via the buttons left/right/up/down on your Jeti-Box. |
|
1. open the Text-Telemetry
The menu to save and load a SinglePoints can be found in the Text-Telemetry.
After switching on the copter you see "Tx" in the display. |
... you change to "Rx". And with another "click" to the right ... |
... to Mx. |
||
|
|
|
|
|
|
||||
A "click" down opens the Text-Telemetry -> |
|
|||
Once you open the text telemetry, you can reach different subwindows from here.
To navigate through the subwindows use the left/right/up/down buttons.
2. place and save a SinglePoint
Fly your copter to the place in the air where you will save the waypoint and ...
... change in the Text-Telemetrie with the left/right buttons to |
... a "click" downward opens the submenu ... |
... and select with up / down the desired memory location. |
||
|
|
|
|
|
|
||||
A "click" to the right stores the waypoint -> |
|
|||
The stored waypoint includes now the current position, the altitude and the current direction of view of the copter.
Please note that the camera tilt will not be saved.
3. load SinglePoint
To load already individually saved "SinglePoint" waypoints...
... change in the Text-Telemetrie with the left/right buttons to |
... a "click" downward opens the submenu ... |
... select with up / down the desired memory location. |
||
|
|
|
|
|
|
||||
A "click" to the right then opens the waypoint -> |
|
|||
- In the last window you see then also the distance from the current space of the copter to the waypoint and the altitude of the waypoint.
4. fly automatically to a SinglePoint
To start then the automatic waypoint flight to the SinglePoint, proceed as follows:
activate CareFree
activate AltitudeHold
activate ComingHome
Normally the function AltitudeHold and PositionHold are already activted. Then you only have to activate CareFree
and switch from PositionHold to ComingHome to start the waypoint flight.If you switch back to PositionHold during the waypoint flight, the copter then interrupts the waypoint flight.
Turn back to ComingHome to continue the waypoint flight.To stop and clear the waypoint flight you have to switch to OFF (from PositionHold or ComingHome).
If you now switch to ComingHome the copter will fly back to the place where you start and lift of the copter.
Fixed/Relative Waypoints
Operation via Graupner HoTT
It is operated via the touch-buttons SET and ESC and |
1. open the Text-Telemetry
The menu to save and load a SinglePoints can be found in the Text-Telemetry.
press the touch-buttons ESC a little longer ... |
... until the TELEMETRIE opens. Select here the menu SETTING & DATA VIEW ... |
... and open it with the touch-button SET ... |
... then "click" to the right until the Text-Telemetry is displayed. |
|||
|
|
|
|
|
|
|
Once you open the text telemetry, you can reach different subwindows from here.
To navigate through the subwindows use the left/right/up/down touch-buttons.
2. load a waypoint flight (Fixed Positions)
To load saved waypoints flights ...
... change in the Text-Telemetrie with the left/right buttons to |
... select with up / down the desired memory location ... |
... and open it with the touch-button SET. |
||
|
|
|
|
|
- In "(Fixed position)" the planned waypoints flight is positioned exactly in the place for which it was planned.
Example: We have planed a waypoint flight with 30° Rotation:
Or
3. load a waypoint flight (Relative Positions)
To load saved waypoints flights ...
... change in the Text-Telemetrie with the left/right buttons to |
... select with up / down the desired memory location ... |
... and open it with the touch-button SET. |
||
|
|
|
|
|
In "(Relative Position)" the planned waypoints flight is not positioned at the location for which it was planned.
The waypoints are placed there, at which the copter is currently located. The location of the copter ist then the POI or the first waypoint.
Example: We have planed a waypoint flight with 30° Rotation:
|
|
|||
Planning on PC |
Load on the field. |
If you turn the copter in a |
4. fly automatically Relative Waypoints
To start then the automatic waypoint flight, proceed as follows:
activate CareFree
activate AltitudeHold
activate ComingHome
Normally the function AltitudeHold and PositionHold are already activted. Then you only have to activate CareFree
and switch from PositionHold to ComingHome to start the waypoint flight.If you switch back to PositionHold during the waypoint flight, the copter then interrupts the waypoint flight.
Turn back to ComingHome to continue the waypoint flight.To stop and clear the waypoint flight you have to switch to OFF (from PositionHold or ComingHome).
If you now switch to ComingHome the copter will fly back to the place where you start and lift of the copter.
Operation via Jeti
It is operated via the buttons left/right/up/down on your Jeti-Box. |
|
1. open the Text-Telemetry
The menu to save and load a waypoint flight (Fixed/Relative) can be found in the Text-Telemetry.
After switching on the copter you see "Tx" in the display. |
... you change to "Rx". And with another "click" to the right ... |
... to Mx. |
||
|
|
|
|
|
|
||||
A "click" down opens the Text-Telemetry -> |
|
|||
Once you open the text telemetry, you can reach different subwindows from here.
To navigate through the subwindows use the left/right/up/down touch-buttons.
2. load a waypoint flight (Fixed Positions)
To load saved waypoints flights ...
... change in the Text-Telemetrie with the left/right buttons to |
... a "click" downward opens the submenu ... |
... and select with up / down the desired memory location. |
||
|
|
|
|
|
|
||||
Ein "Klick" nach rechts speichert dann den Wegpunkt -> |
|
|||
- In "(Fixed position)" the planned waypoints flight is positioned exactly in the place for which it was planned.
Example: We have planed a waypoint flight with 30° Rotation:
Or
3. load a waypoint flight (Relative Positions)
To load saved waypoints flights ...
... change in the Text-Telemetrie with the left/right buttons to |
... a "click" downward opens the submenu ... |
... and select with up / down the desired memory location. |
||
|
|
|
|
|
|
||||
A "click" to the right opens the waypoint -> |
|
|||
Example: We have planed a waypoint flight with 30° Rotation:
|
|
|||
Planning on PC |
Load on the field. |
If you turn the copter in a |
4. fly automatically Fixed Waypoints
To start then the automatic waypoint flight, proceed as follows:
activate CareFree
activate AltitudeHold
activate ComingHome
Normally the function AltitudeHold and PositionHold are already activted. Then you only have to activate CareFree
and switch from PositionHold to ComingHome to start the waypoint flight.If you switch back to PositionHold during the waypoint flight, the copter then interrupts the waypoint flight.
Turn back to ComingHome to continue the waypoint flight.To stop and clear the waypoint flight you have to switch to OFF (from PositionHold or ComingHome).
If you now switch to ComingHome the copter will fly back to the place where you start and lift of the copter.
Airspeed between the points
If you load a SinglePoint waypoint and fly automatically to it, the airspeed is 5m/s (standard in the settings). But you can change the speed in the KopterTool via Navi-Ctrl2.
There you will find then the entry Single WP speed.
If you will not have a fixed speed you can also use e.g. a potentiometer on your transmitter to change it manually.To do this you need a free channel on your transmitter. This channel you set to the potentiometer on your transmitter and you set this channel also under Single WP speed (as Poti).
Altitudes between the single points:
You can fly with your copter to different places in different altitudes to save a SinglePoint. If you fly then between the points, the copter will fly in a direct line between them.
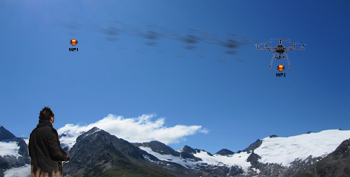
Here the MK flew to two points and thy were stored via the transmitter.
Then the points were called and the MK flew automatically between these points (eight times):
<<BR>
Video
(Load / save positions)
(Save a camera track)








.jpg?m=1439822341)


