|
 This page as PDF-File? Just click on the right icon and wait some seconds (10-20 sec)...
siehe auch: BL-Ctrl_Anleitung
Inhaltsverzeichnis
- Flight-Ctrl V1.0: Schematic, Parts Soldering and Getting Started
- Micro Controller
- General security notes
- Setting up the board
- Placement plan with color support
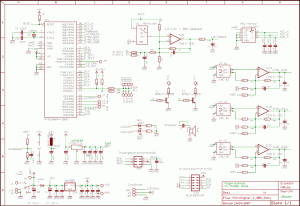
- Schematic
Flight-Ctrl V1.0: Schematic, Parts Soldering and Getting Started
Tasks
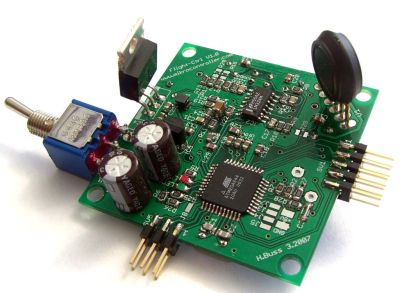
This board is the MikroKopter’s control board . It fulfils the following tasks:
- measuring the angular velocity of the three axes
- measuring the acceleration data of the three axes
- measuring the atmospheric pressure for altitude control
- evaluation of a digital compass signal
- measuring the battery voltage
- evaluation of the R/C signal
- processing of sensor data and computing the actual angular position
- driving four Brushless ESCs (electronic speed controllers)
Other Features:
- Dimensions 50 * 50mm
Two LEDs (e.g. Okay & Error)
- Two transistor outputs for external lights (or other functions)
- Undervoltage detection
- A receiver can be powered by 5V
Version V1.3
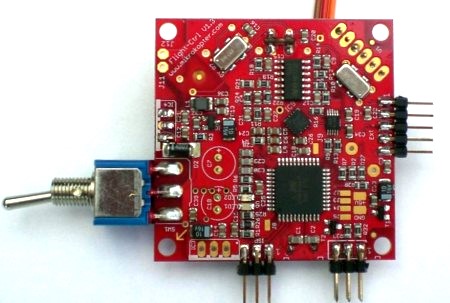
(only the differences are listed)
- automatic Gyro adjustment, i.e. no manual adjustment of resistors required
One-sided assembly - it is now possible to build FlightCtrl much flatter
- External connection areas (supply, I2C, etc.) have been enlarged
- Optional: second voltage supply 7805 for servo supply (eg for camera tilt servo, targeting 7805 as the first with a cooling surface to the outside, not included)
- Servo and external lighting connected via a pin header
- New (compatible) accelerometer sensor
- 4-layer design
 The transistors (PDTC143) to the outputs SV2 of version 1.3 can only switch 100mA! This corresponds, for example, to half a LED strip (3 pieces of 2x3 LED).
ME Variant
See FlightControl ME
- Is not a new version, but as a separate variant parallel to the previously distributed version 1.3
- Quality MEMS gyroscope technology manufactured by Analog Devices
- 5 servo outputs
- Supply is now a Recom-switching regulator
- Optional: 2nd supply voltage for servo output (not included)
- Servo and external lighting connected via pin header
- 4-layer design
Micro Controller
Computing and processing is accomplished by a Atmel ATMEGA644 @ 20MHz. This is a low cost and popular 8-Bit-processor.
The criteria for the choice of the micro controller were:
- satisfactory performance
- good availability
- low cost
- easy to solder
- availability of free development software Sensors
The flight attitude of a quadrocopter must be controlled electronically. We need different sensors for this.
Gyro Sensors
They measure the angular velocity (rotational speed) of each axis. We need three sensors to stabilize all three axes. These sensors are the most elementary components (-> GyroScope )
Acceleration Sensor
The main function of the acceleration sensor is to measure the actual tilt of the MikroKopter and to support the altitude adjustment. Here we use a three axis sensor.
Theoretically we could omit this sensor if the quadrocopter should work in the so called Heading-Hold-Mode. ( --> Acceleration Sensor )
Atmospheric pressure sensor
It serves to stabilize the flight altitude. This sensor is optional. The large pressure openings should be closed with adhesive tape where we make a tiny hole with a needle. This protects from false readings due to wind and light. (--> en/heightsensor )
Airpressure sensor at high altitude: If the Mikrokopter is going to be flown at very high altitudes (eg 2500 meters), then it is possible that the airpressure sensor will not operate correctly. The resistors have been calculated for airpressures of 850 to 1100 hpa. At 2500 metes the airpressure will be about 750 hpa. to correct this, solder a 1.5 (to 4.7) kOhm resistor (value dependent upon altitude) parallel to R21.
Interfaces
The controller board communicates with the outside world through different interfaces.
PPM input
Here we connect the receiver. Two wires for the supply voltage and one for the receiver’s R/C sum signal. Compared to a normal servo PPM signal the sum signal contains all the channels sent by the R/C transmitter before they are decoded by the receiver. This signal is available in every receiver but there are only a few where this signal is directly accessible from outside (e.g. the RX3 Multi by ACT). ( --> RC receiver )
I2C Bus
We connect the BL-ESCs to this bus, which carries the command sequences. The Flight-Ctrl needs our special brushless ESC, to ensure fast communication via the I2C Bus. Standard ESCs cannot be used as they are to slow. The I2C Bus has a clock (SCL) and data (SDA) line. The bus connects all SCL and SDA lines together.
Serial Interface (asynchronous)
Here we connect a PC for testing and calibration. The signal is TTL and not V24. For this reason we need to connect an interface converter if we want to communicate with the standard serial interface of the PC. Later on this interface can also be used for the communication (asynchronous) with other controllers.
ISP Interface (synchronous)
The ATMEL controller will be programmed via an ISP interface. This interface can be also be used for a fast communication (synchronous serial) with other controllers.
Compass connection
A digital compass can be connected to the PC4 input of the universal connector.
General security notes
We do not guarantee an error free behaviour of the electronics or the software. Despite thoroughful design and verification we will not be held responsable (directly or indirectly) for the flawlessness of the software, the hardware or the informations included. You use the electronics at your own risk (this is also applicable for the PC software delivered). Further on we deny any responsability for colateral damages of goods or people which could arise from the use of this application. It is your own responsability to make a complete system test.
The MikroKopter is not a children’s toy. It is too expensive and too dangerous for this. Do not fly over people!
In any case you should contract a special model airplane insurance before the first flight because most ordinary liability insurances will not cover damages caused by model airplanes.
Conditions of use
The use of the whole or parts of the MikroKopter project (hardware, software and documentation) is only allowed for private (non-commercial) use. If you intend a direct or indirect commercial use please contact us for conditions.
Setting up the board
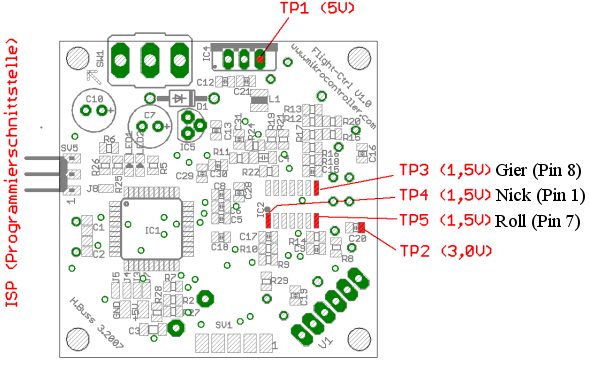
Step 1: Connection and Control of the supply voltage
Before powering up you should once again check the correct position of the voltage regulator IC4 (µA7805) and the diode D1. The supply voltage is connected to the pad J1 (marked „+“ at the switch) and to the pad J2 (marked „-“ close to the switch). It is strongly advised to use a current limited power supply until you know that everything is working correctly. The supply current for the Flight-Ctrl board plus the four BL ESCs is about 200 mA.
5,0V Test of the digital supply. Check at TP1 to GND. Voltage should be between 4,9 and 5,1 V.
3,0V Test of the analog supply. Check at TP2 to GND. Voltage should be between 2,9 and 3,1 V.
Step 2: Gyro Amplifier Calibration
The outputs of the gyro amp (Pins 8, 7 and 1 of IC2) should show a voltage of about 1,2-1,8V (ideal value would be 1,5V) in idle state (board/copter not moving). The factory adjusted output signal of the gyros may vary slightly, we must therefore sometimes correct the signal.
We need to add the resistors R9 (for TP4), R13 (for TP5) and R17 (for TP3) to increase the value of the signal (the lower the value of the resistor, the higher the output signal). Or we need to add the resistors R29 (for TP4), R20 (for TP5) und R15 (for TP3) to lower the signal (the lower the value of the resistor, the lower the output signal).
Default values for the calibration resistors:
Increasing the amplifier signal: signal value < 0,8V : 150kOhm < 1,0V : 220kOhm < 1,2V : 470kOhm
Lowering the amplifier signal: signal value > 2,2V : 150kOhm > 2,0V : 220kOhm > 1,8V : 470kOhm
After a severe crash or irregular movements of the MikroKopter (e.g. pitch is smoother in one direction than the other) the signal should be checked and recalibrated if needed.
Step 3: Programming with the MikroKopter Tool (avrdude)
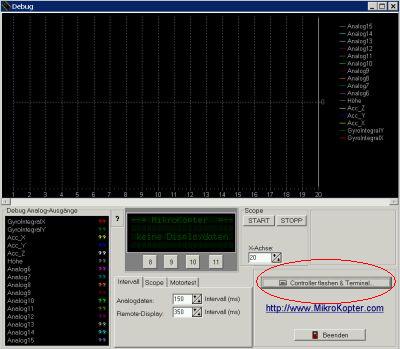
The software transfer (In System Programming) is easiest with our serial converter (SerCon), which contains already an ISP circuit. The PC must have a “real“ serial interface for programming. USB to serial/parallel converters or similar adaptors are definitively not working! The serial converter is connected to the 6 pin header with a ribbon cable. The LED on the converter board will be in an indifferent state (on or off). The Flight-Ctrl board must be connected to the supply voltage for programming.
As an alternative the software can be programmed via USB with an AVR ISP mkII. The description is available under USB-AVRISPmkII. Another possibility for a later data communication via USB is the USB-TTL-232 adaptor.
A boot loader is now available for the Flight-Ctrl. Instructions for programming can be found under MikroKopterTool...
Step 4: Hardware Test
Test of sensor values
When the controller has been successfully programmed, you can check the sensor values with the MikroKopter tool. For this procedure you connect the serial converter with the large ribbon cable. The ISP cable must be disconnected for debugging or the jumper must be removed from the converter board.
Test of gyro and acceleration sensor data
The board must be put in a horizontal position and switched on (or reset), then start the scope option in the MikroKopter tool (if the scope was already running you should stop it for a moment to reset the zoom range). We observe here only the first five analog values. The other analog values can be switched off via the tab „Scope“ in the MikroKopter tool if the display becomes to difficult to read.
Now you tilt the board as smoothly as possible to about 45 degrees in direction of the pitch axis. On the scope you check the signal values. The signal of the pitch integral and the pitch acceleration sensor (here red and yellow) should show a significant value.
It is important that the overlaid graphs are identical as far as possible.
The same check has to be made on the roll axis (here blue and green):
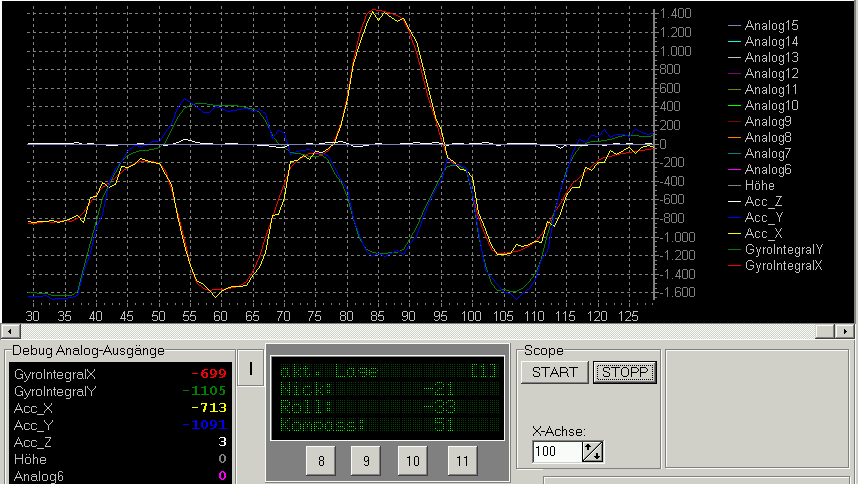
Then we check the yaw gyro. For this purpose we turn the board around the yaw axis and observe the signal of the gyro. As long as we turn the board there will be a value > 0 which will come back to zero when we stop moving the board.
We check the offset values of the gyros in the virtual display (the values in parenthesis):
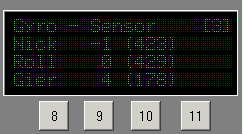
For this purpose we click through the buttons in the corresponding menu. The offset values should be around 500 (+-100). In this example the yaw gyro has a problem (178). It must be recalibrated or changed.
Test of the Rx signal
In the virtual display we can read the R/C values:
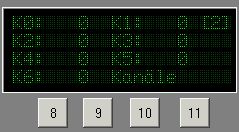
With the R/C control we can adjust the values in the range of ca. -120 to +120.
Test of the voltage measurement
In this menu you can check the value of the voltage measurement:
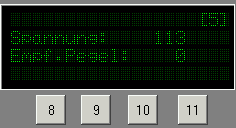
In this example we have 11,3V.
The Rx level is 0 because no receiver was connected.
Step 5: Installation into the MikroKopter
More information on our homepage
Synopsis of the connection of other components
Short form:
- The arrow on the mounted Flight-Ctrl board points in flight direction
- Addressing the motors : 1=front 2=back 3=right 4=left
- The direction of rotation of the motors: the left and right motor (roll axis) turn counter clockwise (seen from above) and the front and back motor (pitch axis) turn clockwise.
Connections:
- the multi signal from the receiver with a 3 wire servo cable
a LiPo battery (11,1V ca. 1,5-2,5Ah dischargeable with 15-20C) with two wires of 0.75mm² minimum (positive=red; negative=black)
- four BL-ESCs with two supply wires of 0.75mm² minimum (positive=red; negative=black)
- I2C Bus for the communication with the Brushless-ESCs
Details of the whole construction see ElektronikVerkabelung....
Step 6: Control of the MikroKopter (short form)
=== Initial Calibration ===
After building, flashing new firmware or changes to the airframe: Place the MK at a level surface, and make sure it's perfectly level. Store ACC data for this position by applying full-throttle+yaw-right (in mode2 - left stick in upper right corner). -From now on you can start from sloping surface.
Switching on the motors
- Calibrate the sensors, apply full-throttle+yaw-left (in mode2: left stick in upper left corner) until the buzzer beeps.
- To start push the throttle/yaw lever to the lower right corner until the motors start
- The levelling control starts working from a certain throttle value only.
Calibration of the sensors and choice of flight mode setting / parameter set
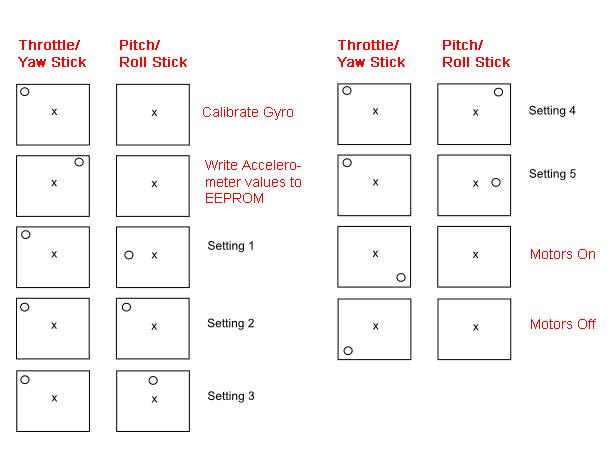
For the calibration of the sensors push the throttle/yaw lever to the upper left corner until the beeper beeps and the green LED goes off. This way the controller regards the current gyro values as "levelled". The beeper will tell you which "setting" is currently active. There are 5 possible settings. During the calibration as just described you can choose the appropriate setting with the pitch/roll lever like this:
Meaning: Pitch-Roll lever left middle = Setting1 ; left upper = Setting2 and so on.
The image below shows greater detail of how the sticks are used to select settings and calibration modes:
Switching off the motors
Push the throttle/yaw lever to the lower left corner until the motors stop.
Here you will find a video demo of how to start the motors, calibrate (1 beep confirms setting1), and stop the motors.
Behaviour when loosing Tx or Rx signal
If the Rx signal gets lost during the flight the motors will continue to turn for a few seconds while the MikroKopter tries to get in a horizontal position. This should (more or less) allow for a controlled descent of the quadrocopter.
Parts soldering
The parts should be soldered in the same order as shown in the listing. This simplifies the task.
Parts in italics are placed on the solder side (bottom)
Qty |
Reichelt Order# |
Remark |
Part |
Name |
|
1 |
ATMEGA 644-20 AU |
Check origin |
AVR-RISC-Controller |
IC1 |
|
1 |
TS 914 I SMD |
Check origin |
Rail to Rail Op-Amp |
IC2 |
|
5 |
NPO-G0805 22P |
|
Capacitor |
C1, C2, C28, C29,C30 |
|
5 |
X7R-G0805 22N |
|
Capacitor |
C9, C15, C17, C27, C31 |
|
17 |
X7R-G0805 100N |
|
Capacitor |
C5, C6, C8, C12, C13, C16, C18, C19, C20, C21, C11, C22, C14, C23, C24, C25, C26 |
|
5 |
SMD-0805 1,00K |
|
SMD-Chip-resistor |
R2, R5, R6, R7, R4 |
|
5 |
SMD-0805 100 |
|
SMD-Chip-resistor |
R24, R27, R28, R32, R33 |
|
5 |
SMD-0805 10,0K |
|
SMD-Chip-resistor |
R8, R12, R16, R1, R3 |
|
4 |
SMD-0805 100K |
|
SMD-Chip-resistor |
R10,R11, R14, R18 |
|
1 |
SMD-0805 220K |
|
SMD-Chip-resistor |
R26 |
|
1 |
SMD-0805 2,20K |
|
SMD-Chip-resistor |
R25 |
|
1 |
SMD-0805 6,80K |
|
SMD-Chip-resistor |
R21 |
|
3 |
SMD-0805 18,0K |
|
SMD-Chip-resistor |
R22, R30, R31 |
|
1 |
SMD-0805 680 |
|
SMD-Chip-resistor |
R19 |
|
1 |
SMD-LED 0805 GN |
Arrow on bottom |
CHIP-LED green |
LED1 |
|
1 |
SMD-LED 0805 RT |
Arrow on bottom |
CHIP-LED red |
LED2 |
|
2 |
BC 817-25 SMD |
Check direction |
CHIP-Transistor |
T1, T2 |
|
1 |
LQH3C 100µ |
|
SMD-Inductor |
L1 |
|
1 |
-- |
Short with wire |
omitted |
C3 |
|
1 |
1N 4001 |
Check marking |
Diode |
D1 |
|
1 |
20,0000-HC49U-S |
|
Quartz 20,0MHz |
Q1 |
|
1 |
LP 2950 ACZ3,0 |
Check marking |
Voltage regulator +3,0V |
IC5 |
|
1 |
µA 7805 |
Check marking |
Voltage regulator |
IC4 |
|
2 |
RAD 330/16 |
Check polarity |
Electrolytic cap |
C7, C10 |
|
1 |
MS 500F |
Solder to the rim |
Switch, 2-pole |
SW1 use wire if necessary |
|
1 |
SL 2X10G 2,54 |
Divide in 2*3 and 2*5 |
Header two rows |
SV1, SV5 |
|
1 |
SUMMER TDB 05 |
Polarity: (+) to the rim of the board |
Beeper |
SP1 |
|
Sensors |
|
||||
1 |
LIS3L02AS4 |
|
Acceleration sensor |
IC3 |
|
2 |
ENC-03JA |
Check direction |
Gyros Pitch and Roll |
GY_N, GY_R |
|
1 |
ENC-03JA |
Check direction |
Gyro Yaw |
GY_G |
|
Option for altitude adjustm. |
|
||||
1 |
MPX 4115A |
Metal plane to the board |
Motorola pressure sensor |
V1 |
|
1 |
1uF SMD1206 |
Not available @ Reichelt /alternative: |
Z5U-5 1,0µ(with wires) |
C4 |
|
Resistors to adjust the gyro signals |
|
||||
3 |
SMD-0805 470K |
See instructions |
SMD-Chip-resistor |
|
|
3 |
SMD-0805 150K |
See instructions |
SMD-Chip-resistor |
|
|
3 |
SMD-0805 220K |
See instructions |
SMD-Chip-resistor |
||
'
Gyros, acceleration & pressure sensors are available in the Shop
Tools & supplies
- Edsyn FL 22 SMD-Flux
- Solder wick 1,5mm
- Solder AG 0,507 0,5mm
- Temperature controlled soldering station with fine tip
- Multimeter
Soldering
- The yaw gyro must be soldered like shown: (JPN marking to the board)
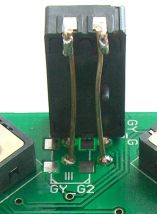
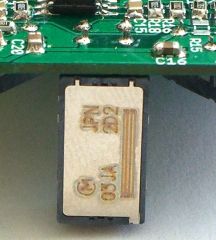
The pins on top must be extended with pieces of wire.
The gyro should also be glued to the board to increase mechanical rigidness.
Under no circumstances should glue penetrate into the gyros
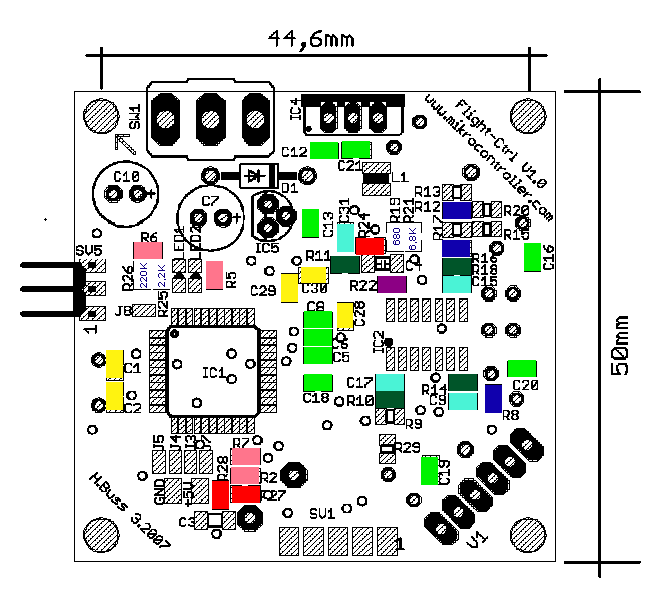
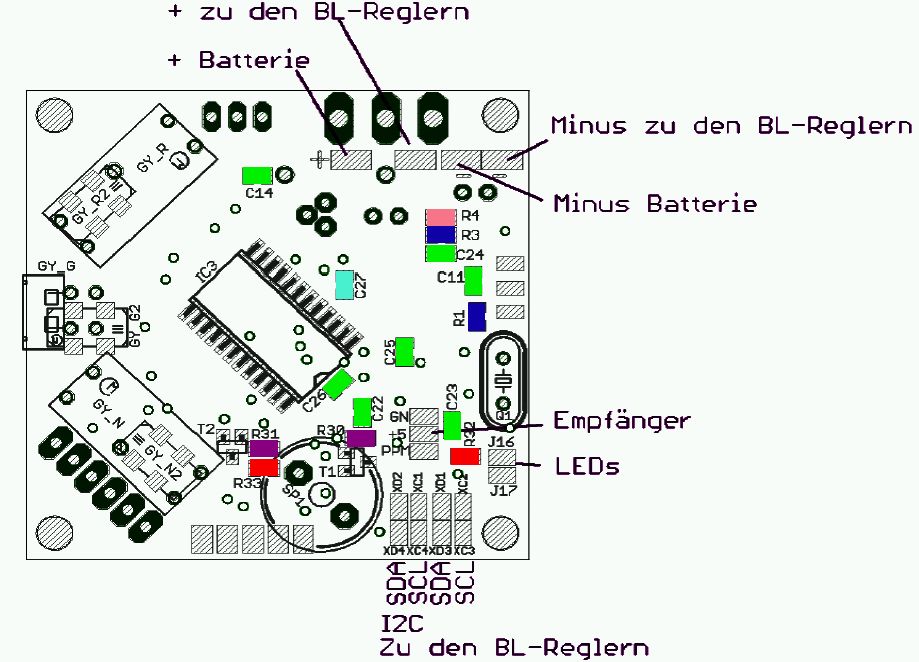
Placement plan with color support
(equally coloured parts are identical)
Schematic
(click for high resolution) '
Translation by french-copter 2007-07-21. Please bear with me, I’m not a native speaker of English, if you find weird phrases or simply balderdash tell me…
'

 Seite in
