Diese Seite befindet sich derzeit in der Überarbeitung. |
|
This page as an PDF-Document? |
EasySetup - Channels |
.jpg?m=1466430972)
Inhaltsverzeichnis
Overview -> Channels

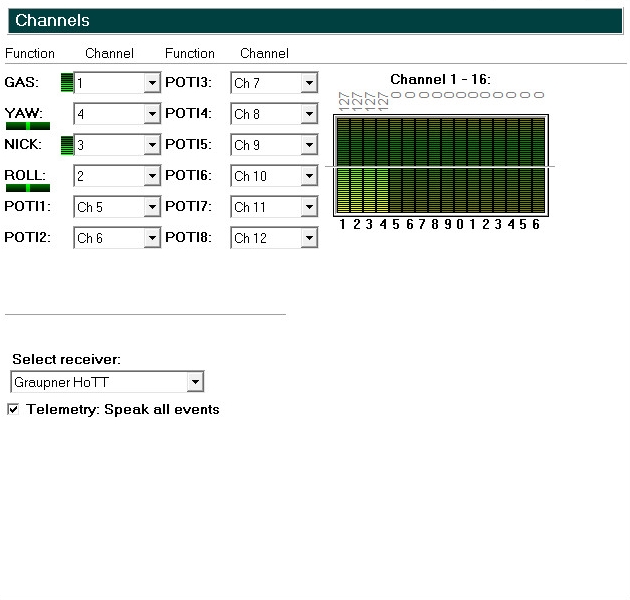
Function + Channel

Control

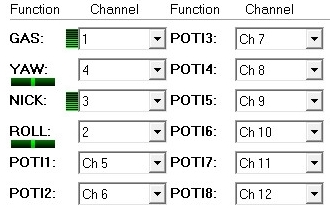
- The first 4 channels are for the controlling of the copter. These have already been set as follows:
Gas => Default channel 1
Yaw => Default channel 4
Nick => Default channel 3
Roll => Default channel 2
This channel setting is suitable for the Mode 2 of different remote controls.
If necessary, the channels can also be set individually.
With the green bar (beside Gas, Yaw, Roll, Nick) you can check the right function of the sticks on your transmitter.
When you move the sticks, the bar must move in the same direction.
- Tipp: If the bar is moving in the other direction then you move the stick, change the direction of the channel in your transmitter (see manual of the transmitter).
Poti

All other channels your used transmitter offers you can set and use for the other functions of your copter.
You will see that some functions can be set with a fix value or with a channel. For this channel we can set here a POTI
These have already been set as follows:POTI1 => Default channel 5
POTI2 => Default channel 6
POTI3 => Default channel 7
POTI4 => Default channel 8
POTI5 => Default channel 9
POTI6 => Default channel 10
POTI7 => Default channel 11
POTI8 => Default channel 12
Channel 1-16

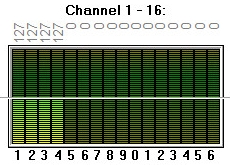
With the bar you can check the function of every single channel your transmitter offer.
If you now move a stick or use a switch or potentiometer on your transmitter, you can see here the moving bar of the (in the transmitter) set channel.
Above the bar you can see a number.
The number shows you =>
Channel OFF (e.g. a switch is in position OFF)
=> Channel number "0" -> bar is downChannel center (e.g. a Potentiometer or a 3way switch is centered)
=> Channel number "127" -> bar is in the middleChannel ON (e.g. a switch is in position ON)
=> Channel number "254" -> bar is full
Select receiver

Receiver

To receiver the right channels you have to set here the right receiver.
Please note that the receiver must use aPPM-summ signal or a
serial signal or a
S-Bus
How to connect the receiver you can see here: Receiver_connections
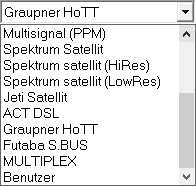
- The available receivers are:
- Multisignal (PPM)
=> Standard receiver (e.g. ACT DSL4 top, 2.4GHz-Receiver R6107SP)
- Spektrum Satellit
=> 2.4GHz satellite receiver Spektrum
- Spektrum Satellit (HIRES)
=> 2.4GHz satellite receiver with high resolution of Spektrum (2048) (e.g. DSX7, DX8, DSX9, DSX12)
- Spektrum Satellit (LowRES)
=> 2.4GHz satellite-receiver with low resolution (512) (is used in some plug-in modules)
- Jeti Satellit
=> 2.4GHz Jeti Satellit (e.g. RMK2)
With this setting, the output of the telemetry is activated too.
Displayed is the telemetry e.g. on the Jeti Box or Jeti transmitter.
- ACT DSL
=> Special 35 MHz receiver with PPM sum signal
- Graupner HoTT
=> 2.4GHz Graupner HoTT receiver (e.g. GR-12, GR-16, GR-24)
With this setting, the output of the telemetry is activated too.
Displayed is the telemetry on the display of the transmitter.
- Futaba S.BUS
=> 2.4GHz Futaba S.BUS receiver
~-(To connect a S.BUS Receiver to th eFlightCtrl you need a Signal inverter (Shoplink).
- Benutzer(User)
=> Free for programmer.
- Multisignal (PPM)
Telemetry

The telemetry of the copter can be shown on a Graupner Hott or a Jeti transmitter.
(unfortunately other transmitters do not support the MK telemetry display )
If the used transmitter also have a speaker and the right voice file you can hear warnings etc. Then you can activate here "Telemetry: Speak all events" .
(see also informations about the transmitters: Graupner HoTT / Jeti
MikroKopter: en/EasySetup/Kanaele (zuletzt geändert am 05.07.2016 13:36 durch LotharF)


