This pages as a PDF-Document? Simply click on the symbol and wait a few seconds... ---> |
Waypoint Generator - Area |

Inhaltsverzeichnis
Open Waypoint Generator
With the Waypoint Generator you can place different waypoint pattern with different settings on a map. Quickly and easily you can cover areas, put circles or planning a panorama.
You can open the waypoints generator
with the Menü "WayPoints" -> "Generator..."
or
- directly via the generator button:

Area
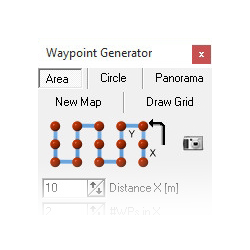
In the Waypoint Generator you can select the tab "Area".
With this feature you can automatically generate an arbitrary rectangular grid with up to 200 waypoints.
Settings: |
||
Symbol - |
Opens the Camera tool |
|
Distance X[m]: |
Distance in meters between the waypoints in X-direction |
|
#WPs in X: |
Number of waypoints in the X-direction |
|
Distance Y[m]: |
Distance in meters between the waypoints in Y-direction |
|
#WPs in Y: |
Number of waypoints in the Y-direction |
|
Grid Rotation [°] |
Orientation of the grid |
|
Waypoint: |
||
Radius [m] |
Radius around the individual waypoint (should be "10") |
|
Altitude [m] |
Altitude of the waypoint |
|
Heading [°] |
Direction in which the copter looks when it reaches the waypoint |
|
Cam-Nick [°] |
Tilt of the camera when it reaches the waypoint |
|
Speed [0.1m/s] |
Flight speed between the waypoints |
|
Climb rate [0.1m/s] |
Flight speed to change the altitude between the waypoints |
|
DelayTime [s] |
Waiting time per waypoint. |
|
WP event |
Switching duration per box of the Bitmask for "Out1" |
|
Auto Trigger [m] |
Triggering the switching output "Out1" every X meters |
|
WP Prefix |
Enter an individual letter. Helpful when a large number of waypoints are planned. |
|
Add 1sec Curve DelayTime |
Sets a waiting period of 1 sec for the vertices |
|
Deleting existing WPs |
Deletes existing WPs when you press the button "Generate" |
|
Generate |
Create the new waypoints |
|
Convert to AutoTrigger |
Explanation see Convert to !AutoTrigger |
|
Example 1 - triggering at each waypoint
In this example, we fly over an area of approximately 180m x 80m (see also Distance).
The starting point on the field is top left (red arrow).
These requirements should be respected:
- the flight series should go beyond the short side of the field
- every 10 meters the copter should trigger the camera without stopping at the waypoints
- the flight rows have a distance of 12 meters
- the flying height should be 30 meters
- airspeed 3m / s
- and the camera to look down in flightdirection
Step 1
- First we have to mark the starting point in the map. Move the mouse pointer to the place where we will start and press the left mouse button. Now you see a marker there.
Step 2
- The copter should trigger all 10m and the rows should have a distance of 12 meters.
For 80m we need then 9 waypoints in "X" direction (80:10=8 +1=9 => one WP in 0m - 10m - 20m ... 80m)
and for the 180m we need 16 waypoints in "Y" direction (180:12=15 +1=16 => one WP in 0m - 12m - 24m ... 180m).
So we have totally 144 waypoints.
So we have to set:
DistanceX[m] = 10
#WPs in X = 9
DistanceY[m] = 12
#WPs in Y = 16

Step 3
In this example the grid for the waypoint flight should be simular with the field. So we have to change the "Rotation". Here we need 170°:
"Rotation [°]" = 170°.
TIP: You can point the grid in every direction you need. So you can align the orientation on a road or a field.
Step 4
- Now we set the altitude (30m), the camera tilt (down = 90°), triggering for Out1 (to get pictures), the airspeed (3m/s) and the line of sight for the copter (straight to the flight path).
We have to set:
Altitude[m] = 30
Cam-Nick[°] = 90
WP event = 6
Speed[0.1m/s] = 30
Heading[°] = 170
The copter should not stop at each waypoint. So we set the DelayTime to 0:
DelayTime:[s] = 0
Climb rate[0.1m/s] = 30
INFO:
When you start your copter you will "park" him in any height. When you now activate the waypoint flight the copter can climb automatically to the set altitude when you set a value under Climb rate. If you set here a "0" the copter will not climb up/down to a set altitude. He will hold the altitude where you "park" him.Tip:
To slow down a little bit when the copter reach the waypoint at the end of a line, we can activate "Add 1sec Curve DelayTime". Then the copter will reach this waypoint softer.
Step 5
With a click on the button "Generate" all 144 needed waypoints will be placed on the map.
That looks like this:INFO
If "Deleting existing WPs" is activated you will clear all already set waypoints on the map and place only the new waypoints. Without you can place the same waypoints one above the other or at different locations on the map.
- The entries in the editor for this WP flight look like this:
Here you can see that the flight have a totally distance of ~1455m and that the flight time is ~11:50.
These figures are estimates and may vary from the actual flight (e.g wind etc.).
Example 2 - triggering every X meters
In this example, we also fly over the same field with the dimensions approximately 180m x 80m (see also Distance).
But here we will not place every 10m a waypoint. Now we will do this with less waypoints and a triggering all X meters.
Also here these requirements should be respected:
- the flight series should go beyond the short side of the field
- every 10 meters the copter should trigger the camera without stopping at the waypoints
- the flight rows have a distance of 12 meters
- the flying height should be 30 meters
- airspeed 3m / s
- and the camera to look down in flightdirection
Step 1
First we have to mark the starting point in the map. Move the mouse pointer to the place where we will start and press the left mouse button. Now you see a marker there.

Step 2
- The copter should trigger all 10m and the rows should have a distance of 12 meters.
For 80m we need now 2 waypoints in "X" direction (Starting point and end point of the line)
and for the 180m we need 16 waypoints in "Y" direction (180:12=15 +1=16 => one WP in 0m - 12m - 24m ... 180m).
So we have totally 32 waypoints (remember, in example 1 we need 144 waypoints).
So we have to set: :
DistanceX[m] = 80
#WPs in X = 2
DistanceY[m] = 12
#WPs in Y = 16
To trigger the camera automatically all 10m on "Out1" we have to set now "AutoTrigger[m]":
AutoTrigger[m] = 10
Info:
The triggering every X meters use a fixed time interval of 10ms per box of the switching output "Out1".

Step 3
Also here the grid for the waypoint flight should be simular with the field:
"Rotation [°]" = 170°.
Step 4
- Now we set the altitude (30m), the camera tilt (down = 90°), triggering for Out1 (to get pictures), the airspeed (3m/s) and the line of sight for the copter (straight to the flight path).
We have to set:
Altitude[m] = 30
Cam-Nick[°] = 90
WP event = 6 (that the camera will also trigger directly at the waypoint)
Speed[0.1m/s] = 30
Heading[°] = 170
The DelayTime is here also 0:
DelayTime:[s] = 0
Climb rate[0.1m/s] = 30
INFO:
When you start your copter you will "park" him in any height. When you now activate the waypoint flight the copter can climb automatically to the set altitude when you set a value under Climb rate. If you set here a "0" the copter will not climb up/down to a set altitude. He will hold the altitude where you "park" him.!INFO:
To slow down a little bit when the copter reach the waypoint at the end of a line, we can activate "Add 1sec Curve DelayTime". Then the copter will reach this waypoint softer.
Step 5
With a click on the button "Generate" all 32 needed waypoints will be placed on the map.
That looks like this:INFO
If "Deleting existing WPs" is activated you will clear all already set waypoints on the map and place only the new waypoints. Without you can place the same waypoints one above the other or at different locations on the map.
- The entries in the editor for this WP flight look like this
 Here you can see that the flight have a totally distance of ~1460m and that the flight time is ~12:22.
These figures are estimates and may vary from the actual flight (e.g wind etc.).
Example 3 - triggering every X meters - in a given overlapped for pictures
In this example, we also fly over the same field with the dimensions approximately 180m x 80m (see also Distance).
The photos should have a predefined overlap in X and Y direction. Every X meters we trigger the camera automatically, matching to the overlap.
Step 1
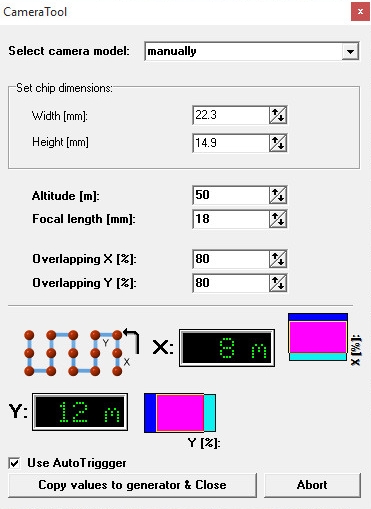
With one "click" on the camera symbol we open the "CameraTool".

With the "CameraTool" we can choose the camera (or set this manually) and set the overlap.
Step 2
- The first thing is now to choose/set the camera. If our camera is not list we can set the dimensions of the sensor chip also manually.
Info:
The "chip dimensions" of the sensor chip are not the pixel. Here you need the dimensions of the chip in "mm". You can find it in the manual of your camera under "technical data".

Step 3
- Now we can set the flight altitude, the used focal length and the desired overlap in X and Y direction. Finally, set a hook at "Use Auto trigger".

Step 4
A "click" on the button "Copy values to generator & close" will close this window and set the needed values to our Waypoint Generator. We have only to set manually the distance between the vertices ("DistanceX[m]") and the number of lines in Y direction we will fly The result with 26 waypoints looks like this:
 And the entries in the editor for this WP flight look like this:
 Here you can see that the flight have a totally distance of ~1220m and that the flight time is ~10:16.
These figures are estimates and may vary from the actual flight (e.g wind etc.).
Example 4 - Convert to AutoTrigger
In this example, we are planning the same waypoint flight as in Example 1.
During this flight, we need the waypoints only to set a point where we will trigger the camera. There is no stop at the single waypoint. In order to save these waypoints between the endpoints, we use the button "Convert to Auto Trigger" .
Distance
If you have loaded a map and if you want to determining a distance between e.g. 2 points or the length and width of a field, you can do this quickly and easily.
- place a waypoint there (by clicking the left mouse button) where you will start your measurement
- then move the cursor (with your mouse) on the map
- in the "Titlebar" you can ow see the distance between the waypoint and the cursor


