|
Größe: 6749
Kommentar:
|
← Revision 118 vom 28.04.2010 22:56 ⇥
Größe: 17129
Kommentar: converted to 1.6 markup
|
| Gelöschter Text ist auf diese Art markiert. | Hinzugefügter Text ist auf diese Art markiert. |
| Zeile 1: | Zeile 1: |
| [[TableOfContents]] | <<BR>> <<BR>> {{attachment:VibTestBanner_small.jpg}} <<BR>> <<BR>> <<BR>> <<TableOfContents(2)>> |
| Zeile 4: | Zeile 10: |
| The tool measures the vibration generated by the motors using the MK build-in sensors. This allows to balance motor/prop assemblies and to experiment with different motor-mounts. | The tool '''evaluates the vibration generated by the motors''' using the MK build-in sensors, so no additional hardware is needed. The VibrationTest works with 1.2 and 1.3 FC boards but unfortunately does not work in combination with ME boards without a hardware patch. <<BR>><<BR>> The tool can be used to '''balance props, balance motor/prop assemblies''', experimenting with different motor-mounts and so on. As the tool only uses the sensors on the MK FlightControl board, no extra hardware is required. As the tool can follow the vibrations caused by the prop, it is possible to '''deduce the motor RPM''' at a given speed value. This allows checking if a ESC/motor assembly performs as expected. For Aerial Photography, it would perhaps be possible to attach a second FC board to a camera to '''visualize the vibrations the camera is exposed to'''. However, this is under investigation if this produces usable results. <<BR>> = Why is it important to reduce vibrations? = The FlightControl sensors pickup the vibrations and this deteriorates performance; the new FC ME comes with vibration dampers in order to reduce the vibrations transferred to the FC. Reducing vibration is very important, especially for Aerial Photography or Video. Vibrations result in blurry footage. Some claim that high frequency vibrations can be picked up by the Optical Image Stabilization lens assembly which is incorporated in almost all recent cameras. The OIS is not designed for these vibrations and makes thing worse, even when you switch the OIS feature off in the camera menu. Propellers can be balanced the traditional way. However it was discovered that also the motors need balancing. One way to accomplish this is let a small unbalance in the prop compensate the motor unbalance, so the orientation of the prop is important (see [[http://www.rcgroups.com/forums/showpost.php?p=12832508&postcount=228|this post]]). Looking at the vibraions of a running motor allows balancing the prop/motor assembly as a whole. <<BR>> = How does it work? = The standard FlightControl program samples all sensors periodically and provides a command to read the latest sample from all sensors. The MKTool uses this command to generate graphs of the analog values. In a first approach the VibrationTest used this standard command to monitor vibrations. The problem is that this mechanism only allows to sample the values 30 times a second. The actual shape of the signals cannot be determined and one can only hope to catch the peak values. In order to get reliable results the values need to be monitored for a long time (a minute for example). This new approach is based on dedicated FlightControl software providing a new command. The new command instructs the FC to sample one of the sensors as fast as possible and store the info in its internal memory. Afterwards the recorded data can be read to analysis. This allows to grab a reliable signal in a very short time. This approach can capture about 11000 samples a second, 500 times more than the MKTool can. |
| Zeile 7: | Zeile 38: |
attachment:test.jpg = Current status = The current implementation is very basic, it is a "command-line" tool without any graphical user-interface. I am still experimenting and working on the first version of the tool. |
<<BR>> <<Anchor(SampleSignalJpg)>> {{attachment:test.jpg}} <<BR>><<BR>> = Current Project status = /!\ ~+'''Version 1.2 is available'''+~ <<BR>><<BR>> At the time of writing, the tool was tested in combination with: * PC/Windows XP and Vista * FC 1.1, FC 1.2 and FC 1.3 * /!\ '''The Tool does not seem to work well in combination with FC ME without hardware modification.''' * /!\ '''Opening the virtual serial port of a Bluetooth dongle might fail.''' I suppose this is the same issue as the most recent MKTool has, will be solved in the next version. <<BR>> Theoretically the tool should also run on MAC and Linux. <<BR>><<BR>> Features/fixes in the pipeline * Tool to help measuring RPM * Measurement parameters in different dialog -> more room for results * Configurable sampling-rate -> sampling over a longer time is needed is some cases * Allow to connect two FC boards for measurement of camera vibrations * Integrated backup and restore of flight settings * Integrated installing and restore of FC code <<BR>><<BR>> {i} [[http://forum.mikrokopter.de/topic-11446.html|MK Forum thread for discussions]] <<BR>> {i} <<MailTo(frederic AT rc-flight DOT be)>> <<BR>><<BR>><<BR>> <<Anchor(Install)>> |
| Zeile 17: | Zeile 71: |
| = How do I use it? = == The command line parameters == {{{ VibrationTest.py COMPORT MOTORS SPEEDS CHANNELS [-m MINSPEED] [-s NBSAMPLES] [-n NAME] [-d FILENAME] [-v] COMPORT Serial port to use. e.g. COM4 MOTORS Motors to activate during test. Multiple motors can be used at the same time. e.g. 1,2,3,4 SPEEDS Indicates at what speeds the motors need to be tested. Format 1: e.g. 50,110,140 Tests at speeds 50, 110 and 140 Format 2: e.g. 100-200:50 Tests at speeds 100, 150 and 200 CHANNELS Channels to monitor. e.g. 5,6,7 Channel 0 = GyroYaw Channel 1 = GyroRoll Channel 2 = GyroNick Channel 3 = Pressure Channel 4 = Batt Channel 5 = AccTop Channel 6 = AccRoll Channel 7 = AccNick -m MINSPEED Minimum speed of the motor(s) -s NBSAMPLES Number of samples -n NAME Name of the test -d FILENAME File to which the measured values will be logged in -v Verbose }}} == General procudure == == Example 1 == Finding what sensor provides best information at what speed: {{{ VibrationTest.py COM5 3 100-200:20 6,7 Speed=100 U=11.3V Channel=AccRoll Min=492 Max=505 pp= 13 ** Speed=100 U=11.3V Channel=AccNick Min=498 Max=507 pp= 9 * Speed=120 U=11.3V Channel=AccRoll Min=489 Max=503 pp= 14 ** Speed=120 U=11.3V Channel=AccNick Min=497 Max=507 pp= 10 ** Speed=140 U=11.2V Channel=AccRoll Min=469 Max=519 pp= 50 ********** Speed=140 U=11.2V Channel=AccNick Min=495 Max=508 pp= 13 ** Speed=160 U=11.1V Channel=AccRoll Min=478 Max=517 pp= 39 ******* Speed=160 U=11.1V Channel=AccNick Min=493 Max=511 pp= 18 *** Speed=180 U=10.9V Channel=AccRoll Min=479 Max=511 pp= 32 ****** Speed=180 U=10.9V Channel=AccNick Min=493 Max=514 pp= 21 **** Speed=200 U=10.7V Channel=AccRoll Min=479 Max=515 pp= 36 ******* Speed=200 U=10.7V Channel=AccNick Min=493 Max=513 pp= 20 **** VibrationTest.py COM5 3 130-160:10 6 Speed=130 U=11.1V Channel=AccRoll Min=484 Max=511 pp= 27 ***** Speed=140 U=11.1V Channel=AccRoll Min=469 Max=524 pp= 55 *********** Speed=150 U=11.1V Channel=AccRoll Min=475 Max=520 pp= 45 ********* Speed=160 U=11.1V Channel=AccRoll Min=479 Max=518 pp= 39 ******* }}} So, lets concentrate on channel 6 at speed 140. Now, the preliminary balancing of the prop: {{{ VibrationTest.py COM5 3 140 6 -d motor3.txt -n 0s0 0s0 Speed=140 U=11.0V Channel=AccRoll Min=470 Max=521 pp= 51 ********** VibrationTest.py COM5 3 140 6 -d motor3.txt -n 1s0 1s0 Speed=140 U=11.0V Channel=AccRoll Min=482 Max=513 pp= 31 ****** VibrationTest.py COM5 3 140 6 -d motor3.txt -n 2s0 2s0 Speed=140 U=11.0V Channel=AccRoll Min=475 Max=520 pp= 45 ********* }}} For now, 1 sticker seems best. Now, lets rotate the prop: {{{ VibrationTest.py COM5 3 140 6 -d motor3.txt -n 1s0 1s0 Speed=140 U=10.9V Channel=AccRoll Min=481 Max=513 pp= 32 ****** VibrationTest.py COM5 3 140 6 -d motor3.txt -n 1s60 1s60 Speed=140 U=10.9V Channel=AccRoll Min=480 Max=512 pp= 32 ****** VibrationTest.py COM5 3 140 6 -d motor3.txt -n 1s120 1s120 Speed=140 U=10.9V Channel=AccRoll Min=477 Max=514 pp= 37 ******* VibrationTest.py COM5 3 140 6 -d motor3.txt -n 1s180 1s180 Speed=140 U=10.9V Channel=AccRoll Min=482 Max=509 pp= 27 ***** VibrationTest.py COM5 3 140 6 -d motor3.txt -n 1s240 1s240 Speed=140 U=10.9V Channel=AccRoll Min=482 Max=510 pp= 28 ***** VibrationTest.py COM5 3 140 6 -d motor3.txt -n 1s300 1s300 Speed=140 U=10.9V Channel=AccRoll Min=482 Max=514 pp= 32 ****** VibrationTest.py COM5 3 140 6,6,6 -d motor3.txt -n 1s360 1s360 Speed=140 U=10.9V Channel=AccRoll Min=482 Max=515 pp= 33 ****** }}} Rotating the prop by 180 degrees produces best results, now lets try to balance the prop again: {{{ VibrationTest.py COM5 3 140 6 -d motor3.txt -n 1s180 1s180 Speed=140 U=10.9V Channel=AccRoll Min=483 Max=509 pp= 26 ***** VibrationTest.py COM5 3 140 6 -d motor3.txt -n 0s180 0s180 Speed=140 U=10.9V Channel=AccRoll Min=472 Max=519 pp= 47 ********* VibrationTest.py COM5 3 140 6 -d motor3.txt -n 1s180 1s180 Speed=140 U=10.9V Channel=AccRoll Min=483 Max=510 pp= 27 ***** VibrationTest.py COM5 3 140 6 -d motor3.txt -n 2s180 2s180 Speed=140 U=10.9V Channel=AccRoll Min=489 Max=508 pp= 19 *** VibrationTest.py COM5 3 140 6 -d motor3.txt -n 3s180 3s180 Speed=140 U=10.9V Channel=AccRoll Min=483 Max=512 pp= 29 ***** }}} So, 2 stickers is best {{{ VibrationTest.py COM5 3 140 6 -d motor3.txt -n 2s180 2s180 Speed=140 U=10.9V Channel=AccRoll Min=488 Max=508 pp= 20 **** VibrationTest.py COM5 3 140 6,6,6 -d motor3.txt -n end end Speed=140 U=10.8V Channel=AccRoll Min=487 Max=510 pp= 23 **** }}} Now, we can perform a sweep in order to compare with the starting-point: {{{ VibrationTest.py COM5 3 100-200:20 6,7 Speed=100 U=11.1V Channel=AccRoll Min=493 Max=501 pp= 8 * Speed=100 U=11.1V Channel=AccNick Min=499 Max=507 pp= 8 * Speed=120 U=11.1V Channel=AccRoll Min=489 Max=507 pp= 18 *** Speed=120 U=11.1V Channel=AccNick Min=497 Max=508 pp= 11 ** Speed=140 U=11.0V Channel=AccRoll Min=489 Max=507 pp= 18 *** Speed=140 U=11.0V Channel=AccNick Min=498 Max=509 pp= 11 ** Speed=160 U=10.9V Channel=AccRoll Min=482 Max=508 pp= 26 ***** Speed=160 U=10.9V Channel=AccNick Min=496 Max=510 pp= 14 ** Speed=180 U=10.7V Channel=AccRoll Min=489 Max=505 pp= 16 *** Speed=180 U=10.7V Channel=AccNick Min=495 Max=508 pp= 13 ** Speed=200 U=10.6V Channel=AccRoll Min=482 Max=508 pp= 26 ***** Speed=200 U=10.6V Channel=AccNick Min=491 Max=509 pp= 18 *** }}} /!\ ToDo: Almost everything :) [[BR]] [[AttachList]] |
The tool is written in programming language called [[http://en.wikipedia.org/wiki/Python_(programming_language)|Python]]. The most logic way to run the tool is to install support for Python on your PC (if you do not have it already) and the Python libraries the tool depends on. Python is also available for Linux and MAC; the tool should also run on these platforms, but I have never tried it. If you do not feel like installing Python, a version that is compiled to a windows executable is provided. So, you have two options. <<Anchor(InstallPython)>> == Option 1: Install Python and required libraries == For a Windows machine I propose you install: * [[http://www.activestate.com/activepython/|ActivePython for Windows]] Press the big "ActivePython Download Now" button. * [[http://sourceforge.net/projects/pyserial/files/|PySerial (support for serial port access)]] Select "pyserial-2.5-rc1.win32.exe" on that page. * [[http://www.wxpython.org/download.php|wxPython wxWidgets for Python]] Select the the win32-unicode version for Python 2.6 * [[http://sourceforge.net/projects/numpy/|NumPy, the fundamental package needed for scientific computing with Python]] Once you have Python support on your PC, unzip [[http://www.rc-flight.be/VibrationTest/VibrationTest_1_2.zip|VibrationTest_1_2.zip]] to a directory on your PC. == Option 2: Get the compiled version == unzip [[http://www.rc-flight.be/VibrationTest/VibrationTestExe_1_2.zip|VibrationTestExe_1_2.zip]] to a directory on your PC <<BR>><<BR>><<BR>> = How do I use the tool? = == Prepare your MK == === Secure your MK === I use luggage straps to secure my MK to the table while it is still able to vibrate: {{attachment:mk1InTest.jpg}} <<BR>><<BR>> /!\ '''For MKs with bigger motors I have found that it is increasingly important to make sure that the straps do not vibrate too much and stay out of the propwach as much as possible''' Using some soft materials to isolate the straps from the frame and to minimize the strap vibrations improve the quality of the measurements, see picture below. {{attachment:mk2InTest.jpg}} <<BR>> Later in this page it will be explained how the quality of the measurements can be checked. <<BR>> <<Anchor(InstallFCSoftware)>> === Installing the FlightControl software === The VibrationTest tool only works in combination with a special version of the FlightControl software. It must be flashed in the FC board before using the test and '''you need to reinstall your regular software version afterwards'''. This just takes a few minutes. Switching the software is done the usual way, using the MKTool. You will find the required hex file in the same directory with the VibrationTest tool. /!\ '''The FC code for the VibrationTest is based 0.74d but is not fit for flying! Before flying, you will need to reinstall your initial FC code. When the version you use for flying is 0.74d, your settings should be preserved. In combination with other versions, it might not be the case. It is a good idea to backup yout settings to PC (via the MKTool) before installing the VibrationTest FC code. ''' After insatlling the FC code for the VibrationTest, the LC-Display in the MKTool will look like this: <<Anchor(InstallFCSoftwareJpg)>> {{attachment:LCDisplay.jpg}} It is normal that a there is a warning for a missing BL-Ctrl. When you have 4 motors for example, it should complain that it did not find motor 5. == Starting the VibrationTest tool == In the directory where you unzipped the tool, dubbleclick VibrationTestGui.py (in case of the Python version) or VibrationTestGui.exe == Using the VibrationTest tool == <<BR>> <<Vimeo(6948282)>> <<BR>><<BR>> <<Vimeo(7670919)>> <<BR>> == Checking the reliability/accuracy of the results == Before you start, it is good to check the reliability of the test and setup. You should alway start with a sweep and look at different sensors. If the vibrations is rather constant over motor-speed, the combination might be well balanced or you might not be measuring what you are hoping to measure. In this case, sticking some tape to the prop should should unbalance it and you should see a difference. <<BR>> You can have a look at the recorded signals, the filtered signals and perhaps the spectrum. The picture below shows an example of (raw) a signal of good quality: {{attachment:GoodSignal.jpg}} <<BR>> The signal below is regular but goes slowly up and down. This is not a big problem as this will be filtered out later; this is still good: {{attachment:MediumSignal.jpg}} <<BR>> The signal in the next picture is of low quality. Propably other components than the motor are vibrating: {{attachment:BasSignal.jpg}} <<BR>> <<BR>> If the signals seem ok, you can repeat the sweep multiple times, using one of the sensors. Each time you should get similar results. Results will never be 100% the same. Another test you should do, is let the tool measure multiple times at the same speed; for example "10*100,10*200". The measurement at the same speed should report the about the same amount of vibrations. The figure below shows the result of such test with a "Roxxy 2824-34 / EPP1045 / 3s / Standard ESC" combination. All but the green line are from the Nick sensor. The black line are vibrations measured at speeds 130 and 185. The other lines are sweeps. This does not look too bad. {{attachment:acuracy1.jpg}} <<BR>> (!) When the results are disappointing, one should experiment with the way the MK is attached. One could fix the MK more firmly to the desk or on the contrary allow more movement. One should also and make sure nothing else but the MK can vibrate. It is also possible that the filter parameters might not be optimal for your setup. In the figure below I have almost disabled the filter and switched to "pp" measurement: {{attachment:acuracy2.jpg}} <<BR>> This is another example of such a test (Turnigy 2836-750 / APC 12x3.8 / 4s / TowerPro ESC): {{attachment:acuracy3.jpg}} <<BR>><<BR>> = Examples = == Balancing example: Roxxy 2824-34 / EPP1045 / 3s / Standard ESC == <<Vimeo(7011506)>> <<BR>> == Effect of prop position, Roxxy 2824-34 / EPP1045 3s / Standard ESC == The importance of the position of the propeller relative to the motor was first reported by RCGroups member "Old Man Mike", see [[http://www.rcgroups.com/forums/showpost.php?p=12832508&postcount=228|this post]]. My tool also shows this effect. However, I observed that sometimes rotating the prop did not produce significant variations... I discovered that when I first balance the prop as good as I can using the VibrationTest, rotating the prop produced very little difference. I come to the conclusion that I need to deliberately unbalance the prop a bit in order to find the "sweet spot". I also observed that when I unbalance the prop by sticking some tape on one side of the prop the vibrations peak while they go trough a minimum when I stick some tape to the other side. I think this supports the theory that the slightly unbalanced prop can compensate for unbalances in the motor. <<BR>><<BR>> {{attachment:StudyRotation.jpg}} <<BR>><<BR>> On the X-asis the rotation of the prop in steps of 60 degrees. The red line is with a prop that I balanced before (needs some tape opposite to the prop size-markers). The green line shows vibrations when I attach an additional strip of tape (so unbalancing it). The blue line shows what happens when I attach tape to the other side (where the markers are). == Balancing example: Turnigy 2836-750 / APC 12x3.8 / 4s / TowerPro ESC == <<BR>> {{attachment:Mk2BalancingExample1.jpg}} <<BR>> The red line is the initial balancing. The prop seemed best balanced with no additional tape.<<BR>> The green line are the measurement while rotating the prop (steps of 45 degrees)<<BR>> The blue line is the re-balancing, due to the repositioning of the prop the results are better. The first 3 measurements showed that no tape produced the best results. In the last 3 measurements of the blue line, I experimented with smaller strips and this produced the best result. <<Anchor(MECaps)>> == Influence of ME ACC capacitors == <<BR>> This example shows why the VibrationTest does not work in combination with FlightControl ME boards. ME boards have bigger capacitors on the ACC lines and these suppress the signal we are interested in. 1.3 boards have 0.1 uF capacitors while ME has 1 uF capacitors. <<BR>><<BR>> To be sure that the issue was due to these capacitors I replaced one of the capacitors and performed some measurements. The first picture below shows the raw signal without capacitor (0uF). The next picture shows the signal with a 0.1uF capacitor, so this corresponds with the capacitor used on 1.3 boards. For the last picture a 1uF capacitor (so the normal value for an ME board) was installed. As you can see the signal is completely suppressed... <<BR>><<BR>> [[http://www.rc-flight.be/VibrationTest/Images/ME-Acc-Cap-0uF.jpg|{{http://www.rc-flight.be/VibrationTest/Images/ME-Acc-Cap-0uF.jpg||width=300}}]] [[http://www.rc-flight.be/VibrationTest/Images/ME-Acc-Cap-0d1uF.jpg|{{http://www.rc-flight.be/VibrationTest/Images/ME-Acc-Cap-0d1uF.jpg||width=300}}]] [[http://www.rc-flight.be/VibrationTest/Images/ME-Acc-Cap-1uF.jpg|{{http://www.rc-flight.be/VibrationTest/Images/ME-Acc-Cap-1uF.jpg||width=300}}]] <<BR>><<BR>><<BR>> The pictures below show the spectra of the same signals. As you can see, the 0.1uF cap already filters a lot but leaves the vibration signal visible. <<BR>> <<BR>> [[http://www.rc-flight.be/VibrationTest/Images/ME-Acc-Cap-0uF-spectrum.jpg|{{http://www.rc-flight.be/VibrationTest/Images/ME-Acc-Cap-0uF-spectrum.jpg||width=300}}]] [[http://www.rc-flight.be/VibrationTest/Images/ME-Acc-Cap-0d1uF-spectrum.jpg|{{http://www.rc-flight.be/VibrationTest/Images/ME-Acc-Cap-0d1uF-spectrum.jpg||width=300}}]] [[http://www.rc-flight.be/VibrationTest/Images/ME-Acc-Cap-1uF-spectrum.jpg|{{http://www.rc-flight.be/VibrationTest/Images/ME-Acc-Cap-1uF-spectrum.jpg||width=300}}]] <<BR>><<BR>> <<Anchor(Changelog)>> = Changelog = ||'''Version'''||'''Date'''||'''Changes'''|| ||1.2||17/11/2009||- Ability to measure Gyro sigals<<BR>>- Tool to measure RPM|| ||1.0||24/10/2009||= 0.9 RC4|| ||0.9 RC4||21/10/2009||- FC code: ignore mixing table so that all motors always work<<BR>>|| ||0.9 RC3||17/10/2009||- Fixed limitation of 4 motors (not tested)<<BR>>- More parameter checking and clear error reporting<<BR>>- Support to connect to NC<<BR>>- Fixed exception at start of measurement|| <<BR>><<BR>> = Older versions = * 1.0 [[http://www.rc-flight.be/VibrationTest/VibrationTest_1_0.zip|VibrationTest_1_0.zip]]<<BR>> [[http://www.rc-flight.be/VibrationTest/VibrationTestExe_1_0.zip|VibrationTestExe_1_0.zip]]<<BR>> <<BR>><<BR>> = Links = === VibrationTest related === * [[http://svn.mikrokopter.de/mikrowebsvn/listing.php?repname=Projects&path=/VibrationTest/#_VibrationTest_|VibrationTest Project in Subversion]] * [[http://forum.mikrokopter.de/topic-11446.html|MK Forum thread for discussions]] * Mail FredericG: <<MailTo(frederic AT rc-flight DOT be)>> === Related Threads === * [[http://forum.mikrokopter.de/topic-7794-1.html|Thread: Vibrationsdämpfung der Antriebsmotoren]] * [[http://forum.mikrokopter.de/topic-post106888.html|Thread: Tilt servo play => Vibrations]] * [[http://www.mk-fr.info/forum/index.php/topic,812.msg12038.html|Thread: Equilibrage des Hélices RC (French)]] * [[http://www.vimeo.com/4257366|Video: Is the Optical Image Stabilization of the FX35 causing problems?]] * [[http://www.rcgroups.com/forums/showthread.php?t=807347|Thread: Multikopter (mikrokopter, UAVP, x-ufo-3rd, etc) AP pictures]] === Related Projects === * [[http://www.rcgroups.com/forums/showthread.php?t=1006721|Old Man Mike "Test Fixture Evaluates Motors/Props/ESCs for Quadcopter Performance"]] === Used Libraries and Tools === * [[http://www.python.org/|Python]] * [[http://www.wxpython.org/|wxPython]] * [[http://wxglade.sourceforge.net/|wxGlade]] * [[http://numpy.scipy.org/|NumPy]] * [[http://www.py2exe.org/|py2exe]] === Technical references === * [[http://en.wikipedia.org/wiki/Sampling_(signal_processing)|Sampling]] * [[http://en.wikipedia.org/wiki/Fourier_analysis|Fourier Analysis]] <<BR>> <<AttachList>> |
| Zeile 188: | Zeile 275: |
| . KategorieTools KategorieProjekte KategorieEnglish KategorieAnleitung |

Inhaltsverzeichnis
What is the VibrationTest Tool?
The tool evaluates the vibration generated by the motors using the MK build-in sensors, so no additional hardware is needed.
The VibrationTest works with 1.2 and 1.3 FC boards but unfortunately does not work in combination with ME boards without a hardware patch.
The tool can be used to balance props, balance motor/prop assemblies, experimenting with different motor-mounts and so on. As the tool only uses the sensors on the MK FlightControl board, no extra hardware is required.
As the tool can follow the vibrations caused by the prop, it is possible to deduce the motor RPM at a given speed value. This allows checking if a ESC/motor assembly performs as expected.
For Aerial Photography, it would perhaps be possible to attach a second FC board to a camera to visualize the vibrations the camera is exposed to. However, this is under investigation if this produces usable results.
Why is it important to reduce vibrations?
The FlightControl sensors pickup the vibrations and this deteriorates performance; the new FC ME comes with vibration dampers in order to reduce the vibrations transferred to the FC.
Reducing vibration is very important, especially for Aerial Photography or Video. Vibrations result in blurry footage. Some claim that high frequency vibrations can be picked up by the Optical Image Stabilization lens assembly which is incorporated in almost all recent cameras. The OIS is not designed for these vibrations and makes thing worse, even when you switch the OIS feature off in the camera menu.
Propellers can be balanced the traditional way. However it was discovered that also the motors need balancing. One way to accomplish this is let a small unbalance in the prop compensate the motor unbalance, so the orientation of the prop is important (see this post). Looking at the vibraions of a running motor allows balancing the prop/motor assembly as a whole.
How does it work?
The standard FlightControl program samples all sensors periodically and provides a command to read the latest sample from all sensors. The MKTool uses this command to generate graphs of the analog values. In a first approach the VibrationTest used this standard command to monitor vibrations. The problem is that this mechanism only allows to sample the values 30 times a second. The actual shape of the signals cannot be determined and one can only hope to catch the peak values. In order to get reliable results the values need to be monitored for a long time (a minute for example).
This new approach is based on dedicated FlightControl software providing a new command. The new command instructs the FC to sample one of the sensors as fast as possible and store the info in its internal memory. Afterwards the recorded data can be read to analysis. This allows to grab a reliable signal in a very short time. This approach can capture about 11000 samples a second, 500 times more than the MKTool can.
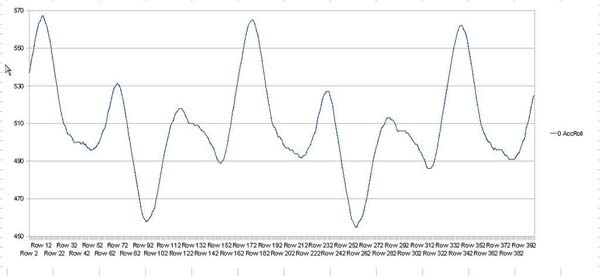
This is an example of the signal measured by the Roll-ACC sensor:
Current Project status
![]() Version 1.2 is available
Version 1.2 is available
At the time of writing, the tool was tested in combination with:
- PC/Windows XP and Vista
- FC 1.1, FC 1.2 and FC 1.3
 The Tool does not seem to work well in combination with FC ME without hardware modification.
  Opening the virtual serial port of a Bluetooth dongle might fail. I suppose this is the same issue as the most recent MKTool has, will be solved in the next version.
Theoretically the tool should also run on MAC and Linux.
Features/fixes in the pipeline
- Tool to help measuring RPM
Measurement parameters in different dialog -> more room for results
Configurable sampling-rate -> sampling over a longer time is needed is some cases
- Allow to connect two FC boards for measurement of camera vibrations
- Integrated backup and restore of flight settings
- Integrated installing and restore of FC code
![]() MK Forum thread for discussions
MK Forum thread for discussions
![]() <frederic AT rc-flight DOT be>
<frederic AT rc-flight DOT be>
How do I install the tool?
The tool is written in programming language called Python.
The most logic way to run the tool is to install support for Python on your PC (if you do not have it already) and the Python libraries the tool depends on. Python is also available for Linux and MAC; the tool should also run on these platforms, but I have never tried it.
If you do not feel like installing Python, a version that is compiled to a windows executable is provided.
So, you have two options.
Option 1: Install Python and required libraries
For a Windows machine I propose you install:
ActivePython for Windows Press the big "ActivePython Download Now" button.
PySerial (support for serial port access) Select "pyserial-2.5-rc1.win32.exe" on that page.
wxPython wxWidgets for Python Select the the win32-unicode version for Python 2.6
NumPy, the fundamental package needed for scientific computing with Python
Once you have Python support on your PC, unzip VibrationTest_1_2.zip to a directory on your PC.
Option 2: Get the compiled version
unzip VibrationTestExe_1_2.zip to a directory on your PC
How do I use the tool?
Prepare your MK
Secure your MK
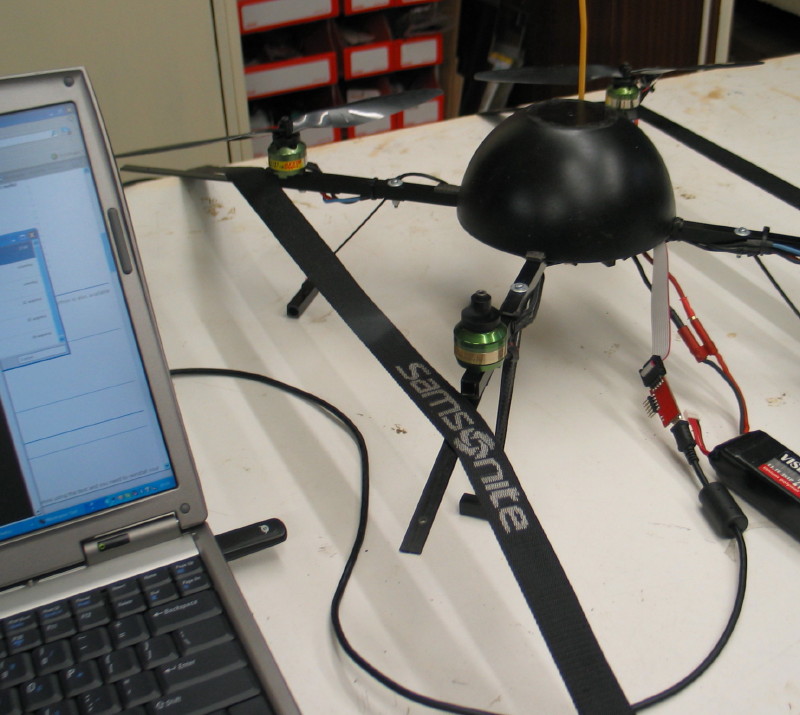
I use luggage straps to secure my MK to the table while it is still able to vibrate:
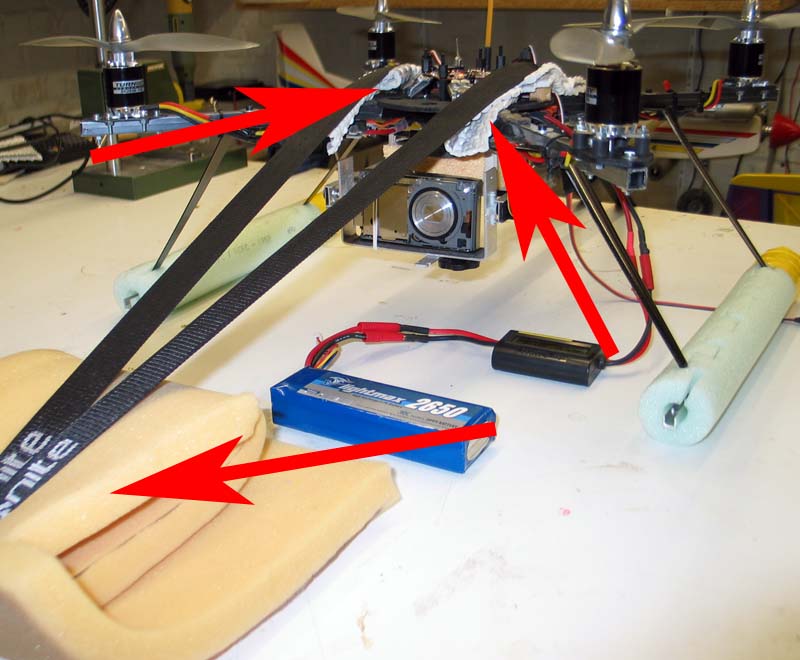
![]() For MKs with bigger motors I have found that it is increasingly important to make sure that the straps do not vibrate too much and stay out of the propwach as much as possible Using some soft materials to isolate the straps from the frame and to minimize the strap vibrations improve the quality of the measurements, see picture below.
For MKs with bigger motors I have found that it is increasingly important to make sure that the straps do not vibrate too much and stay out of the propwach as much as possible Using some soft materials to isolate the straps from the frame and to minimize the strap vibrations improve the quality of the measurements, see picture below.
Later in this page it will be explained how the quality of the measurements can be checked.
Installing the FlightControl software
The VibrationTest tool only works in combination with a special version of the FlightControl software. It must be flashed in the FC board before using the test and you need to reinstall your regular software version afterwards. This just takes a few minutes. Switching the software is done the usual way, using the MKTool.
You will find the required hex file in the same directory with the VibrationTest tool.
![]() The FC code for the VibrationTest is based 0.74d but is not fit for flying! Before flying, you will need to reinstall your initial FC code. When the version you use for flying is 0.74d, your settings should be preserved. In combination with other versions, it might not be the case. It is a good idea to backup yout settings to PC (via the MKTool) before installing the VibrationTest FC code.
The FC code for the VibrationTest is based 0.74d but is not fit for flying! Before flying, you will need to reinstall your initial FC code. When the version you use for flying is 0.74d, your settings should be preserved. In combination with other versions, it might not be the case. It is a good idea to backup yout settings to PC (via the MKTool) before installing the VibrationTest FC code.
After insatlling the FC code for the VibrationTest, the LC-Display in the MKTool will look like this:
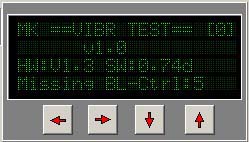
It is normal that a there is a warning for a missing BL-Ctrl. When you have 4 motors for example, it should complain that it did not find motor 5.
Starting the VibrationTest tool
In the directory where you unzipped the tool, dubbleclick VibrationTestGui.py (in case of the Python version) or VibrationTestGui.exe
Using the VibrationTest tool
Checking the reliability/accuracy of the results
Before you start, it is good to check the reliability of the test and setup.
You should alway start with a sweep and look at different sensors. If the vibrations is rather constant over motor-speed, the combination might be well balanced or you might not be measuring what you are hoping to measure. In this case, sticking some tape to the prop should should unbalance it and you should see a difference.
You can have a look at the recorded signals, the filtered signals and perhaps the spectrum. The picture below shows an example of (raw) a signal of good quality:
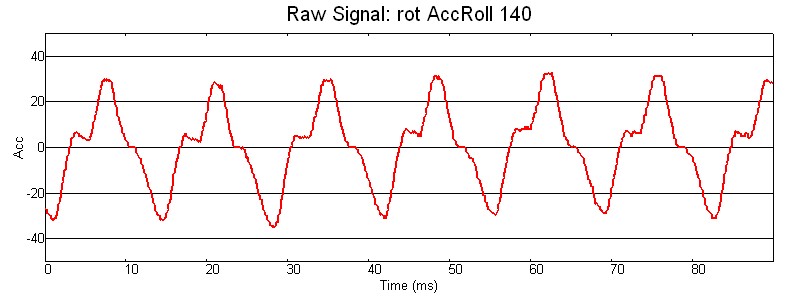
The signal below is regular but goes slowly up and down. This is not a big problem as this will be filtered out later; this is still good:
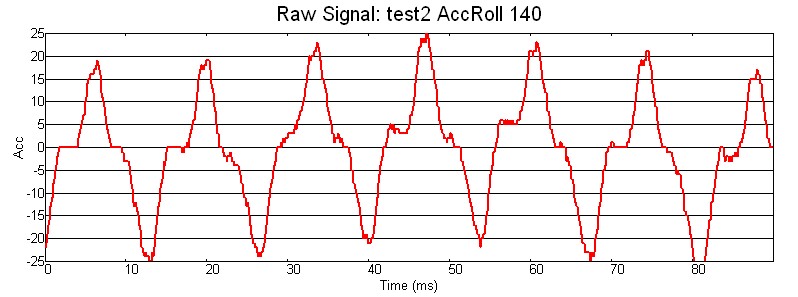
The signal in the next picture is of low quality. Propably other components than the motor are vibrating:
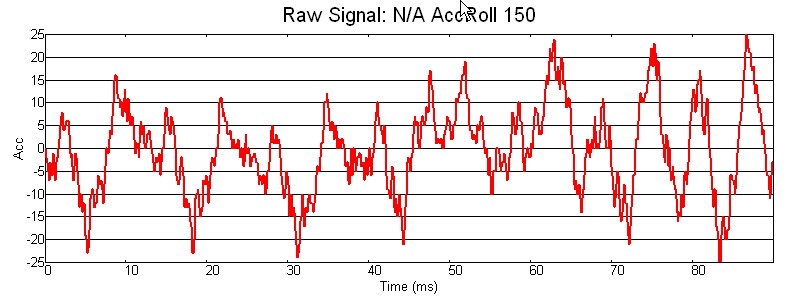
If the signals seem ok, you can repeat the sweep multiple times, using one of the sensors. Each time you should get similar results. Results will never be 100% the same.
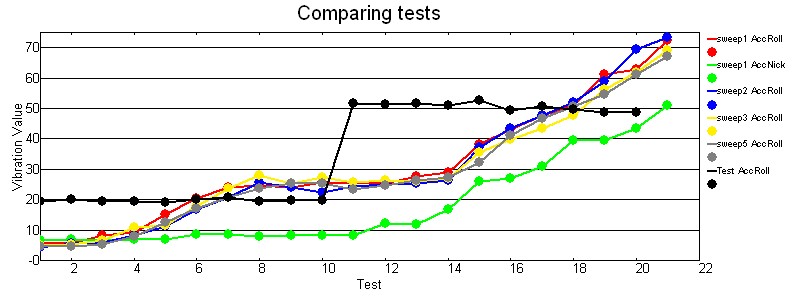
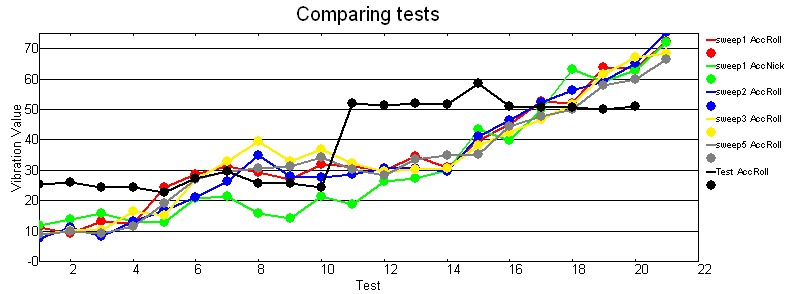
Another test you should do, is let the tool measure multiple times at the same speed; for example "10*100,10*200". The measurement at the same speed should report the about the same amount of vibrations.
The figure below shows the result of such test with a "Roxxy 2824-34 / EPP1045 / 3s / Standard ESC" combination. All but the green line are from the Nick sensor. The black line are vibrations measured at speeds 130 and 185. The other lines are sweeps. This does not look too bad.
![]() When the results are disappointing, one should experiment with the way the MK is attached. One could fix the MK more firmly to the desk or on the contrary allow more movement. One should also and make sure nothing else but the MK can vibrate.
When the results are disappointing, one should experiment with the way the MK is attached. One could fix the MK more firmly to the desk or on the contrary allow more movement. One should also and make sure nothing else but the MK can vibrate.
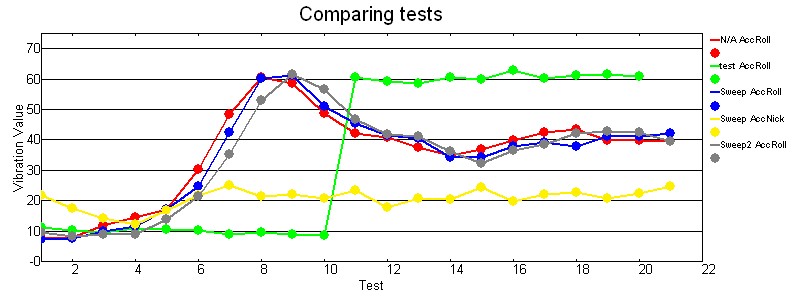
It is also possible that the filter parameters might not be optimal for your setup. In the figure below I have almost disabled the filter and switched to "pp" measurement:
This is another example of such a test (Turnigy 2836-750 / APC 12x3.8 / 4s / TowerPro ESC):
Examples
Balancing example: Roxxy 2824-34 / EPP1045 / 3s / Standard ESC
Effect of prop position, Roxxy 2824-34 / EPP1045 3s / Standard ESC
The importance of the position of the propeller relative to the motor was first reported by RCGroups member "Old Man Mike", see this post. My tool also shows this effect. However, I observed that sometimes rotating the prop did not produce significant variations...
I discovered that when I first balance the prop as good as I can using the VibrationTest, rotating the prop produced very little difference.
I come to the conclusion that I need to deliberately unbalance the prop a bit in order to find the "sweet spot". I also observed that when I unbalance the prop by sticking some tape on one side of the prop the vibrations peak while they go trough a minimum when I stick some tape to the other side. I think this supports the theory that the slightly unbalanced prop can compensate for unbalances in the motor.
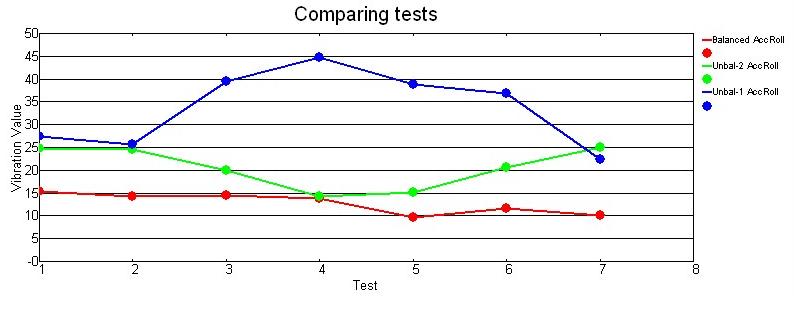
On the X-asis the rotation of the prop in steps of 60 degrees. The red line is with a prop that I balanced before (needs some tape opposite to the prop size-markers). The green line shows vibrations when I attach an additional strip of tape (so unbalancing it). The blue line shows what happens when I attach tape to the other side (where the markers are).
Balancing example: Turnigy 2836-750 / APC 12x3.8 / 4s / TowerPro ESC
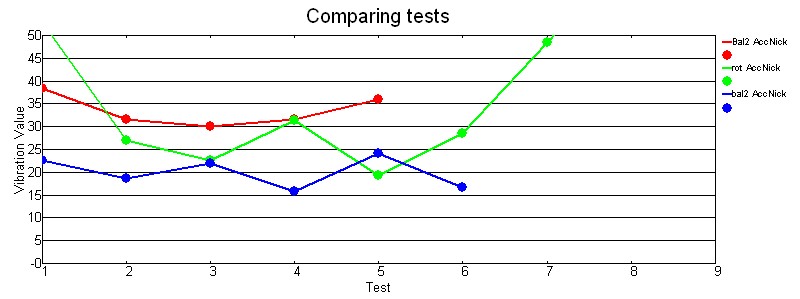
The red line is the initial balancing. The prop seemed best balanced with no additional tape.
The green line are the measurement while rotating the prop (steps of 45 degrees)
The blue line is the re-balancing, due to the repositioning of the prop the results are better. The first 3 measurements showed that no tape produced the best results. In the last 3 measurements of the blue line, I experimented with smaller strips and this produced the best result.
Influence of ME ACC capacitors
This example shows why the VibrationTest does not work in combination with FlightControl ME boards. ME boards have bigger capacitors on the ACC lines and these suppress the signal we are interested in. 1.3 boards have 0.1 uF capacitors while ME has 1 uF capacitors.
To be sure that the issue was due to these capacitors I replaced one of the capacitors and performed some measurements. The first picture below shows the raw signal without capacitor (0uF). The next picture shows the signal with a 0.1uF capacitor, so this corresponds with the capacitor used on 1.3 boards. For the last picture a 1uF capacitor (so the normal value for an ME board) was installed. As you can see the signal is completely suppressed...


The pictures below show the spectra of the same signals. As you can see, the 0.1uF cap already filters a lot but leaves the vibration signal visible.


Changelog
Version |
Date |
Changes |
1.2 |
17/11/2009 |
- Ability to measure Gyro sigals |
1.0 |
24/10/2009 |
= 0.9 RC4 |
0.9 RC4 |
21/10/2009 |
- FC code: ignore mixing table so that all motors always work |
0.9 RC3 |
17/10/2009 |
- Fixed limitation of 4 motors (not tested) |
Older versions
- 1.0
VibrationTest_1_0.zip
VibrationTestExe_1_0.zip
Links
VibrationTest related
Mail FredericG: <frederic AT rc-flight DOT be>
Related Threads
Video: Is the Optical Image Stabilization of the FX35 causing problems?
Thread: Multikopter (mikrokopter, UAVP, x-ufo-3rd, etc) AP pictures
Related Projects
Used Libraries and Tools
Technical references
